
Autumn harvest festivals are all about celebrating the season's best flavors and traditions. This guide dives into creating and presenting apple, pumpkin, and spice-themed baked goods that look as good as they taste. From decorating techniques to flavor pairings, here's what you’ll learn:
- Apple Treats: Tips for decorating apple-shaped cookies, flavor pairings like cinnamon and caramel, and orchard-inspired designs like apple carts and bushels.
- Pumpkin Spice Baking: How to shape and decorate pumpkin cookies and cakes, plus flavor ideas like cream cheese frosting, maple glazes, and espresso powder.
- Rustic Textures: Techniques for wood grain and burlap effects in icing to add a cozy fall vibe.
- Farmers Market Presentation: Ideas for displays, packaging, and pricing to attract customers and showcase your baked goods.
Whether you're baking for a festival, farmers market, or family gathering, these tips will help you create treats that capture the essence of fall.
Fall / Autumn Cake Decorating Tutorial with Pumpkin Cake Toppers
sbb-itb-529d1c3
Apple-Themed Treats for Fall
Apples are the centerpiece of autumn baking, and turning them into decorative treats is all about balancing flavor and appearance. With the right approach, you can transform simple cookies into orchard-inspired creations that truly capture the essence of harvest season. Here's how to craft apple cookies that bring the orchard to life.
Decorating Apple-Shaped Cookies
The foundation of great apple-shaped cookies starts with the dough. To ensure the shapes hold their detail, skip leavening agents like baking powder and chill the cut-out shapes until nearly frozen before baking. This helps prevent spreading during baking. For clean edges, dip cookie cutters lightly in flour before cutting. If you're looking for extra detail, plunger-style cutters, like those in the Fall Harvest Impression kit, can emboss textures into the dough before baking.
When it comes to decorating, the outline and flood technique with medium-consistency royal icing is your go-to for a smooth, polished finish. A scribe tool or even a toothpick can help pop air bubbles and guide icing into tight corners for a flawless look. One baker praised this method for creating firm, detailed cookies that look professional.
For a modern twist, move away from bright red apples and try soft, pastel fall tones. Prepare your icing colors 24 hours ahead to let the gel colors deepen and stabilize, which helps avoid color bleeding. Use a single drop of Pastel Tulip Red for muted apple bodies and Pastel Mint Green for softer leaves and stems. For caramel-dipped apple designs, mix Gold and Brown gel colors evenly to achieve a rich caramel shade. A touch of gold luster dust applied with a fine brush can add a touch of shimmer to your designs.
Specialized piping tips can take your cookies to the next level. For instance, Tip #44 creates a basketweave texture, perfect for "bushel of apples" designs, while Tip #352 is ideal for piping realistic leaves. Let the icing set for 18–24 hours before packaging to prevent smudges. If you roll your dough to 1/4-inch thickness, you can expect a batch to yield about 20–24 decorated apple cookies.
While presentation is key, flavor is just as important. Let’s dive into flavor pairings that complement apple treats.
Flavors That Pair Well with Apple
Apple desserts shine brightest when paired with flavors that highlight their natural sweetness. Warm spices like cinnamon, nutmeg, ginger, allspice, and cloves are classic choices that enhance apple's depth. You can take it further by incorporating spiced apple powder or pumpkin spice bakery emulsion directly into the dough for an extra layer of flavor.
In September 2024, King Arthur Baking showcased a Whipped Caramel Apple Cake by Tatiana Bautista. This recipe used applesauce for moisture and boiled cider for a tangy kick, topped with a whipped caramel frosting that mimicked the experience of biting into a caramel apple.
"Cinnamon and apple go together like a flannel and a beanie", one baker said.
For a sweeter touch, caramel, maple syrup, and brown sugar are perfect partners, while nutty accents like walnuts, pecans, or hazelnuts add texture and earthiness. If you want to explore fruit pairings, cranberries and pears create layered flavors, while citrus notes from orange or lemon juice balance the sweetness with a hint of acidity.
Boiled cider - essentially concentrated apple cider - packs an intense apple flavor and enhances the fruit's tartness. Similarly, apple butter can amplify the apple profile in baked goods. For something unconventional, try pairing apples with savory ingredients.
"Sausage, cheddar, and apples are a winning combination - the sweet-tart fruit offsets the richness of the meat, cheese, and flaky pastry", notes one expert.
Orchard-Inspired Decorating Techniques
To bring orchard themes to your treats, layering textures and incorporating natural elements is key. The basketweave technique, achieved with Ateco #44 piping tip, mimics the look of wooden harvest crates. For a "bushel" design, pipe the basket texture first, let it crust, and then layer on apples for a 3D effect.
Realistic leaves can elevate any apple-themed dessert. Piping tips like Wilton #352 or PME ST50 allow you to create lifelike leaves by adjusting pressure to control their size and shape. To get a natural look, blend a tiny amount of complementary colors - like a dot of red in green icing - to tone down the brightness and achieve muted fall shades.
For consistent shapes, use stickers as templates under wax paper to create royal icing transfers. Once dry, these can be attached to cookies or cakes with a dab of fresh icing. Dried apple slices are another great option for rustic, edible decorations, whether on cakes or strung into garlands. Fondant can also be shaped into leaves to adorn the base or tiers of autumn-themed cakes.
"This new Apple Harvest tutorial is bushels of fun! Learn how to make these 6 Apple Harvest cookies: Apple Cart, Apple Butter Jar, 2 Cute Apple Designs, Caramel Apple, and a Bushel of Apples", says a recent guide.
Popular orchard-themed designs include apple carts, apple butter jars, bushels, and even apple trucks.
Pumpkin Spice Decorating and Flavoring
Autumn Harvest Icing Color Formulas for Fall Baking
Bring your pumpkin treats to life with techniques that combine texture, flavor, and color. By using ribbed designs and thoughtful spice pairings, you can create desserts that perfectly embody the rustic charm of fall.
Making Pumpkin-Shaped Cookies and Cakes
Achieving lifelike pumpkin cookies starts with sectional flooding. Begin by outlining and filling the outer sections, letting them set for 15–20 minutes before flooding the center. This method preserves the distinct ridges that mimic a pumpkin's natural shape. For added texture and dimension, use pressure piping with soft peak icing to craft stems and vines in a tight zigzag pattern. If you're decorating a 3.5-inch cookie, you'll need about 1 to 1.25 ounces of royal icing to cover it completely.
To ensure consistency, trace your cookie cutter onto parchment paper and mark design details with a food-safe marker. Highlight the ridges with a fine dusting of gold luster using a detail brush. For a smooth finish and to prevent small craters, use a fan or mini heat gun immediately after flooding the icing.
"If you dry the cookies with the heat gun for too long, it will make the icing crack. Less is best and you'll have to practice to see what works best for you", advises Lisa from The Bearfoot Baker.
For cakes, royal icing transfers are a great option. Pipe your designs onto wax paper over a template, let them dry completely, and then attach them with a dab of fresh icing. Fondant is another versatile choice - use it to create autumn leaves or etch harvest patterns with a linoleum cutter on firm surfaces.
Flavors That Complement Pumpkin Spice
Flavor harmony is just as important as design. Pair pumpkin spice with tangy cream cheese frosting for a balanced bite. Maple or caramel glazes, as well as honey butter, can add richness to pumpkin-based treats.
Bittersweet or semisweet chocolate enhances pumpkin's depth, making it a great addition to brownie swirls or cheesecake crusts. For a nutty texture and earthy flavor, fold in toasted pecans or hazelnuts. You can also layer fruit flavors like apples, cranberries, or pears to create unique combinations in cakes and puddings.
Espresso powder is another way to add complexity, offering a bitter contrast to the sweetness. Dust it over pumpkin cakes or whipped cream toppings for an extra layer of flavor. For an unexpected twist, add a pinch of finely ground black pepper to your pumpkin pie spice blend.
"I always add a touch of freshly ground black pepper to my pumpkin pie filling... No one will even know it's there except for you! And they will all be wondering what makes your pumpkin-spiced treats so much better", shares Sally McKenney, author and baker.
Brown butter in cookie dough or icing introduces a toasted, nutty flavor. A hint of lemon juice or zest can brighten the overall profile, cutting through the spices with a touch of acidity. A classic pumpkin pie spice blend is typically made up of about 50% ground cinnamon, with ginger, nutmeg, cloves, and allspice rounding out the mix.
Working with Harvest Color Palettes
To achieve a natural pumpkin hue, enhance basic orange by mixing in a bit of brown or ivory. For a softer, non-bitter orange, combine tulip red with yellow shades like lemon or egg yellow instead of using orange gel directly.
"One of the things I love about autumn is the shift from bright fun summer colors, to the deep rich tones derived from nature", says Callye Alvarado, founder of The Sweet Adventures of Sugar Belle.
For a cohesive color scheme, add a small amount of each palette color to every other color (except white) to tie the tones together. Using ivory as a base instead of white can create softer, more natural autumn shades.
Metallic accents like gold, copper, or brass can elevate rustic designs. Mix gold luster dust with high-proof alcohol and lightly splatter it over your treats for a touch of elegance. Don’t feel limited to traditional oranges and browns - experiment with muted tones like sage green, ivory, soft pink, navy, or deep purple to reflect the season's variety.
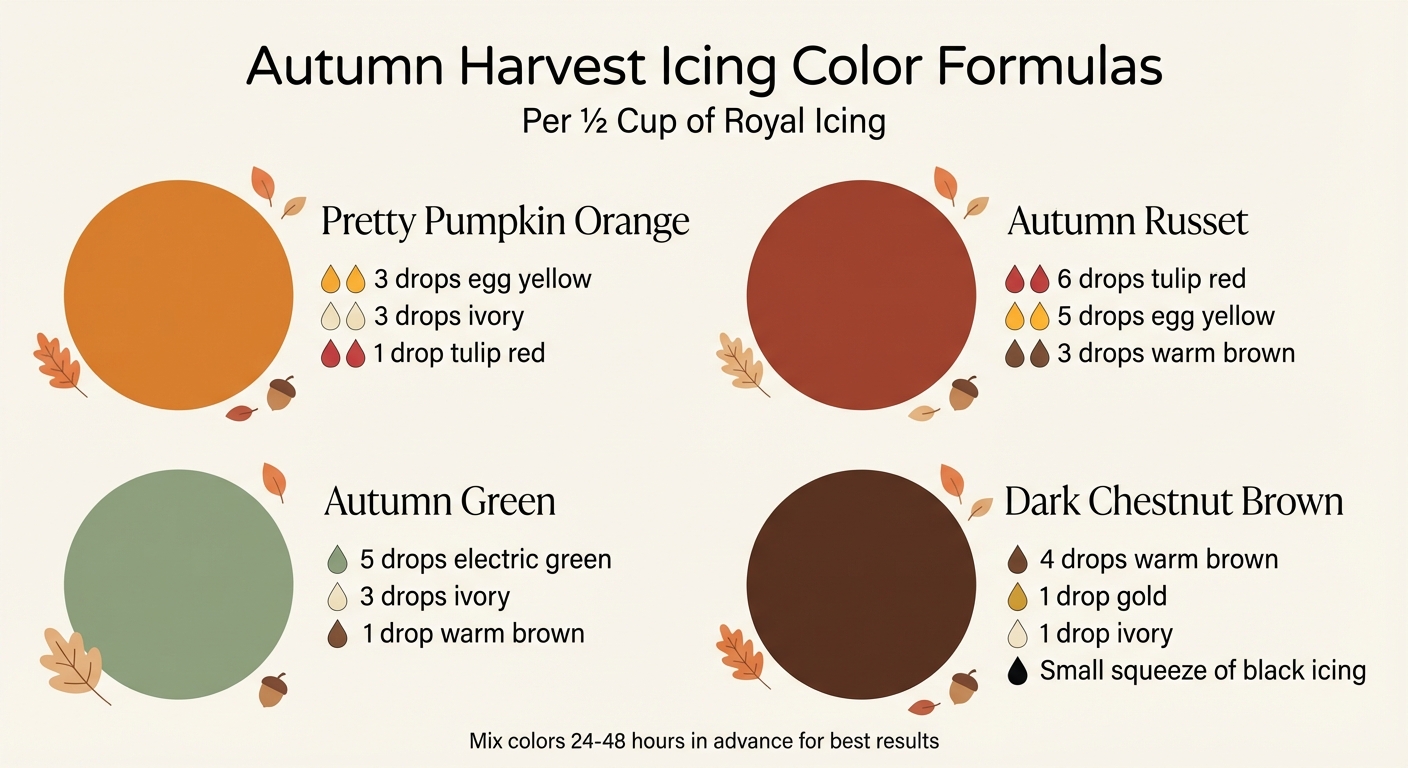
| Color | Formula (per 1/2 cup icing) |
|---|---|
| Pretty Pumpkin Orange | 3 drops egg yellow + 3 drops ivory + 1 drop tulip red |
| Autumn Russet | 6 drops tulip red + 5 drops egg yellow + 3 drops warm brown |
| Autumn Green | 5 drops electric green + 3 drops ivory + 1 drop warm brown |
| Dark Chestnut Brown | 4 drops warm brown + 1 drop gold + 1 drop ivory + a small squeeze of black icing |
Textured Icing Techniques for Fall Themes
Rustic textures can transform cookies and cakes into eye-catching harvest-themed centerpieces. Designs like wood grain and burlap bring the cozy charm of autumn to your desserts, evoking the feel of farmers markets and seasonal gatherings. These techniques add both depth and character to your festive treats.
How to Create Wood Grain Effects in Icing
To achieve realistic wood grain effects, start by mixing your icing colors 24–48 hours in advance. This allows the shades to deepen and develop natural grain-like patterns over time. For a rich chestnut brown, combine 4 drops of warm brown, 1 drop of gold, 1 drop of ivory, and a small squeeze of black icing per ½ cup. This combination avoids the flat look of single-tone gels.
Use the Ateco #44 Basketweave tip to pipe wood slats, perfect for designs like apple carts or harvest bushels. Begin with a light brown base, then layer darker brown lines for contrast and depth. To add wood knots, etch lines into the icing using a scribe tool or turkey lacer before it sets. For smaller rustic details, pressure piping works well - use soft-peak consistency icing and pipe a tight zigzag pattern to create instant texture. For a weathered finish, mix gold luster dust with high-proof alcohol, then lightly tap a paintbrush over the surface to highlight the grain.
If you’re looking for another rustic option, burlap textures can also bring a unique finish to your cakes.
Making Burlap and Rustic Textures on Cakes
Burlap effects require icing with medium-peak consistency to maintain the woven look without spreading. The Ateco #44 tip is ideal for creating the open-weave texture of burlap fabric. To mimic the woven pattern, pipe vertical threads first and let them crust for about 15 minutes. Then, add horizontal lines to create clean intersections. For lattice-style designs that resemble fabric patterns, tips like #47 or #103 are great for forming intersecting lines.
Keep your buttercream at a stable temperature to ensure sharp, fabric-like textures. Use a scribe tool or toothpick to tidy up any uneven intersections for a polished finish. For an authentic burlap look, stick to muted tones such as ivory, light brown, and gold. Add a small amount of these colors to your other icings to create a cohesive, natural palette that ties your design together.
Presenting Treats at Farmers Markets and Community Events
Once you've nailed the rustic textures and harvest-inspired designs, it's time to showcase your creations to customers. Farmers markets and community events are fantastic venues for sharing your autumn-themed baked goods. However, to stand out, you'll need to focus on smart presentation, thoughtful packaging, and pricing that reflects the quality of your treats.
Setting Up Displays That Attract Customers
Create an inviting booth by using wooden crates, galvanized buckets, or rustic baskets to display your baked goods. These elements bring out a cozy, farm-to-table vibe. Enhance the scene with seasonal accents like mini pumpkins, gourds, apples, and wheat stalks. For extra charm, sprinkle in pinecones, acorns, or cinnamon sticks - they add both visual interest and a hint of seasonal aroma.
Set up your display so that your products are at eye level, making it easier for customers to browse. Position your register at one end of the booth so shoppers pass by all your items before checking out. Keep the table looking plentiful by consolidating stock into smaller containers as items sell. A half-empty display can deter buyers. To protect your baked goods, use a clean canopy for shade and cover your items to guard against flies and dirt.
"Market patrons want to buy from vendors whose products appear clean, high quality, with clear pricing and attractive displays." - Brian F. Moyer, Education Program Associate, Penn State Extension
Add clear chalkboard signs to your booth that list product names, prices, and special details like "made with local apples" or "pumpkin spice blend." This not only helps customers make quick decisions but also gives your stand a polished, professional touch.
Once your display is ready to impress, turn your attention to packaging that keeps your treats safe and appealing.
Packaging for Bulk Orders and Transport
When handling bulk orders, sturdy corrugated cardboard boxes are your best friend. Their layered design protects heavy or fragile items during transport. For delicate baked goods like decorated cookies or cupcakes, use dividers or foam inserts to prevent shifting and preserve those intricate icing details. Shipping items in their display boxes can also reduce waste and align with a sustainable brand image.
Opt for eco-friendly materials such as kraft paper, recycled cardboard, or compostable bioplastics. These choices not only enhance the rustic theme but also resonate with modern consumers - 72% of Americans say packaging design influences their buying decisions. For individual pastries or grab-and-go items, kraft paper bags are a simple and affordable solution. Adding QR codes to your packaging that link to allergen details or seasonal recipes is a thoughtful way to provide extra value.
If you're offering apple-based treats, prevent browning by soaking the apples in an ascorbic acid solution (1 teaspoon per gallon of water) during preparation. For preserves or applesauce, use a boiling water bath canning process - 15 minutes for pints and 20 minutes for quarts - to ensure they stay shelf-stable.
Every packaged item should include essential details: product name, net weight in both U.S. and metric units, a complete ingredient list, allergen information, and the manufacturer's name and address. If you're selling from an uninspected home kitchen (where permitted), labels must also state: "NOT FOR RESALE – PROCESSED AND PREPARED WITHOUT STATE INSPECTION".
With your presentation and packaging ready, it's time to set prices that reflect the care and effort behind your autumn treats.
How to Price Treats for Local Sales
Autumn-themed treats often justify higher prices, as customers associate them with special occasions and seasonal exclusivity. Price your artisanal items above grocery store levels by factoring in costs for ingredients, packaging, labor, and your booth space.
Focus on items that have low ingredient costs but offer high perceived value. The sensory experience - like the aroma of cinnamon or offering small samples - can help justify a premium price. You can also encourage larger purchases by bundling items, such as offering a half-dozen apple cider donuts at a slight discount.
"There is much more to being a vendor at a market than 'piling it high and watching it fly.'" - Brian F. Moyer, Penn State Extension
Keep in mind that any unrefrigerated food samples must be discarded after four hours. For treats with temperature-sensitive ingredients, like certain fillings or fresh fruit, maintain a booth temperature of 41°F or lower. Always carry copies of your permits to ensure you're prepared for inspections.
Conclusion
Autumn harvest festivals are a fantastic time to showcase treats that highlight the best flavors and textures of the season. Imagine crafting apple-shaped cookies with lifelike details using dimensional piping or pumpkin spice cupcakes topped with beautifully textured buttercream swirls. These techniques don’t just make your baked goods delicious - they make them memorable, perfect for community events or farmers markets.
By mastering key skills - like using two-consistency icing or ensuring proper layer curing - you can take your homemade treats to the next level. These small but meaningful adjustments can transform your desserts into eye-catching creations that truly embody the spirit of the harvest season.
Once your techniques are polished, it’s all about nailing the perfect flavor combinations. Pair tart Granny Smith apples with caramel for a comforting classic, or enhance pumpkin spice with a creamy layer of cream cheese frosting. Adding concentrated ingredients like boiled cider or a pinch of apple pie spice can pack your treats with bold, seasonal flavors that leave a lasting impression.
Gloria's Cake & Candy Supplies has everything you need to bring your autumn-inspired designs to life. From specialized piping tips like the #44 basketweave and #352 leaf tip to gel colors that develop rich, vibrant tones overnight, the right tools make even intricate techniques - like wood grain textures or hand-painted maple leaves with luster dust - achievable for bakers of all skill levels.
Start by focusing on a few techniques and practicing them until they become second nature. The warm spices of fall, the rich colors of the harvest, and the joy of creating treats that look and taste amazing will keep customers coming back year after year.
FAQs
How can I make sure my apple-shaped cookies keep their shape while baking?
To keep your apple-shaped cookies looking sharp and well-defined, start with a firm dough rolled evenly to about ¼-inch thick. This ensures the edges won’t spread out during baking, preserving that crisp apple silhouette. To make cutting easier, lightly coat your cookie cutter with flour - this helps create clean edges and prevents sticking.
Before baking, let the dough chill in the fridge for at least 30 minutes. This step helps the cookies maintain their shape in the oven. Use a parchment-lined baking sheet and bake at the recommended temperature, typically 350°F. The parchment not only prevents sticking but also makes it simple to lift the cookies off without breaking them. By following these steps, you’ll have perfectly shaped apple cookies, ready to decorate with intricate “wood-grain” or “burlap” icing designs.
What are some creative flavor combinations for pumpkin spice treats?
Pumpkin spice, that timeless mix of cinnamon, nutmeg, ginger, and cloves, can be taken to the next level with a few creative additions. For a sweet and savory twist, toss in some maple syrup or sprinkle on toasted pecans for a satisfying crunch. Want a deeper flavor? A splash of espresso or coffee does the trick. If you're after a brighter note, try adding a touch of orange or lemon zest to balance the earthy spices. For an extra indulgent touch, mix in caramel or brown butter. These playful pairings make your desserts feel cozy yet adventurous - just right for the autumn season!
What’s the best way to create a realistic wood grain effect with icing?
To create a natural wood grain effect on your baked goods, try using a faux bois stencil. Lay the stencil over your cookie, cupcake, or cake, then gently pipe royal icing across the top. When you lift the stencil, the icing will retain the wood grain pattern, giving your dessert a textured, rustic look.
For the best results, start with a base layer of light brown or tan icing, and use a darker brown for the grain details. Let the icing set slightly before removing the stencil to keep the design intact. This easy technique adds a polished, seasonal touch to your autumn-inspired treats.
Shop Supplies at Gloria's
Everything mentioned in this article is available at our Culver City shop. Come see it in person or browse online.
Shop at Gloria's11117 Washington Blvd, Culver City • Tue-Sat 10am-6pm • (323) 289-8807
Related Blog Posts
- How To Make Fondant Autumn Leaves
- Color Psychology in Cake Design
- How to Make Rustic Fall Cake Toppers
- Thanksgiving Cake Decorating: Fall Colors and Flavors

