
Creating flawless chocolate heart molds for Valentine’s Day comes down to three key steps: choosing the right chocolate, mastering temperature control, and using clean, dry tools and molds. Whether you’re making bite-sized hearts or large smash hearts, here’s what you need to know:
- Chocolate Options: Use real chocolate (requires tempering for a glossy finish) or compound coatings like Merckens wafers (no tempering needed).
- Tempering Basics: Properly tempered chocolate ensures a shiny finish, a satisfying snap, and easy release from molds.
- Tools: Use polycarbonate molds for professional results, and always polish them before use. Keep a digital thermometer handy to monitor temperatures.
- Tips for Success: Avoid water contact to prevent chocolate from seizing, tap molds to release air bubbles, and refrigerate to set properly.
Start with high-quality chocolate, maintain precise temperatures, and follow a step-by-step process for smooth, glossy results every time.
How To Make A Breakable Chocolate Heart!
Chocolate Basics for Heart Molds
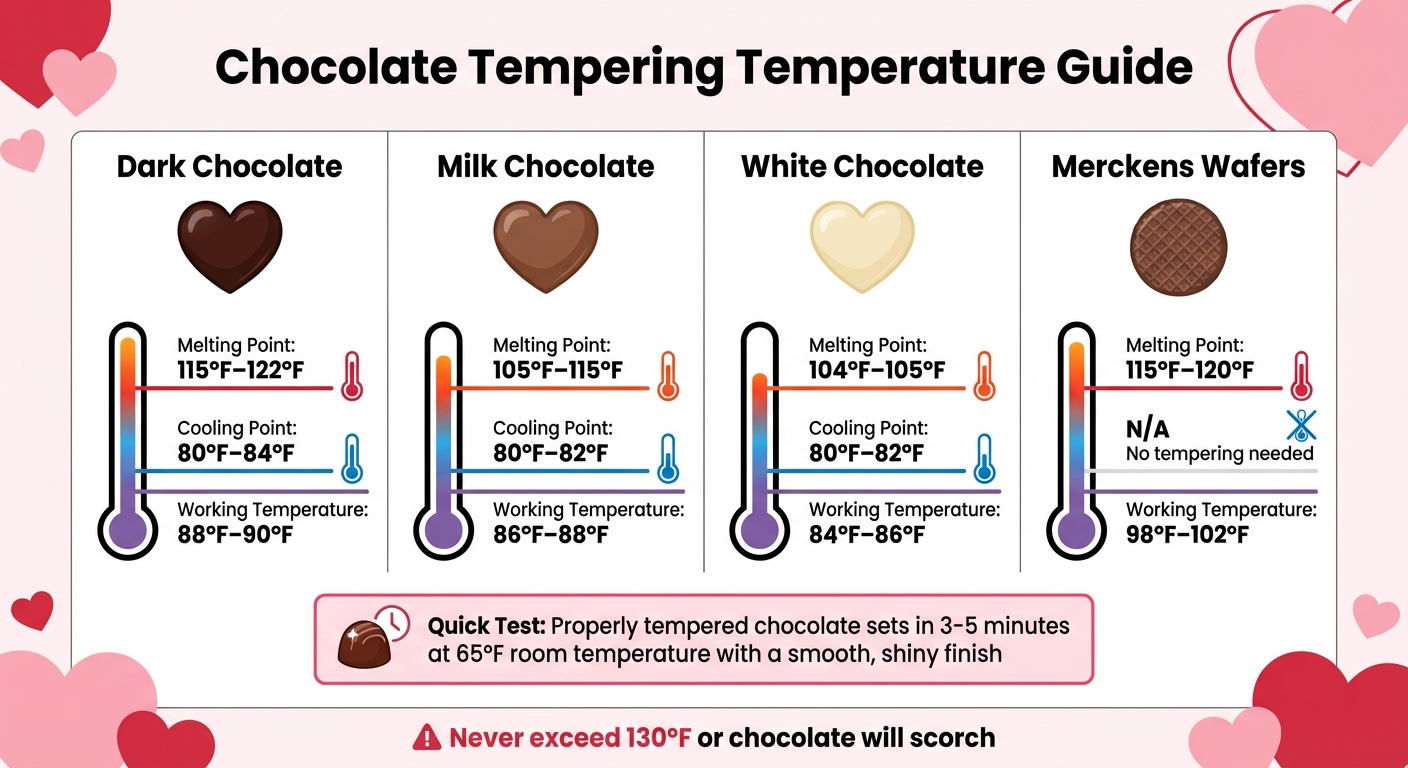
Chocolate Tempering Temperature Guide for Valentine's Day Heart Molds
Selecting Chocolate for Molding
When crafting chocolate hearts, you have two main choices: real chocolate (couverture) or compound coatings like Merckens wafers. Real chocolate is made with cocoa butter, giving it a rich flavor and that satisfying snap we all love. However, it comes with a challenge - it needs tempering to achieve a glossy finish and proper texture. On the other hand, compound coatings use vegetable oils instead of cocoa butter, making them much easier to work with. Just melt and go - no tempering required! Merckens wafers, for example, are a popular choice because they provide consistent results without the fuss.
Keep in mind that workability is key. Real chocolate is more sensitive to temperature and humidity, while compound coatings are more forgiving. However, both can seize - turning thick and lumpy - if they come into contact with even a tiny drop of water.
How to Temper Chocolate
If you’re using real chocolate, tempering is a must. According to Stover & Company:
Tempering is simply a method of temperature control where you heat, cool & reheat the material to specific temperatures in order to achieve a desired finish.
Tempering aligns the cocoa butter crystals, giving your chocolate a smooth, shiny finish and a firm snap. It also helps the chocolate shrink slightly as it cools, making it easier to release from heart molds.
Here’s a quick guide to tempering temperatures for different types of chocolate:
| Chocolate Type | Melting Point | Cooling Point | Working Temperature |
|---|---|---|---|
| Dark Chocolate | 115°F–122°F | 80°F–84°F | 88°F–90°F |
| Milk Chocolate | 105°F–115°F | 80°F–82°F | 86°F–88°F |
| White Chocolate | 104°F–105°F | 80°F–82°F | 84°F–86°F |
| Merckens Wafers | 115°F–120°F | N/A | 98°F–102°F |
To test if your chocolate is tempered, dip a metal spoon into it and let it sit at room temperature (around 65°F). If it sets within 3–5 minutes with a smooth, shiny finish and no streaks, you’re good to go.
Tools Needed for Chocolate Molding
Once your chocolate is ready, having the right tools will make all the difference. A few key items can turn your kitchen into a chocolate workshop.
Start with a digital thermometer - this is crucial for keeping your chocolate at the right temperature, as overheating past 130°F can ruin it.
Next, consider your molds. Polycarbonate molds are the gold standard for professionals. They’re durable, clear, and great for intricate designs. For larger creations like smash hearts, silicone molds are a great alternative. They’re flexible, making it easy to pop out your chocolate without breaking it. Both types are available at Gloria's Cake & Candy Supplies.
Other helpful tools include:
- Offset spatulas for spreading chocolate evenly
- Pastry bags or squeeze bottles for precise filling
- Food-safe brushes for decorative details or layered effects
- Dry towels to keep your workspace moisture-free (remember, water and chocolate don’t mix!)
With the right preparation and tools, you’ll be ready to create stunning chocolate hearts that look as good as they taste.
How to Prepare and Fill Chocolate Molds
Once you've mastered tempering chocolate and chosen the right tools, it's time to prepare and fill your molds. Here's how to do it step by step.
Choosing Heart Mold Styles
The type of mold you pick depends on the look and purpose of your final product. For smaller treats, like gift boxes or party favors, bite-sized heart molds are a great choice. These molds typically have 15–18 cavities per tray and cost between $2.99 and $3.69 each. If you're aiming for something more eye-catching, consider large hollow heart molds. These are perfect for making trendy smash hearts - geometric shells filled with goodies like candy, pretzels, or strawberries, designed to be broken open.
When it comes to materials, polycarbonate molds are the gold standard for professionals. They're durable, heavy, and give your chocolates a beautiful, glossy finish. Clear plastic molds are beginner-friendly because they let you see air bubbles and check when the chocolate has set. Silicone molds, on the other hand, are flexible and make it easy to release the chocolates, but they do hold heat longer, which can slow down the cooling process.
Before you start filling your molds, make sure they're thoroughly cleaned and polished.
Cleaning and Polishing Molds
If you want your chocolates to shine and release cleanly, your molds need to be spotless. Wash them by hand using warm (not hot) soapy water and a soft cloth, then dry them immediately. Avoid using the dishwasher - high heat can warp plastic molds.
To achieve a professional finish, polish each cavity with a dry paper towel before every use. As Confectionery House explains:
Chocolate molds need to be clean, dry, and polished before each use! We recommend polishing the cavities of your chocolate molds between uses with a dry paper towel. If the cavities of the mold are dull your homemade chocolates will lack shine.
After polishing, handle the molds by their edges to avoid leaving fingerprints or introducing moisture, as even a small drop of water can cause your chocolate to seize.
Tempering Merckens Chocolate Step-by-Step
If you're using Merckens compound wafers, you can skip tempering. But if you're working with their couverture line, tempering is essential. The seeding method is a straightforward way to temper chocolate at home.
Start by melting your couverture chocolate in the microwave using a plastic or silicone bowl (avoid glass or ceramic bowls, as they retain too much heat). Heat the chocolate to 110°F–120°F. Then, add small chunks of unmelted chocolate (known as "seeds") to bring the temperature down to 84°F. Once cooled, reheat briefly to 88°F–89°F.
Keep a close eye on the temperature throughout. If it goes above 90°F after cooling, the chocolate will fall out of temper, and you'll need to start over. To check if the chocolate is tempered, dip a metal spoon into it and let it sit at room temperature. Properly tempered chocolate will set in 3–5 minutes, with a smooth, shiny finish.
When your chocolate is ready, warm your polished molds slightly to 79°F–80°F. Fill each cavity completely and tap the mold firmly to release air bubbles. For hollow shells, pour out the excess chocolate back into your melter, then place the mold upside down on parchment paper for about 5 minutes to allow it to drip. Finally, scrape the top clean to ensure sharp, neat edges.
sbb-itb-529d1c3
Advanced Techniques for Perfect Results
Creating Even, Strong Chocolate Shells
After filling your mold, keep it rotating to ensure the chocolate coats every edge and corner evenly. This step is especially crucial for molds with intricate shapes, like heart molds with pointed bottoms or curved sides. Once coated, firmly tap the mold against your work surface or use a palette knife to release any trapped air bubbles.
For larger molds, such as smash hearts, a single chocolate layer won't suffice. After draining the excess chocolate, let the mold rest upside down on parchment paper for a few minutes. When the first layer feels dry to the touch but hasn’t fully hardened, pour in more tempered chocolate and repeat the process. This second layer adds the necessary thickness for the chocolate shell to contract and release cleanly from the mold without cracking. As Cacao Barry notes:
"The larger the mold, the thicker the layer of chocolate needs to be. In fact, during cooling, the chocolate shell hardens and contracts. This is the way the chocolate figure comes out of the mold."
Draining the excess chocolate also creates a slightly thickened rim, which strengthens the edges and makes sealing halves easier. Once the shells are set to the appropriate thickness, you can move on to unmolding and finishing your chocolate hearts.
Removing and Finishing Chocolate Hearts
Before unmolding, check the bottom of the mold. If it looks cloudy or white, that’s a sign the chocolate has contracted and is ready to release. For standard molds, refrigerate for 10–20 minutes, and for larger smash hearts, extend the cooling time to about 60 minutes.
To release the hearts, turn the mold over onto a soft kitchen towel. If the hearts don’t immediately pop out, give the mold a gentle tap with the back of a palette knife. Always wear gloves when handling finished chocolates to avoid leaving fingerprints or dulling their shine with body heat. For stubborn pieces that won’t release, place the mold in the freezer for no more than 5 minutes. The extreme cold will help the chocolate contract further, making removal easier. However, avoid extended refrigeration, as condensation can form when the chocolate returns to room temperature, ruining the finish.
When adding decorative details, timing is key. Apply gold luster dust, edible glitter, or contrasting chocolate drizzles while the surface is still slightly tacky. If using sprinkles, press them gently into place within the first minute after unmolding, before the chocolate hardens completely. With the hearts unmolded and decorated, you’re ready to assemble your smash hearts.
Filling and Assembling Smash Hearts
To assemble two-piece hearts, start by filling one half with your chosen treats. Options like truffles, wrapped candies, mini cookies, or freeze-dried strawberries work well. Be sure to leave about 1/16 inch of space from the rim to allow for a proper seal. If using fillings like ganache, ensure they don’t exceed 82°F to avoid melting the chocolate walls.
Next, heat a stainless steel plate to 95°F. Gently warm the rim of one heart half on the plate, then press it against the other half to seal them together. Work quickly and confidently, as the melted chocolate edge will begin to set in seconds.
Troubleshooting Common Problems
To achieve flawless chocolate hearts, addressing potential issues with tempering and mold preparation is just as important as the troubleshooting process itself.
Fixing Common Molding Issues
Even seasoned chocolatiers can run into challenges when working with heart molds. One of the most frequent problems is chocolate sticking to the mold, often due to improper tempering or insufficient cooling. If this happens, look for a cloudy or contracted base as an indicator. Gently tapping the mold or briefly flash-freezing it can help release the chocolate.
Cracking is another issue, usually caused by chocolate shells that are too thin or not fully set. To fix this, apply a second coat of chocolate and refrigerate for at least 10 minutes between layers, paying extra attention to the upper edges where cracks are most likely to form. For silicone molds, carefully push up from the bottom of the cavity, where the chocolate is thickest and strongest.
| Issue | Common Causes | Solutions & Prevention |
|---|---|---|
| Sticking to Mold | Improper tempering; dirty molds; moisture | Ensure proper tempering by visual inspection; clean plastic molds with warm water only and silicone/polycarbonate molds with warm soapy water; keep tools dry |
| Cracking/Breaking | Shell too thin; insufficient cooling | Apply two coats of chocolate; refrigerate for at least 10 minutes between coats; focus on strengthening the upper edges |
| Dull Finish | Improper tempering; humidity; mold residue | Maintain the correct working temperature (87°F–91°F for dark chocolate); polish molds with a lint-free cloth; avoid soap on plastic molds |
| Air Bubbles | Chocolate too thick; trapped air | Tap the mold firmly on the work surface after filling; use thinner chocolate; add paramount crystals to improve flow if necessary |
If your chocolate seizes because of water contact, it cannot be salvaged for molding - unfortunately, you’ll need to start fresh with completely dry tools. For minor imperfections like small cracks or dull spots, dipping the entire heart in melted chocolate and adding sprinkles can help mask the flaws. Be cautious about refrigerating chocolate for too long, as condensation can form and ruin the glossy finish.
By addressing these common issues, you’ll find it easier to produce beautiful chocolate hearts consistently.
Producing Multiple Hearts Efficiently
Once you’ve tackled the common problems, it’s time to streamline your workflow for producing multiple chocolate hearts. Consistency is key - maintain a steady working temperature throughout the process. For example, keep Mercken's wafers at 98°F–102°F using a heating pad or a low-heat source. Properly tempered chocolate sets in just 3 to 5 minutes at room temperature, with molds taking about 10 to 20 minutes to fully harden in the refrigerator.
For speed and precision, use squeeze bottles or pastry bags instead of spoons to fill the molds. After filling, scrape the tops of the molds with a bench scraper to create flat, professional-looking bases. If the chocolate thickens during the process, mix in 1 teaspoon of paramount crystals per cup to restore its flow without affecting the final set. To avoid leaving fingerprints on your finished hearts, always wear gloves when handling them.
Getting Expert Help from Gloria's Cake & Candy Supplies
Whether you’re preparing for Valentine’s Day orders or simply refining your skills, having access to expert tools and advice can make all the difference. Gloria's Cake & Candy Supplies has been a trusted resource for Los Angeles bakers since 1972. They offer same-day pickup on Mercken's chocolate wafers and professional-grade molds, so you won’t have to worry about shipping delays.
Their in-store staff provides hands-on guidance for troubleshooting issues like temperature control and finishing techniques. Whether you’re a home baker crafting gifts or a commercial operation gearing up for Valentine’s Day, their expertise can help you avoid costly mistakes and wasted chocolate. With the right tools and support, you’ll be well on your way to creating stunning chocolate hearts every time.
Conclusion: Creating Professional Chocolate Heart Molds
Perfecting chocolate hearts for Valentine's Day hinges on three key factors: precise temperature control, moisture-free tools, and high-quality ingredients. For Merckens wafers, melt them between 115°F–120°F and cool to 98°F–102°F. If you're working with couverture chocolate, ensure the temperature stays below 130°F to avoid scorching. Maintaining strict control over temperatures and keeping your workspace free of moisture is crucial - just one drop of water can cause the chocolate to seize.
Merckens chocolate wafers have been a staple for nearly a century. With a 4.9 out of 5-star rating across milk, white, and dark varieties, they deliver consistent results without the need for tempering. You can find them at Gloria's Cake & Candy Supplies for $7.99 per pound, with same-day pickup available to help you stay on schedule for Valentine's Day.
Equally important as the chocolate are the molds you use. Professional-grade polycarbonate molds are ideal for achieving a glossy finish and providing sturdy support for detailed designs. Their transparency also allows you to monitor the chocolate as it sets. To use, fill the molds with a squeeze bottle or pastry bag, tap gently to release any air bubbles, and refrigerate at 45°F–65°F for 15–20 minutes to allow proper crystallization. With the right tools and techniques, your chocolate hearts will be ready for a professional touch.
Since 1972, Gloria's Cake & Candy Supplies has been a go-to resource for Los Angeles bakers, offering expert advice and top-tier supplies. Whether you need help troubleshooting temperature issues, picking out the right molds, or avoiding common mistakes, their knowledgeable staff is ready to assist. With these proven methods and premium materials, you’ll create chocolate hearts with a glossy finish and crisp snap - perfect for making this Valentine’s Day unforgettable.
FAQs
What type of chocolate works best for making heart-shaped molds?
For making heart-shaped chocolate treats, Mercken’s chocolate wafers are a fantastic option. These candy melts are super convenient since they skip the need for tempering, melt effortlessly, and provide a smooth, polished finish every single time. Whether you're a home baker or a pro, these wafers are perfect for crafting beautiful Valentine’s Day chocolates with ease.
How do I know if my chocolate is properly tempered?
To determine if your chocolate is tempered just right, pay attention to these telltale signs:
- Glossy finish: Well-tempered chocolate will have a shiny, smooth surface. If it appears dull or has streaks, it’s likely not tempered properly.
- Sharp snap: Break off a small piece after it sets. It should snap cleanly with a crisp sound rather than bending or crumbling.
- Easy mold release: If you’re using molds, tempered chocolate should pop out effortlessly, leaving clean edges and no streaks behind.
Using a candy thermometer is crucial to keeping your chocolate within the correct temperature range. For instance, dark chocolate should cool to about 95–100°F before adding seed chocolate. Proper tempering not only gives your Valentine's Day treats a polished, professional look but also ensures a smooth and satisfying texture.
What mistakes should I avoid when making chocolate heart molds?
To make flawless chocolate heart molds, there are a few pitfalls you’ll want to steer clear of. These missteps can result in cracks, dull finishes, or chocolate that just won’t release from the mold.
First up, temperature control is everything. If you overheat chocolate, it can scorch or turn lumpy. On the flip side, exposing it to water or steam can make it seize into an unusable mess. For Merckens chocolate wafers, aim to melt them to a temperature of 115–120°F, then let them cool down to 98–102°F. It’s crucial not to let the temperature go over 120°F.
Next, careful mold handling is a must. Don’t grease the molds - this can leave behind a residue that ruins the chocolate’s finish. Also, avoid overfilling the mold cavities, as this can create uneven shapes. Once filled, give the chocolate time to fully set before attempting to remove it. A quick chill in the refrigerator (not the freezer) should do the trick, helping the chocolate firm up without causing cracks.
By keeping your chocolate at the right temperature, steering clear of moisture, and treating your molds with care, you’ll end up with smooth, glossy heart-shaped chocolates - perfect for Valentine’s Day or any special occasion.
Shop Supplies at Gloria's
Everything mentioned in this article is available at our Culver City shop. Come see it in person or browse online.
Shop at Gloria's11117 Washington Blvd, Culver City • Tue-Sat 10am-6pm • (323) 289-8807

