
When it comes to edible printing, image resolution and color management are the two biggest factors that determine how professional your prints will look. Here’s what you need to know:
- Resolution is critical: Always use images at a minimum of 300 DPI to avoid pixelation. For text-heavy designs, aim for 400 DPI for sharper clarity. Avoid resizing low-resolution images, as it won’t improve quality.
- Color adjustments matter: Edible inks and frosting sheets don’t replicate screen colors exactly. Convert images to CMYK format and boost saturation and contrast to ensure colors appear vibrant when printed.
- Printer setup and maintenance: Use food-safe edible ink cartridges and calibrate your printer for color accuracy. Regular maintenance, like cleaning printheads, prevents clogs caused by sugar-based inks.
- Choose the right substrate: Frosting sheets produce brighter and more detailed prints, while wafer paper works better for simpler designs like cupcake toppers.
For professional results, start with high-quality images, fine-tune your printer settings, and select the right materials. These steps ensure edible prints look sharp, vibrant, and ready to impress.
Resolution Standards for Edible Images
What DPI Means for Edible Printing
DPI, or dots per inch, measures how many individual dots of ink fit into a one-inch line. The higher the DPI, the sharper and more detailed your edible image will look. For crisp and professional results, aim for 300 DPI when printing edible images. If your design includes text, like a birthday message or a company logo, bump it up to 400 DPI to keep the text clean and easy to read.
Most images you find online are set at just 72–96 DPI. While this resolution is fine for viewing on a screen, it’s not enough for printing on frosting sheets. Low-resolution images often appear blurry or pixelated when printed because the printer can’t add detail that wasn’t there to begin with. As Rachel, an edible printing expert, explains:
"If you have a poor quality image on screen to begin with - no amount of changing settings will result in a high quality image once printed on edible paper so this is an imperative step!".
Avoid the temptation to upsample - resaving a 72 DPI image as 300 DPI won’t magically improve its quality. Instead, it will introduce blurry artifacts. To determine the maximum print size for a given image, divide its pixel dimensions by 300. For example, an image that’s 1,200 x 1,600 pixels will print sharply at up to 4" x 5.33".
Once you’ve ensured the resolution is up to par, the next step is selecting the right file format to maintain that quality.
Selecting Image Files That Print Well
The file format you choose is just as important as the resolution. TIF and EPS files are ideal for edible printing because they retain quality even after multiple edits. On the other hand, formats like JPEG and GIF compress the image to save space, which can degrade the quality over time. Each time you save a JPEG, for instance, you risk losing sharpness and clarity. If you must use a JPEG, convert it to TIF or EPS before making any edits to preserve its quality.
For accurate color reproduction - especially for designs involving corporate logos or specific brand colors - convert your images to CMYK format instead of RGB. RGB (red, green, blue) is used for screens, while printers rely on CMYK (cyan, magenta, yellow, black). This conversion ensures your edible print matches the original colors as closely as possible. Finally, always request high-resolution files directly from clients rather than relying on images pulled from websites or email signatures, as these are often too low in quality for proper printing.
sbb-itb-529d1c3
Setting Up and Calibrating Your Edible Printer
How to Calibrate Your Printer
Start by installing the latest driver specific to your printer model. For instance, Canon PIXMA printers are a popular choice because they allow detailed color adjustments and feature removable printheads, making cleaning or replacement more convenient. Always use a dedicated edible printer - never repurpose a regular printer that has been used with standard ink.
Once you've installed food-grade edible ink cartridges, fine-tune your printer settings before using costly frosting sheets. Navigate to Print > Properties > Color/Intensity > Manual to adjust the color channels. If your prints appear too dark, set the brightness to "Light"; if they're too pale, choose "Dark". To avoid wasting edible sheets, run initial tests on plain A4 paper to check for color accuracy and proper alignment.
For thicker icing sheets, modify the media type to "Envelope" or enable the "Printer Abrasion" setting in the maintenance tab. This raises the rollers, reducing smudging and ensuring smoother printing. Additionally, select "Best" or "High" quality settings to slow down the feeding process, allowing the sheets to absorb the ink better and produce sharper details. Before tackling professional jobs, always perform a "Nozzle Check" from the maintenance menu to ensure there are no clogged printheads.
Once the calibration is complete, maintaining your printer becomes essential to keep prints looking their best.
Keeping Your Printer in Good Condition
Calibration is just the beginning; ongoing maintenance is key to keeping your edible printer running smoothly. Edible ink contains sugar particles that can crystallize when temperatures drop below 64°F (18°C). To avoid clogs, print one to two pages weekly or power-cycle the printer every other day to activate its cleaning functions.
Develop a weekly maintenance routine that includes running a nozzle check, cleaning the rollers, and wiping the bottom plate. If you notice streaky prints, perform a cleaning or deep cleaning cycle - though keep in mind that deep cleaning uses more ink. If these steps don’t resolve the issue, remove the printhead and soak it in hot distilled water (about 1–2 inches) for 30 minutes. Let it dry completely before reinstalling.
Regular upkeep not only prevents clogs but also ensures your edible prints stay sharp and vibrant - critical for professional cake decorating. If you plan to store the printer for an extended period, remove the cartridges, place them in their original protective clips, and manually clean the printhead. Also, keep the printer away from cold windows or drafty areas, as low temperatures can speed up ink crystallization.
Edible Print Settings for Printing on Printable Icing Sheets and other media
Managing Color with Edible Inks and Printing Surfaces
Frosting Sheets vs Wafer Paper Comparison for Edible Printing
Using Color Profiles with Edible Inks
Edible inks are specially formulated to be safe for consumption but tend to have a more limited and less vibrant color range compared to traditional inks. These inks, approved by the FDA, are designed to work with specific inkjet printers while adhering to food safety standards.
"Edible printers use specific types of edible inks that are safe to consume but might not offer the same color intensity as traditional, inedible inks on white printing paper." – Watson & Webb
One of the biggest challenges in edible printing is achieving vibrant red tones. Regulatory restrictions on ingredients often result in reds appearing duller than expected. Colors like pinks, purples, and reds are particularly tricky to reproduce accurately. To address this, it’s helpful to adjust your images in editing software before printing. Boosting contrast and saturation beyond normal levels on-screen can help the final printed colors appear closer to your expectations.
When designing, work in CMYK color mode and make manual adjustments to fine-tune hues. For example, reducing Cyan can enhance red tones, while lowering Yellow can deepen blues. If you're printing corporate logos or other branded materials, request the artwork in CMYK format to achieve better alignment with brand colors.
Humidity control is another key factor. Keep the workspace humidity between 45% and 65%. Since edible inks are water-based and contain sugars, they are sensitive to moisture. Low humidity can cause ink to crystallize and clog the printheads, while high humidity can make the ink spread and blur.
These adjustments and conditions are especially important because the printing surface also plays a significant role in the final appearance of colors.
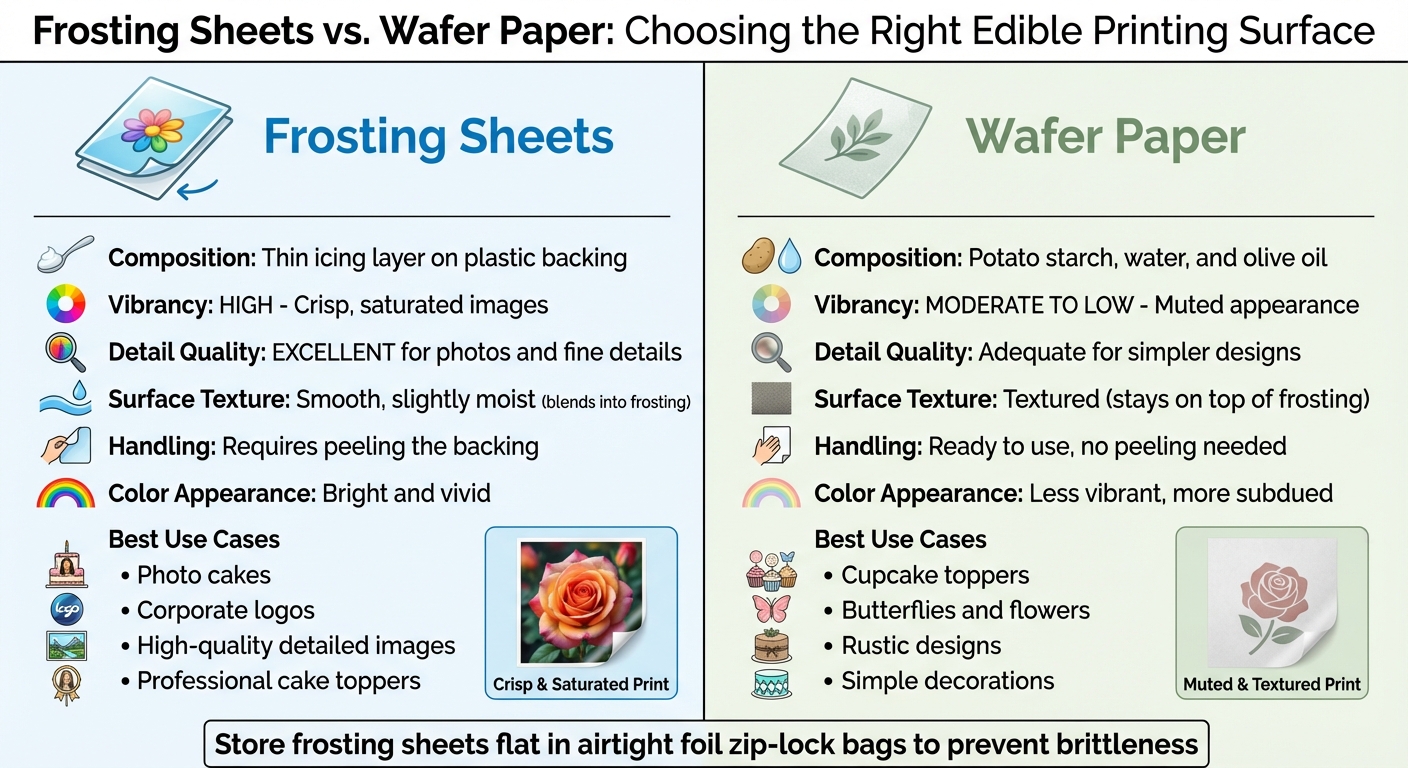
Frosting Sheets vs. Wafer Paper
The type of printing surface you use has a major impact on how colors appear. Think of the surface as an additional "color" in your design. Frosting sheets and wafer paper, two common options, interact with ink differently, influencing brightness and detail.
Frosting sheets have a thin icing layer on a plastic backing. They deliver bright, vivid images with excellent detail, making them ideal for high-quality photos and professional cake toppers. Their smooth, slightly moist surface allows the ink to integrate seamlessly with cake frosting. Before use, the plastic backing must be removed.
Wafer paper, on the other hand, is made from potato starch, water, and olive oil. It’s stiff, slightly transparent, and doesn’t have a backing. Colors printed on wafer paper tend to look more muted and less vibrant. Its textured surface prevents the design from blending into the frosting, making it better suited for simple or rustic decorations like cupcake toppers, butterflies, or flowers .
| Feature | Frosting Sheets | Wafer Paper |
|---|---|---|
| Vibrancy | High; crisp, saturated images | Moderate to low; muted appearance |
| Detail Quality | Excellent for photos and fine details | Adequate for simpler designs |
| Composition | Thin icing layer on plastic backing | Potato starch, water, olive oil |
| Surface Texture | Smooth, slightly moist (blends in) | Textured (stays on top) |
| Handling | Requires peeling the backing | Ready to use, no peeling needed |
| Best Use | Photo cakes, corporate logos | Cupcake toppers, rustic designs |
For best results, store frosting sheets flat in airtight foil zip-lock bags to protect them from becoming brittle or absorbing moisture. After printing, let edible images dry for at least 10 minutes before handling or applying them to baked goods.
Preparing and Editing Images for Printing
Sizing Images for Common Cake Dimensions
The quality of your edible prints depends heavily on the resolution of your original image. Vector graphics, like SVG files, are ideal because they can be resized without losing clarity. On the other hand, raster images, such as JPEGs, are made up of pixels and can become blurry or pixelated if stretched too much.
"If your edible prints look low quality, it's usually not the printer's fault - it's the image resolution!" – Ink4Cakes
Edible sheets come in standard sizes, such as 8.5″ x 11″ for icing sheets, 7.5″ x 10″ for frosting sheets, and 10″ x 16″ for wide-format sheets. To ensure your image fits properly, always download the highest-quality version of the file. Avoid screenshots, as they often reduce resolution. If you're saving an image on your phone, long-press it and choose "Save" or "Download" to maintain its quality.
After resizing, adjust the image's brightness, contrast, and saturation to ensure it looks its best when printed.
Basic Photo Editing for Better Prints
Edible inks tend to look less vibrant than what you see on your backlit screen. To counter this, edit your image to appear more saturated on your monitor than you might ordinarily prefer.
"Since images are ALWAYS duller once you print them on edible paper... you may want to increase settings such as the saturation, contrast, brightness etc. way more than you'd like on the screen." – paper2eat.com
Boosting contrast, saturation, and sharpness can help bring out details, especially on textured surfaces. Switching your image from RGB to CMYK color mode can also improve color accuracy when working with edible inks. For quick edits, tools like Canva are easy to use, while Adobe Photoshop and Lightroom offer more advanced options.
Before committing to an edible sheet, test your adjustments by printing on plain A4 paper. Use the "Best" or "High" quality setting on your printer to slow the paper feed and capture finer details. This extra step helps you confirm both the sizing and color accuracy of your image.
Fixing Common Edible Printing Problems
Preventing Pixelation and Distortion
Pixelation happens when an image doesn’t have enough detail - typically below 300 DPI - resulting in blurry or blocky prints. Stretching small raster images, like JPEGs or PNGs, magnifies the color dots, making pixelation more noticeable.
"If your edible prints look low quality, it's usually not the printer's fault - it's the image resolution!" – Ink4Cakes
To avoid this, use vector graphics (like SVG files) for logos and text that need resizing. Vectors can scale up or down without losing sharpness. Additionally, set your printer to "Best" or "High" quality mode. For icing sheets, choose the "Envelope" or "High Glossy" media setting. This raises the rollers and helps prevent smudging. Combining high resolution with proper printer settings ensures clearer, more professional results. Fixing pixelation also sets the stage for achieving richer and more accurate colors in your edible prints.
Getting Brighter, More Accurate Colors
Once image clarity is sorted, the next challenge is making colors pop. Edible prints often look less vibrant than digital screens because CMYK inks are thicker and can dry out, leading to clogs and faded colors.
"A common issue is clogged printheads, which can happen if you leave your printer idle for too long... try printing at least 1–2 pages per week to keep the ink flowing." – Icinginks
If colors seem dull, start with a Nozzle Check from your printer’s maintenance menu. Gaps in the pattern mean it’s time for a "Cleaning" or "Deep Cleaning" cycle. For tougher clogs, try using cleaning cartridges to clear dried ink. Adjusting the Cyan, Magenta, and Yellow balance in the printer’s "Color/Intensity" settings can also help if prints look too dark or muddy. For better color accuracy, convert image files to CMYK format before printing - this is especially useful for corporate logos. After printing, let the images dry for 10–15 minutes to prevent smudges or fingerprints. These steps ensure your edible prints not only look sharp but also have vibrant, consistent colors.
Applying Edible Images to Cakes and Confections
Preparing Cake Surfaces for Image Application
For the best results when using edible images, opt for buttercream or fondant as your frosting base. These surfaces provide the ideal texture for the image to adhere properly. While whipped cream and non-dairy toppings are also options, their high water content can cause the image's colors to bleed or fade over time.
Stick with white frosting in the area where the edible image will be placed. Since edible sheets are slightly translucent, any color underneath could show through and distort the design. Make sure the cake is freshly frosted and perfectly level. Avoid adding borders, piping, or other decorative elements until after the image is applied.
"Ensure the icing is still moist or sticky. It is this moisture in the icing that will ensure the image blends with the cake." – Icinginks
If the frosting has dried, lightly mist the surface where the image will go with water to reactivate the stickiness. For fondant, apply just a tiny amount of water to the area to avoid leaving marks. If you’re working with a frozen cake, let it thaw slightly and eliminate any moisture bubbles before applying the image.
Once the surface is prepped, you’re ready to apply the edible image.
Attaching and Handling Edible Images
With your cake surface ready, follow these steps to attach the edible image securely. Start by peeling off the plastic backing. If the image sticks due to humidity, place it in the freezer for 30–60 seconds. This will harden the icing sheet, making it easier to peel off. Hold the image by its edges and apply it from the center outward to avoid trapping air bubbles.
"After laying the image on the cake it's best to work from the center and smooth outward. Small smooth strokes back and forth. It's best to do this on a chilled cake so the image doesn't rip while smoothing." – Melissa Diamond, Baker and Decorator, Legacy Cakery
Using clean, dry hands, gently pat the image from the center outward in a circular motion. This technique helps eliminate air bubbles and prevents wrinkles. For cookies, chocolate, or hard candy, edible glue or corn syrup thinned with a bit of water works well as an adhesive. Once the image is applied, the cake can be refrigerated or frozen. However, avoid refrigerating unused edible images, as they may become brittle or crack.
Conclusion
Creating professional edible images involves paying close attention to every detail, from resolution and color calibration to substrate choice and regular upkeep. High-resolution output, accurate color management, and consistent maintenance are non-negotiable. To keep your printer in top shape, print a test page with color weekly - this prevents sugar-based ink from crystallizing and clogging the system.
"The most important maintenance tip is to keep the printer active. Since edible ink is made from food ingredients (sugar and water), it can crystallize if the printer sits idle for too long." – Ink4Cakes
For optimal results, use edible ink cartridges within six months, opt for premium frosting sheets, and calibrate your monitor to align with CMYK output. Also, keep an eye on ink levels - each cartridge typically prints about 200 sheets. Beyond ink and calibration, the type of substrate you use plays a big role in enhancing print quality.
The substrate is just as important as the printer settings. Frosting sheets are ideal for achieving high-resolution images that blend seamlessly into buttercream or fondant. On the other hand, wafer paper is better suited for creating 3D decorations or structural elements.
FAQs
How can I make sure my edible prints have vibrant colors and accurate details?
To get vibrant and accurate edible prints, start by using a printer specifically designed for edible ink. Make sure to install fresh, food-grade edible ink cartridges recommended by the manufacturer. These cartridges are key to achieving the best color quality. Keep your printer’s printhead clean and store your edible inks in a cool, dry place to prevent clogs and fading over time.
Set your printer to 300 dpi or higher and choose the “photo” or “high-quality” mode for sharp details and to avoid streaks or banding. Before committing to the final print, test your design on the same type of frosting sheet you’ll use. This allows you to tweak the color settings if needed to ensure the print matches your screen preview. For richer and more vibrant colors, opt for premium frosting sheets, as they absorb more ink compared to wafer paper.
Lastly, evaluate your prints in neutral lighting to judge colors accurately, and store completed designs flat in a cool, low-humidity environment. By following these tips, you’ll consistently produce professional-grade edible creations.
How can I maintain my edible printer to ensure it works properly?
To keep your edible printer running smoothly and producing high-quality prints, here are a few essential tips:
- Choose the right media setting: Always select the correct media type in your printer settings, such as "Other Photo Paper." This ensures the printer operates in its highest resolution and photo mode, giving you sharp and vibrant images on frosting sheets or wafer paper.
- Store edible ink correctly: Keep unopened ink cartridges in a cool, dry place. Once opened, aim to use them within 3–6 months for optimal results. If ink has been stored for over 12–24 months, it's best to discard it to avoid compromising print quality.
- Use color management tools: Activate the printer's built-in color management by selecting "ICM Handled by Printer" in the settings. This helps maintain consistent and accurate colors for all your prints.
By sticking to these practices, you can avoid common problems like clogged nozzles or dull prints, ensuring your edible printer stays in great shape - whether you're crafting cakes at home or managing a busy bakery.
Why do I need to use high-resolution images for edible printing?
When it comes to edible prints, using high-resolution images (at least 300 DPI) is a must. Low-resolution images tend to look blurry or pixelated when enlarged, which can ruin the overall appearance of your design.
With high-resolution files, every detail of your image is captured perfectly on frosting sheets or other edible surfaces. This means your cakes and confections will have a polished, professional look. To get the best outcome, always double-check your image's resolution before printing, and steer clear of files that are overly small or heavily compressed.
Shop Supplies at Gloria's
Everything mentioned in this article is available at our Culver City shop. Come see it in person or browse online.
Shop at Gloria's11117 Washington Blvd, Culver City • Tue-Sat 10am-6pm • (323) 289-8807
Related Blog Posts
- Edible Image Printing 101: Everything You Need to Know Before Ordering Custom Cake Images
- Frosting Sheets vs. Wafer Paper: The Complete Guide to Edible Image Materials
- The Ultimate Edible Image Troubleshooting Guide: 10 Common Problems Solved
- Holiday Edible Images: Custom Christmas and Thanksgiving Cake Toppers in LA

