
When it comes to decorating desserts, edible glitter sprays and glitter dusts are two popular tools for adding sparkle. The choice between them depends on the effect you're aiming for, the scale of your project, and your budget. Here's a quick breakdown:
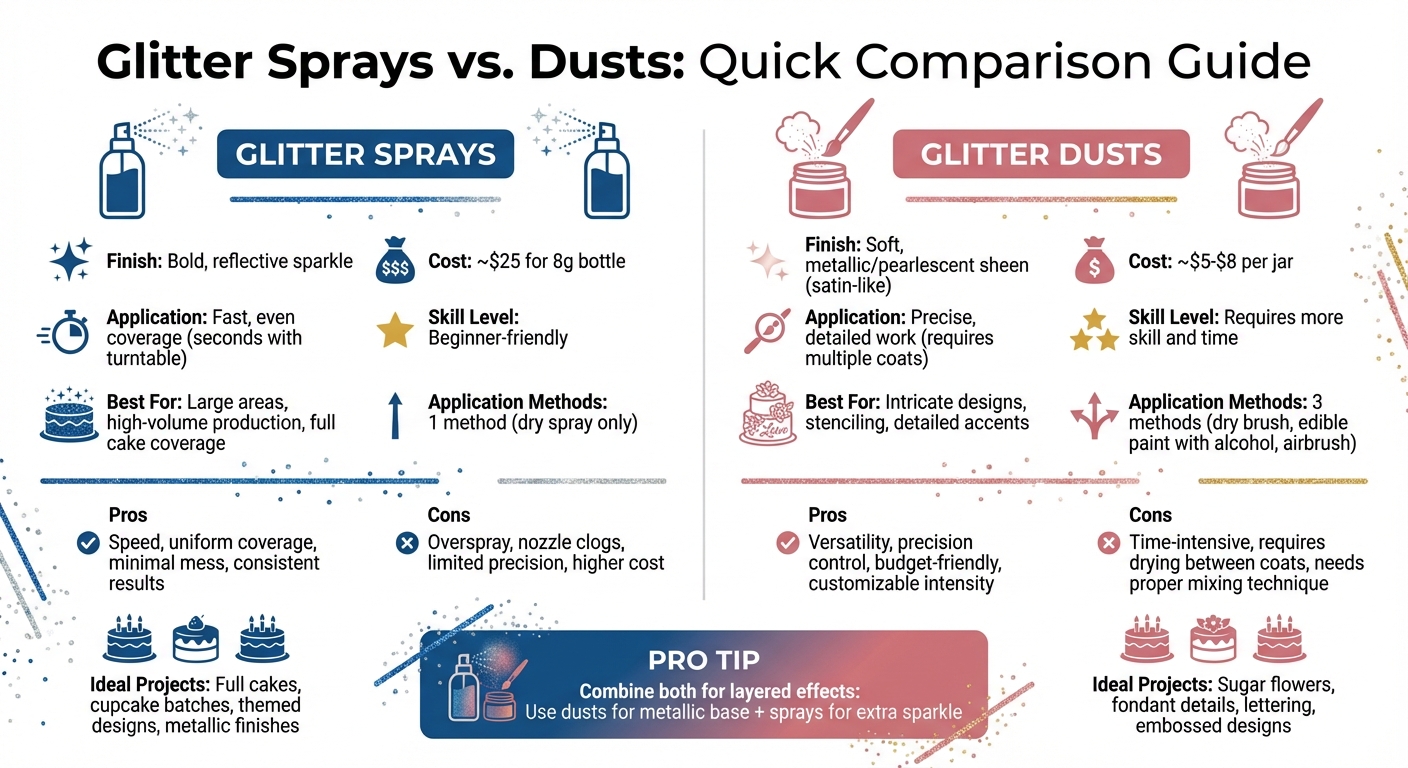
- Glitter Sprays: Offer bold, reflective sparkle, ideal for covering large areas quickly. They are beginner-friendly and cost around $25 for an 8-gram bottle. Perfect for festive occasions but can lead to overspray and nozzle blockages.
- Glitter Dusts: Provide a soft, metallic sheen and precise control for detailed designs. They cost about $5–$8 per jar and can be applied dry, mixed with alcohol for edible paint, or diluted for airbrushing. However, they require more time and skill.
Quick Comparison:
| Feature | Glitter Sprays | Glitter Dusts |
|---|---|---|
| Finish | Bold sparkle | Metallic or pearlescent |
| Application | Fast, even coverage | Precise, detailed work |
| Cost | ~$25 (8g bottle) | ~$5–$8 (per jar) |
| Best For | Large areas, speed | Intricate designs |
| Drawbacks | Overspray, clogs | Time-intensive |
Tip: Combine sprays and dusts for layered effects - use dusts for a metallic base and sprays for extra sparkle.
Glitter Sprays vs Dusts Comparison Chart for Cake Decorating
Glitter Sprays: Pros and Cons
Benefits of Glitter Sprays
Glitter sprays are all about speed and convenience, making them a go-to option for decorators handling larger projects. With the help of a turntable, you can coat an entire cake in just a few seconds. This approach ensures an even, streak-free finish, whether you're working with fondant or buttercream.
One of the standout features of spray pumps is how they minimize the typical mess of gold edible glitter. The particles are contained, reducing that frustrating glitter cloud. Plus, the process is beginner-friendly - no need for mixing, airbrushing, or advanced techniques. Professional Pastry Chef Michelle Anderson suggests holding the spray about one foot away from your cake for smooth, even coverage.
Sprays offer a variety of finishes. Luster sprays provide a sleek metallic sheen, while shimmer sprays add that extra sparkle. You can even tweak your technique to create different looks. For example:
- Spray evenly for a consistent shimmer.
- Spray above the dessert for a "starry" effect as the glitter falls.
- Use quick, targeted sprays to highlight specific areas.
This quick, clean application makes glitter sprays a favorite for large-scale decorating projects.
Drawbacks of Glitter Sprays
While glitter sprays are handy, they come with their fair share of challenges. One common issue is nozzle blockages. Edible glitter dust can clump inside the nozzle, stopping the spray. To fix this, you’ll need to unscrew the nozzle, soak it in warm water (not boiling), and pump the trigger while submerged to clear the clog. Other mechanical issues, like broken springs or tubing that doesn’t reach the bottom of the bottle, can also cause headaches.
Overspray is another drawback. Glitter particles tend to scatter and stick to unintended areas, which means you'll need to cover nearby surfaces with parchment paper or cardboard shields. While these methods help with precision, they also lead to more waste. Unlike brushes, which allow for detailed work, sprays can struggle with intricate designs unless you're using physical barriers to control the glitter.
Best Uses for Glitter Sprays
Given their strengths, glitter sprays shine brightest when you need speed and uniform coverage. They're perfect for creating metallic finishes on full cakes, whether they're covered in fondant or buttercream. They’re also great for themed designs, such as anniversary or holiday cakes, and for adding dramatic touches to roses, ribbons, and logos with metallic tones like gold, silver, or bronze.
The "glitter cake trend" that’s taken over TikTok has turned edible glitter sprays into a must-have for creating desserts that are as eye-catching as they are delicious. Before you dive in, make sure your cake is prepped properly - your buttercream or icing should be completely dry or chilled in the freezer to prevent the glitter from clumping. And don’t forget to test the spray pattern on a separate surface first to check the nozzle’s pressure and coverage area.
sbb-itb-529d1c3
Glitter Dusts: Pros and Cons
Benefits of Glitter Dusts
Glitter dusts offer precise control, making them ideal for detailed work on fondant, gum paste, and chocolate. Their fine, silky texture allows for delicate applications, whether you're brushing on a soft shimmer or mixing them with clear alcohol - like vodka or lemon extract - for sharp lines and lettering. This versatility makes them a favorite for intricate designs.
Another perk is their customizable intensity. A light, dry application gives a subtle, iridescent look, while layering two or three coats can create a striking metallic finish.
Cost is another factor in their favor. A standard jar of luster dust costs around $4.79, with specialty colors ranging from $8.00 to $9.00. They blend well into frostings and fondants without altering texture, and high-quality options are often flavorless, FDA-compliant, and may also meet Kosher, vegan, nut-free, and gluten-free standards.
Drawbacks of Glitter Dusts
The main downside is the time and skill required for application. Brushing on glitter dust is slower than using sprays, especially for large areas, and achieving a pronounced effect often requires multiple coats, with drying time in between.
They also don’t mix well with water. Glitter dusts are not water-soluble, so combining them with water results in a sticky mess instead of a smooth paint. Instead, it's best to mix them with high-proof alcohol or lemon extract, adding liquid gradually until the mixture reaches the consistency of thick cream.
Another issue is market confusion. Many products labeled as "non-toxic" are not the same as "food-grade" or "edible." Knock-off brands often use ingredients that aren’t FDA-approved, so it’s crucial to check that the product is explicitly labeled "Edible" or "Food Grade".
While these challenges require extra care, the results can be worth the effort, especially for precision work.
Best Uses for Glitter Dusts
Glitter dusts shine in applications where precision matters. They’re perfect for stenciling patterns on royal icing, creating lifelike edible flowers with petal dust, or painting sharp lines and lettering on fondant. For broader applications, a dry pastry brush works well, while a fine-tip paintbrush is better for detailed metallic accents.
For a professional metallic effect, multiple coats are key, ensuring each layer dries fully before applying the next. Glitter dusts also work beautifully with airbrushes, offering smooth, pearlescent coverage over larger areas. They're the tool of choice for adding subtle shimmer to chocolate decorations, fondant details, or any project requiring refined, detailed finishes.
This level of control sets glitter dusts apart from the bold, expansive coverage of glitter sprays, making them indispensable for intricate designs.
Glitter Sprays vs. Dusts: Direct Comparison
Visual Results and Finish
The difference in appearance between glitter sprays and dusts comes down to particle size. Glitter sprays deliver a bold, sparkling effect that grabs attention immediately, while dusts create a softer, pearlescent or metallic sheen, similar to satin finishes. Texture also plays a role: sprays leave visible glitter particles on surfaces, while dusts blend smoothly into frostings and fondant without affecting the texture of the food. Many glitters use mica, which refracts light to produce colors like gold, green, or pink, adding a striking "interference" effect. For maximum impact, combining both sprays and dusts can create layered finishes that stand out even more.
These visual differences also influence how each product is applied.
Application and Ease of Use
Sprays are favored for their speed and uniformity. Dry spray pumps can coat surfaces evenly in seconds, making them perfect for high-volume production settings where efficiency is crucial.
Dusts, on the other hand, are ideal for detailed work. They take more time but offer unmatched precision, whether you're stenciling patterns, painting fine lines, or enhancing intricate fondant designs. Brushes are often used for application, and achieving the desired effect may require multiple coats. Dusts are incredibly versatile - they can be applied dry, mixed with vodka or lemon extract to create edible paint, or diluted for airbrushing. This flexibility makes dusts a go-to choice for decorators who need options for various techniques.
Cost and Value
Cost is another key factor when choosing between sprays and dusts. Prices vary depending on the format and quantity. A standard jar of edible glitter costs about $9.00, while an 8-gram spray bottle is priced around $25.00. Luster dusts typically range from $5.99 to $8.00 per jar, with specialty shades sometimes costing more.
| Feature | Glitter Sprays | Glitter Dusts |
|---|---|---|
| Primary Strength | Speed and even coverage | Versatility and detailed work |
| Best Value For | High-volume production | Multi-use decorating |
| Waste Factor | Low (controlled dispersion) | Moderate (spillage risk) |
| Application Methods | One (dry spray) | Three (dry, wet paint, airbrush) |
"When using our products in a busy bar setting, we know that time is money... Both the spray pumps and the shakers are easily the most popular product we sell to bar, club and restaurant groups." – Bakell
The choice depends on your priorities. Sprays are a time-saver in professional environments where consistency across multiple servings is essential. Dusts, however, provide more versatility, as one jar can be used in multiple ways - dry shimmer, edible paint, or airbrush medium - making them a cost-effective option for decorators who employ a variety of techniques.
Choosing the Right Glitter Option for Your Project
Key Factors to Consider
When selecting glitter for your project, think about the scale of your work. Sprays are perfect for covering large areas quickly or working on multiple items at once - like decorating a dozen cupcakes or an entire sheet cake. On the other hand, dusts excel in detailed tasks, such as painting intricate designs on sugar flowers, accenting embossed fondant, or adding metallic touches to individual cake toppers.
Sprays are beginner-friendly, offering consistent results with minimal effort. Dusts, however, require a bit more skill, especially if you're mixing them with clear alcohol or lemon extract to create edible paint. Keep in mind that each coat of paint needs to dry completely before applying the next, which can extend your decorating time.
Budget is another factor to weigh. A jar of luster dust typically costs around $8.00, while an 8-gram spray bottle runs closer to $25.00. Dusts are versatile - you can use them dry, mix them into paint, or dilute them for airbrushing. Sprays, while more expensive, provide precise application and help minimize waste, which is especially useful in production environments. As you decide, it's also essential to ensure that your chosen glitter meets food safety standards.
Safety and Ingredient Standards
Safety should always be a top priority. Check the label to confirm that the product is explicitly marked as "Edible" and includes a complete list of ingredients. Avoid anything labeled "Non-toxic" or "Decorative Only", as these are not FDA-approved for direct food use. Look for products with FDA-approved components like mica-based pearlescent pigments, FD&C colors (e.g., Blue No. 1), sugar, acacia, maltodextrin, and cornstarch.
"If the label simply says 'non-toxic' or 'for decorative purposes only' and does not include an ingredients list, the product should not be used directly on foods." – U.S. Food and Drug Administration
High-quality products often feature additional certifications, such as Kosher, Halal, or Vegan, and are generally free from common allergens. Be cautious of suspiciously low-priced items, as they may contain non-edible fillers. If you're buying pre-decorated goods from a bakery, ask to see the labels to confirm that the glitter used is food-grade.
Where to Find Quality Glitter Supplies
If you're in the Los Angeles area, Gloria's Cake & Candy Supplies in Culver City is a trusted source for professional-grade decorating materials. Since 1972, they've been helping decorators find the perfect tools for their projects. Their knowledgeable staff can assist in verifying product safety and guide you toward the best glitter option for your needs. With same-day pickup and a wide range of sprays and dusts, you can compare products in person before making a decision. Their consultation services are particularly helpful if you're unsure which format works best for your technique or production scale.
The Difference Between Edible Glitter and Edible Luster Dust
Conclusion: Sprays or Dusts – Which Is Right for You?
When it comes down to glitter sprays versus dusts, the choice hinges on your project’s needs and your level of expertise. If you're tackling large-scale projects that demand quick, even coverage, sprays are a fantastic option. They deliver consistent results, keep the mess to a minimum, and are perfect for high-volume tasks. At around $25.00 for an 8-gram spray bottle, sprays cater to convenience and efficiency, while luster dusts, priced at about $8.00 per jar, serve a different purpose.
For intricate, detail-oriented work - like painting delicate sugar flowers, adding metallic highlights to fondant, or accentuating embossed designs - luster dusts shine. They’re not only budget-friendly but also incredibly versatile. You can apply them dry with a brush, mix them with vodka or lemon extract to create edible paint, or even use them with an airbrush for a smooth finish.
Many decorators find a balance between these two tools to achieve stunning effects. As Edward Frys from The Sugar Art puts it:
"The main difference between Luster Dust and edible glitter is going to be the mica itself. When it's a smaller particle it looks like satin or a metallic finish; when it's a larger particle it then twinkles and shines in the light"
Combining both techniques can elevate your designs. Applying a base coat of luster dust for a soft metallic sheen and finishing with a light spray of glitter creates a layered effect that combines subtlety with sparkle.
Ultimately, your choice will depend on your comfort level, the scale of your project, and the final look you’re aiming for. Sprays deliver bold, reflective sparkle with minimal effort, while dusts offer a soft, pearlescent finish that allows for precise control. Both are essential tools for decorators looking to create dazzling, show-stopping confections.
In Los Angeles, Gloria's Cake & Candy Supplies provides the expertise and high-quality materials you need to bring your glittering creations to life.
FAQs
How do I stop glitter spray overspray?
To avoid overspray, start by testing the glitter spray on a small, hidden spot to assess its coverage and spray direction. Keep the can about 6 to 12 inches away from the surface and spray with a steady, even motion. This approach helps you control the application and minimizes excess mist. Using the right technique ensures your cakes or desserts have a clean, polished look.
What liquid should I mix with luster dust?
To make a decorative paint or luster dust mixture, combine luster dust with vodka or a clear, alcohol-based flavoring. The alcohol evaporates fast, ensuring a smooth and shiny finish on your decorations.
How can I tell if glitter is truly edible?
To ensure glitter is safe to eat, carefully check the label for a clear statement that it is edible. Look for a list of ingredients such as sugar, gum arabic, maltodextrin, or approved food colorings. If the label only mentions "non-toxic" or says "for decorative purposes only" without providing ingredients, it’s probably not meant to be consumed.
Shop Edible Glitter & Decorations
Edible glitter sprays, dusts, and decorating supplies in stock.
Shop at Gloria's11117 Washington Blvd, Culver City • Tue-Sat 10am-6pm • (323) 289-8807
Related Blog Posts
- Ultimate Guide to Edible Glitter Application
- How to Make 'Ugly Cakes' That Look Perfectly Imperfect
- Gel vs. Liquid vs. Powder: The Complete Food Coloring Guide for Bakers
- How to Use Stencils for Cake Designs

