
The "ugly cake" trend is reshaping the way cakes are designed - intentionally messy yet visually striking. These cakes feature textured frosting, uneven drips, and off-center decorations, blending artistry with a playful approach. Here's how to make one:
- Start with a sturdy base: Bake and stack even layers, use a crumb coat, and chill the cake for stability.
- Texture your frosting: Use swirls, combs, or painterly strokes for a bold finish.
- Add drips and accents: Apply ganache drips or metallic highlights for flair.
- Decorate creatively: Place elements off-center and use bold colors or quirky details for a standout design.
- Refine and transport: Smooth out imperfections, clean edges, and chill before moving.
With the right tools and techniques, you can craft a cake that's both fun and unforgettable.
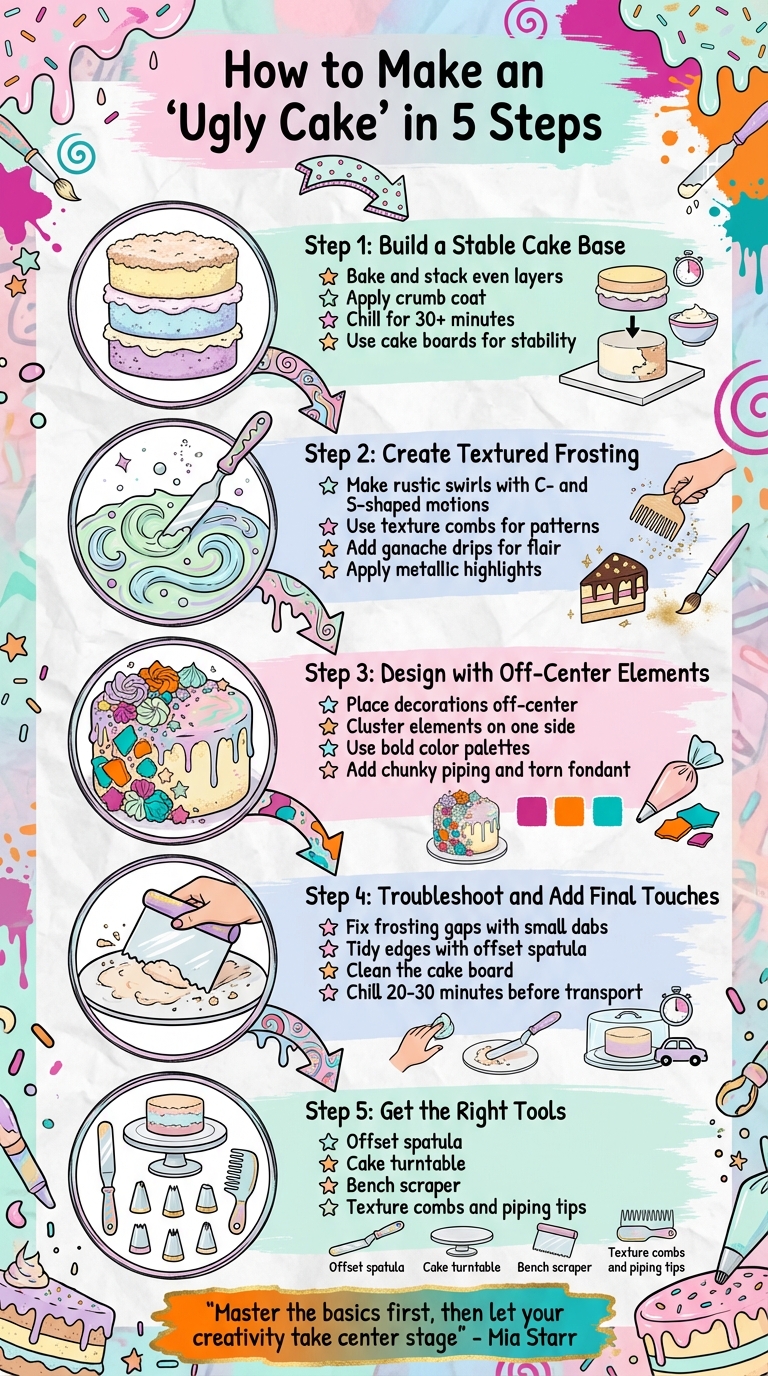
5-Step Process to Make Perfectly Imperfect Ugly Cakes
Step 1: Build a Stable Cake Base
Before diving into creative chaos, you need a cake base that’s solid enough to handle your artistic ambitions. A stable foundation is what separates a quirky, "ugly" cake from a collapsed disaster. When it comes to handling, transporting, and serving your masterpiece, a strong base is essential.
Mia Starr, host of Tastemade's Baking the Holidays, puts it best:
"Learning the fundamentals of stacking, assembling, and frosting a cake [with a crumb coat] are really important".
She also advises:
"Learn the rules so then you can break them and be creative".
This sums up the philosophy of an ugly cake perfectly: master the basics first, then let your creativity take center stage.
Bake and Stack Your Layers
Start with even cake layers. Weigh your batter into each pan before baking to ensure consistency. If you want a taller, more dramatic cake, bake three layers - this may require doubling your recipe. Once baked, let the cakes cool in their pans for 30 minutes, then transfer them to a wire rack for another 30 minutes. This cooling process is critical to prevent your buttercream from melting during assembly.
To create a flat surface, level the domed tops of your cakes with a sharp serrated knife. Use the edge of the pan as a guide for precision. Place your bottom layer on a cake board that matches its size, then set it on a larger board (at least 2 inches wider) for easier decorating and transport. To keep everything secure, smear a thin layer of frosting on the larger board before centering the smaller one. Add another dab of frosting before placing your first cake layer - this prevents sliding.
Spread 1/4 to 1/3 cup of buttercream on each layer, starting from the center and working outward, leaving a 1/2-inch border. For a smoother stack, invert the subsequent layers. Once stacked, check the cake at eye level and gently press down any high spots to even it out.
The crumb coat is your secret weapon for stability. After stacking, freeze the cake for 15 minutes to reduce loose crumbs. Then, apply a thin layer of frosting over the entire cake. As Mia Starr explains:
"If you rush it and you're frosting a hot cake, or even a warm cake, then your buttercream is going to get all melty, and you're not going to be able to have such a smooth finish".
Chill the crumb-coated cake in the fridge for at least 30 minutes - or even overnight - to ensure the buttercream firms up before you add your final textured layers. This chilled base will hold its shape and keep your artistic imperfections exactly where you want them.
Tools You'll Need for Base Preparation
Having the right tools makes all the difference when building your cake base. Here are some essentials:
- Offset spatula: Perfect for spreading buttercream evenly across layers and around the sides.
- Cake turntable: Helps you rotate your cake smoothly for better control and even frosting coverage.
- Bench scraper: Also known as a cake scraper, this tool is key for smoothing the sides and getting clean edges on your crumb coat.
- Serrated knife: Use a long, sharp one for leveling the tops of your cakes.
- Cake boards: You'll need one that matches your cake size and another that’s at least 2 inches larger for stability during decorating.
- Digital kitchen scale: For precision bakers, weighing your batter ensures consistent layers every time.
You can find these tools - like offset spatulas, turntables, bench scrapers, and digital scales - at Gloria's Cake & Candy Supplies. Investing in quality equipment makes the process smoother and sets you up for decorating success.
Step 2: Create Textured Frosting
Once your crumb-coated cake is chilled and firm, it’s time to move on to the star of the show: the textured frosting. This step combines precision with creativity, aiming for textures that feel deliberate rather than random. Let’s dive into techniques that turn plain buttercream into a visual masterpiece.
Make Rustic Swirls and Painterly Strokes
After applying the final layer of buttercream, grab your offset spatula and channel your inner artist. Use quick swipes, along with C- and S-shaped motions, to create rustic swirls on the sides and top of the cake. The goal? A textured, carefree look that feels effortless. As the team at Sugar & Sparrow puts it:
"While rustic swirls are easy to create, they do require a little bit of strategy. The first time I tried this look, I found myself spending way too much time trying to perfect each and every swirl. Turns out that in order to get that carefree look, you have to let loose a little bit. Once you get to the point of wild abandon, your cake will look amazing!"
Feeling adventurous? Use a food-safe paintbrush to create smooth ridges or blend colors directly into the buttercream for a painterly, multi-tonal effect.
Add Combed and Distressed Buttercream
For even more texture, try using texture combs. These tools can add patterns like elegant lines, lace-like details, or even woodgrain effects . If you’re feeling crafty, make your own comb from aluminum foil by shaping its edges to create custom designs. To keep the look balanced, disrupt these patterns intentionally - leave some areas smooth while others are heavily textured. Kerrie Wyer from Viva La Buttercream shares:
"Texture adds a depth to cakes that other techniques cannot match."
This contrast is what gives rustic cakes their charm.
Apply Drips and Abstract Effects
A classic finishing touch for textured cakes? Ganache drips. These should look artfully messy, not haphazard. Start with a chilled cake to keep the buttercream firm and prevent the ganache from sliding too far down the sides . Test the drip on one side first, adjusting the ganache temperature to control its flow. Vary the pressure as you apply the drips to create different lengths. Amy from Amycakes Bakes explains:
"We want the drips to look natural instead of too uniform in length--that's what provides the cakes with their 'whimsy' feel."
For application, use a squeeze bottle for speed or a spoon for greater precision . To add an artistic flair, consider abstract accents like edible watercolor brushstrokes or metallic highlights using edible gold paint over set white chocolate drips. If you’re using white chocolate ganache, tint it with gel food coloring - avoid liquid coloring, as it can ruin the consistency.
Step 3: Design with Off-Center Elements and Playful Decorations
Once your textured frosting is done, it’s time to dive into the fun part - adding decorations that give your cake its quirky, artsy vibe. This step is all about embracing imperfection in a way that feels intentional. By placing decorations in unexpected spots and playing with balance, you’ll transform your cake into a visual masterpiece with a touch of whimsy.
Place Elements Off-Center for a Bold Look
Forget symmetry - off-center designs are where the magic happens. Try clustering decorations on one side of the cake or letting fondant accents cascade down just one edge. You could also concentrate sprinkles or piping details in specific areas instead of spreading them evenly. Use a turntable to check the overall balance as you work. The goal is to create a focal point that feels deliberate, drawing attention without making the cake look uneven or awkward.
Decorations That Bring Ugly Cakes to Life
The charm of ugly cakes lies in their ability to turn “messy” into an art form. Go for bold textures like chunky piping to create dramatic rosettes or use torn fondant for a raw, handmade look. Edible images or hand-painted details can add extra personality. These techniques are approachable, even for beginners, and they let you turn any imperfections into part of the design. The result? A cake that’s as unique as it is eye-catching.
Color Palettes That Balance Chaos and Harmony
Even though ugly cakes celebrate imperfection, your color choices should feel intentional. Using a color wheel can help you find shades that complement each other. Neutral tones like white, beige, or gray can balance out brighter colors. For a playful vibe, try the Cotton Candy Dream palette, featuring pinks that range from soft (#FF80AB) to deep (#C51162). If you’re after something dynamic yet balanced, the Coral Crush palette combines warm tones like #FF6F61 with softer shades like #FFE0B2. When mixing gel food coloring, remember that colors deepen over time, so add a little at a time. You can also tweak your shades by adjusting the primary colors - add blue to cool down greens, or yellow to warm up oranges.
With these tips, your cake will be a delightful mix of controlled chaos and creative flair.
sbb-itb-529d1c3
Step 4: Troubleshoot and Add Final Touches
Even when aiming for that perfectly imperfect look, there’s a fine line between “artfully messy” and just plain sloppy. This step is all about refining your cake to keep its charm intact while giving it a polished finish.
Fixing Frosting Mishaps
Uneven patches or gaps in your frosting? No problem. Add a small dab of buttercream to those areas and lightly smooth it out with a bench scraper. Use less pressure than before to avoid overworking it. Before starting, give your buttercream a quick stir - about two minutes - to get rid of air bubbles and restore its creamy texture. For an extra-smooth finish, run your bench scraper under hot water, dry it off, and then gently glide it over the frosting. The warmth will help melt the buttercream just enough to blend everything together. If the cake looks too messy to fix on the spot, apply a thin crumb coat to lock in the crumbs. Let it chill in the fridge for 20 minutes (or 5 minutes in the freezer) before adding a fresh layer of frosting [32–34].
Tidying Edges and Adding Flair
Neat edges can make all the difference in your cake’s presentation. Use a small offset spatula to pull excess frosting from the top edge toward the center. Wipe the spatula clean after each swipe to keep the lines crisp [33–34]. A metal bench scraper is also handy for creating smooth, defined boundaries. Don’t stress about making the edges razor-sharp - just aim for a clean, intentional look [33,36].
And don’t forget the base! Wipe away any frosting smudges on your cake board; a clean board instantly elevates the overall appearance. If you notice small flaws, consider turning them into features. Ganache drips or a sprinkle border around the bottom edge can transform imperfections into part of the design.
Storing and Transporting Your Cake
Before moving your cake, chill it in the fridge for 20–30 minutes. This firms up the buttercream and reduces the risk of smudging during transport [37–39]. Place the cake on a board that’s at least 2 inches wider than the cake itself. This extra space makes handling easier and keeps your fingers away from the frosting [37–39]. To prevent the cake from sliding, use a small swipe of frosting to stick it to the board [37,39].
For transport, place non-slip mats (like silicone trivets or yoga mats) under the cake board in the box and on the floor or trunk of your car [37–39]. If you’re dealing with warm weather, swap out at least half the butter in your buttercream recipe for vegetable shortening. This adjustment helps the frosting hold its shape and prevents delicate peaks from melting. Keep the cake out of direct sunlight and crank up the air conditioning if needed [37–39]. For extra peace of mind, pack fragile decorations separately and bring along an emergency kit with buttercream, an offset spatula, and some sprinkles - just in case [37,39].
Step 5: Get Your Tools and Supplies from Gloria's Cake & Candy Supplies
Bring your "ugly cake" masterpiece to life with the help of Gloria's Cake & Candy Supplies. A staple for Los Angeles bakers since 1972, their Culver City store at 11117 Washington Boulevard is packed with professional-grade tools to help you nail that perfectly imperfect design.
Decorating Tools for Quirky Creations
To execute the techniques we've discussed, you'll need the right tools - and Gloria's has you covered. Check out these must-haves:
- 2-piece Sculpting Tool Set ($1.39): Ideal for adding texture and fine details to fondant. Erica B. from Inglewood raves, "Made my cake decorating so much easier. I love how precise I can get with them!"
- Monster Truck Piping Tip ($2.25): This closed star tip creates bold swirls and unique textures. Jenna R. from Venice says, "Absolutely love this piping tip! It makes my cakes look so professional."
- Ugly Sweater Cookie Cutter/Press ($2.95): A fun way to craft quirky cake toppers that add personality to your design.
If you're local, swing by their Culver City store Tuesday through Saturday, 10:00 AM to 6:00 PM, for same-day pickup. With these tools in hand, you'll be ready to bring your delightfully imperfect vision to life.
Conclusion
Creating an "ugly cake" is all about blending intentional imperfection with a touch of artistry. Start with a sturdy foundation, then layer on textured frosting, rough edges, painterly strokes, and uneven drips. The secret lies in striking a balance - every flaw should feel purposeful, not accidental. This harmony between chaos and intention drives every creative choice in the process.
As Sarah H from Intensive Cake Unit explains about the rising trend of imperfect cake designs:
"Suuuper trendy recently has been the 'fault line' cake! I've been seeing them literally EVERYWHERE lately, and obviously had to try my hand at a couple of my own!"
The rough-edge style, which gained popularity after its debut at a royal wedding, has transitioned from being a bold statement to a celebrated design choice. Using high-quality ingredients and creative techniques - like textured finishes and striking accents - turns these "imperfect" cakes into works of art with undeniable charm.
FAQs
What tools do I need to make a perfectly imperfect 'ugly cake'?
To craft a charmingly "ugly cake" with that perfectly imperfect aesthetic, you’ll want a few key tools in your arsenal. Start with a cake scraper, offset and straight icing spatulas, a turntable, and cake boards - these will help you build and decorate your creation with ease.
For extra precision, tools like a cake leveler, acrylic disk, and cake lifter can make a big difference. Want to get creative with the details? Grab some piping bags, a drip bottle, and parchment paper. These will let you play around with textured frosting, fun designs, and artistic finishing touches!
How can I make sure my cake is stable and ready for decorating?
To get your cake ready for decorating, start by chilling the layers thoroughly. This step helps keep them stable and easier to handle. Next, apply a thin crumb coat with a long offset spatula - this will trap any loose crumbs and create a smooth base. Once that's done, let the cake come to room temperature, ideally around 70°F (21°C), so the frosting stays at the right consistency. Make sure to use a sturdy, level cake board or base to keep everything steady while you work.
What are some easy ways to add texture to cake frosting?
To achieve textured frosting, begin by spreading a generous and even layer of buttercream over your cake. Then, grab tools like textured cake combs or an offset spatula to carve or press patterns into the frosting. Play around with various angles or strokes to create the look you’re going for. For a more freeform, artistic vibe, try gently dabbing the frosting with a spoon or palette knife. The trick is to let those little imperfections shine while keeping your design purposeful.

