
Key Takeaways:
- What makes hybrids special: Combines the fluffiness of cake with the chewiness of cookies.
- Why Mercken's chocolate works: Melts smoothly, no tempering needed, and resists bloom.
- Essential tools: Baking pans, portion scoops, parchment paper, and pastry bags.
- Recipes to try: Cakie bars, cookie dough cake layers, and molten-stuffed lava cookies.
- Pro tips: Chill dough for better shape, use paramount crystals to adjust chocolate consistency, and avoid overmixing to achieve the perfect texture.
Want bakery-quality results at home? Start by mastering basic techniques like proper chocolate melting, dough handling, and layering. With the right tools and ingredients, you’ll create desserts that look and taste amazing.
Layered Cookie Cake: a dreamy dessert ready in no-time!
Tools and Ingredients You'll Need
Ready to dive into the world of hybrid desserts? Before you start, make sure you have the right ingredients and tools to bring your creations to life. Here's what you'll need to craft bakery-quality cake-cookie hybrids, with a little help from Gloria's Cake & Candy Supplies.
Key Ingredients for Better Results
Start with Mercken's chocolate wafers, a go-to for smooth, glossy coatings and decorations. These versatile wafers come in three options:
- White chocolate: Perfect for delicate coatings on cake pops - it won’t drip or leave messy tails.
- Dark chocolate: Great for enrobing desserts and adding decorative touches.
- Cocoa Lite (milk chocolate): A classic choice for dipping and molding, delivering that familiar, rich flavor.
These chocolate wafers are priced at $8.75 for 1.5 lbs. Since they use vegetable oil instead of cocoa butter, there’s no need for tempering, and they resist bloom, making them user-friendly.
For the cookie part of your hybrid desserts, high ratio shortening is key. It creates a softer, denser cookie texture compared to butter. Add a generous amount of vanilla extract to balance the sweetness of caramelized sugars, and opt for hand-chopped chocolate or premium wafers instead of standard chips for better flavor and texture.
Tools That Make the Job Easier
Having the right tools on hand ensures your desserts look as good as they taste.
- A 9-inch springform pan is a must for layered desserts, allowing for easy removal without damaging your creation.
- A 13x9-inch baking pan works wonders for stuffed cookie bars and brownie layers.
- For uniform cookies that bake evenly, a #70 portion scoop (2½ teaspoons) is your best friend.
- Parchment paper keeps your desserts from sticking and makes cleanup a breeze.
When it comes to decorating, pastry bags with round tips offer precision for piping buttercream and filling layers. And if your white or colored chocolate gets too thick for dipping, keep paramount crystals nearby - just one teaspoon per pound of wafers will thin it out perfectly.
With these ingredients and tools, you're all set to create desserts that are as impressive as they are delicious.
How to Work with Mercken's Chocolate Wafers

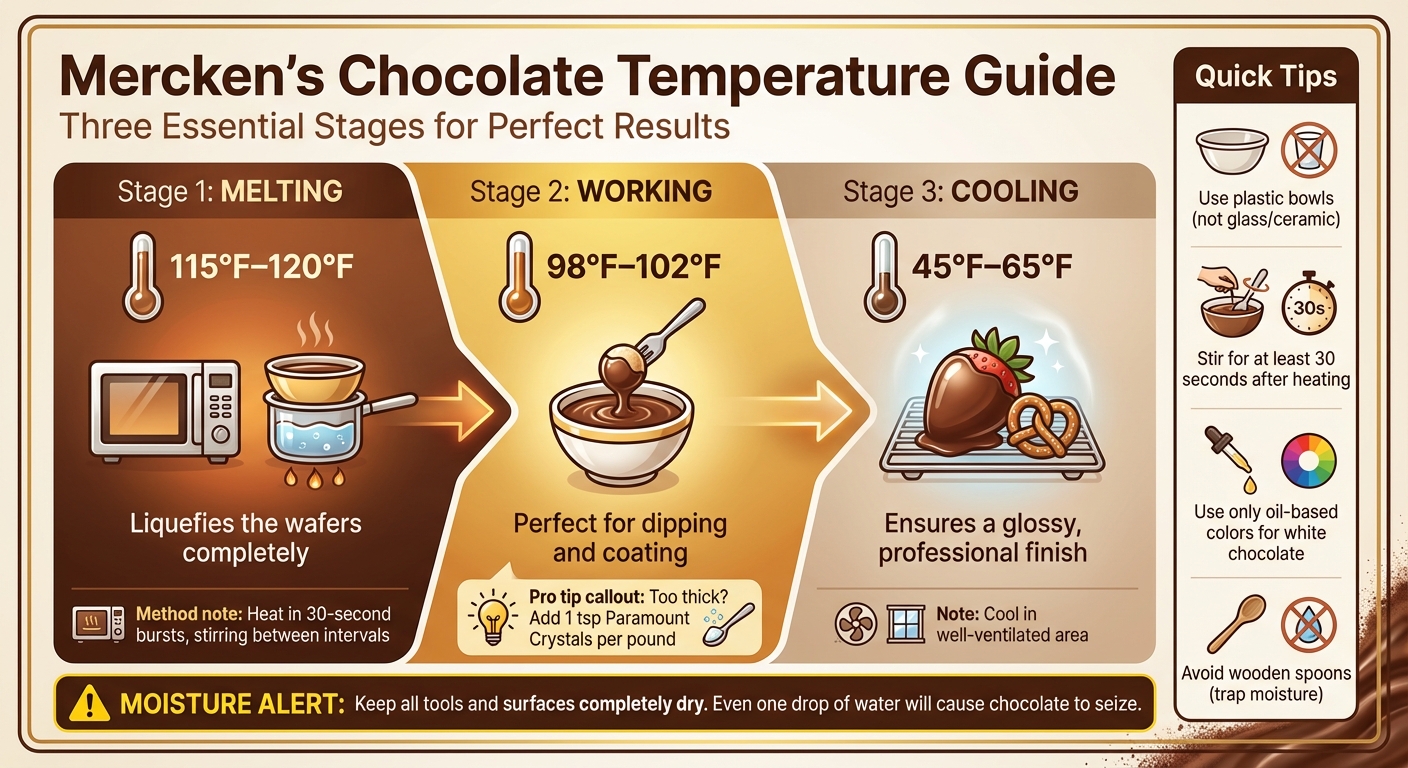
Mercken's Chocolate Temperature Guide for Cake-Cookie Hybrids
Mercken's chocolate wafers are a convenient choice for confectionery projects because they use vegetable oil instead of cocoa butter, which eliminates the need for traditional tempering. To get the best results, manage the temperature carefully: melt the wafers at 115°F–120°F, then cool them to 98°F–102°F for the perfect consistency. Make sure all tools and surfaces are completely dry - just a single drop of water or a hint of steam can make the chocolate seize, rendering it unusable.
Now, let’s dive into the best techniques for melting and working with these chocolate wafers.
How to Melt Chocolate Properly
When melting chocolate in the microwave, use a plastic bowl to reduce the risk of overheating. Heat the wafers in 30-second bursts at medium-high power, stirring thoroughly after each interval to promote even melting. If you prefer the double boiler method, fill the bottom pot with simmering water, ensuring the top bowl doesn’t touch the water. Stir constantly until the chocolate reaches its melting temperature of 115°F–120°F.
If the melted chocolate feels too thick for dipping or drizzling, add paramount crystals in small amounts - just a teaspoon at a time - until you achieve the right texture.
| Stage | Temperature | Purpose |
|---|---|---|
| Melting | 115°F–120°F | Liquefies the wafers completely |
| Working | 98°F–102°F | Perfect for dipping and coating |
| Cooling | 45°F–65°F | Ensures a glossy, professional finish |
How to Temper Chocolate
Although traditional tempering isn’t required for Mercken's compound chocolate wafers, there are steps you can take to ensure a polished, glossy finish. Start by melting the wafers to 115°F–120°F, then cool them to the working range of 98°F–102°F. Once your desserts are coated, place them in a cool, well-ventilated area (between 45°F and 65°F) to set. Avoid relying solely on room temperature or refrigerating for extended periods, as this can lead to a dull appearance or unwanted condensation.
If you’re coloring white chocolate wafers, stick to oil-based candy colors. Water-based gels or liquids will cause the chocolate to seize, which can ruin your batch.
3 Cake-Cookie Hybrid Recipes
Here are three recipes that bring together the best of cakes and cookies, all featuring Mercken's chocolate for that luxurious, smooth finish. These recipes rely on the melting and tempering methods discussed earlier to ensure flawless results every time.
Cakie Bars: Where Cake and Cookie Collide
Cakie Bars deliver the height and fluffiness of a cake with the dense, chewy satisfaction of a cookie, all wrapped around a rich chocolate center. The trick lies in layering the dough just right to achieve the perfect texture.
Start by preparing your dough. In one bowl, mix flour, salt, and baking soda. In another, cream softened butter with granulated and brown sugars. Add eggs and vanilla extract to the butter mixture, then gradually fold in the dry ingredients. Press about 2 cups of dough into a 13x9-inch baking pan to form a smooth, even base.
For the chocolate layer, melt Mercken's chocolate wafers until smooth. If the chocolate feels too thick to spread, add 1 teaspoon of Paramount Crystals per cup of chocolate to thin it out. Spread the melted chocolate evenly over the dough base.
Next, roll out the remaining dough into a 13x9-inch rectangle on waxed paper. Carefully invert it over the chocolate layer and peel off the waxed paper. If the dough becomes too soft to handle, chill it for about 10 minutes before proceeding.
Bake in a preheated oven at 350°F for 28 minutes, or until the top turns lightly golden. Let the bars cool completely on a wire rack so the layers can set before slicing.
If you’re ready to take things a step further, try layering cookie dough as cake layers for an even more dramatic contrast in texture.
Cookie Dough Cake Layers
This recipe transforms cookie dough into cake-like layers, topped with a rich Mercken's chocolate frosting. The layering method ensures a stable structure while delivering a decadent chocolate experience in every bite.
Follow the same layering process as the Cakie Bars: press the dough into the pan, add a chocolate layer, and top with another layer of dough using the waxed paper method. To keep the dough from spreading too much during baking, chill it for at least 2 hours before assembling. For a deeper chocolate flavor, mix unsweetened cocoa powder into the dough before folding in Mercken's chocolate chunks or wafers.
For the frosting, melt Mercken's chocolate wafers and thin them with 1 teaspoon of Paramount Crystals per cup of chocolate to create a smooth, pourable consistency. If you’re using shortening instead, add it gradually - 1 teaspoon at a time - to maintain the right thickness.
Stuffed Lava Cookies
If a gooey, molten center is your idea of dessert heaven, these stuffed cookies are the ultimate indulgence. The secret? A rich chocolate ganache filling that stays molten even after baking.
Start by making the ganache. Melt Mercken's chocolate wafers with heavy cream, stir until smooth, and chill until firm. Once set, scoop the ganache into small balls and freeze for 30 minutes. Freezing prevents the filling from leaking during baking.
For the cookie dough, use a recipe that includes brown sugar and an extra egg yolk to create a sturdy, chewy dough that can support the molten center. Chill the dough for at least 2 hours to ensure it’s firm enough to work with. When assembling, flatten a portion of dough into a disk, place a frozen ganache ball in the center, and wrap the dough completely around it.
"Make sure there are no gaps so the filling doesn't ooze out during baking." - Christina Marsigliese, Pastry Chef and Cookbook Author
"It's also important that you use enough cookie dough that the ganache doesn't sink through to the bottom... make sure it's well surrounded by dough on all sides!" - Sam Merritt, Recipe Developer, Sugar Spun Run
Once assembled, chill the cookies for 15 minutes before baking at 375°F. The higher temperature helps set the outer layer quickly, reducing the risk of spreading or leaks. For best results, use a kitchen scale to measure your flour accurately - too little flour can cause the cookies to spread too much, while too much can make them dry and crack. Let the cookies cool for at least 1 hour before serving to achieve that ideal molten center.
sbb-itb-529d1c3
Fixing Common Problems
Even seasoned bakers can face challenges when blending cake and cookie textures. The upside? Most issues are easy to fix once you pinpoint the cause.
Getting the Texture Right
If your results are dry and crumbly, it’s likely due to too much flour or not enough fat. To avoid this, use a digital scale for precise measurements. If the dough feels too dry, gradually add small amounts of milk, water, or melted butter - about a teaspoon at a time - until it comes together.
How you mix the dough is just as important as the ingredients. Over-mixing can activate gluten, leading to a dense, tough texture. As Sally McKenney advises, only mix until you no longer see streaks of flour.
Allow the dough to rest in the refrigerator for 1–24 hours. This step hydrates the flour and relaxes the gluten, improving both texture and flavor. When baking, remove your treats from the oven while the centers are still slightly soft - they’ll continue to firm up as they cool. Just a few extra minutes in the oven can turn a perfectly moist hybrid into something unpleasantly dry.
If you’re baking at high altitudes (above 3,000 feet), adjust accordingly: raise the oven temperature by 15–25°F, shorten the baking time, and add 1–2 tablespoons of extra liquid to counteract faster moisture loss.
Once you’ve tackled texture, it’s time to focus on chocolate handling to ensure a flawless finish.
Preventing Chocolate Mistakes
After perfecting your dough, proper chocolate handling is essential to avoid common mishaps.
Even a tiny drop of water can cause melted chocolate to seize, turning it into a thick, grainy mess. Food science expert Harold McGee explains:
"The small amount of water acts as a kind of glue, wetting the many millions of sugar and cocoa particles just enough to make patches of syrup that stick the particles together."
If your chocolate seizes, you can salvage it by adding hot cream or boiling water to transform it into a ganache. For chocolate that’s too thick but not seized, mix in Paramount Crystals - about one tablespoon per pound of chocolate - until it reaches the right consistency.
Prevention is key. Use completely dry plastic bowls instead of glass or ceramic, which retain heat and can scorch chocolate like Mercken’s wafers. After microwaving, always stir for at least 30 seconds to evenly distribute the heat. As Lynn’s Cake and Candy emphasizes:
"Stirring for at least 30 seconds is crucial. This process helps dissipate the heat evenly, preventing the chocolate from seizing."
This simple step avoids hot spots that can ruin your chocolate.
When working with tools, choose only dry, non-porous options. Avoid wooden spoons, which can trap moisture. If using a double boiler, ensure the water doesn’t touch the bowl and that no steam escapes into the chocolate. These precautions will save you from unnecessary chocolate headaches.
Professional Techniques and Tips
Once you're comfortable with the basics, these advanced methods can help you craft hybrid desserts that look and taste like they came straight from a professional bakery.
Making Chocolate Garnishes
To create stunning chocolate decorations, start by melting Mercken's wafers to a temperature between 115°F and 120°F, then let it cool to 98°F–102°F for a smooth, workable texture. This consistency is perfect for piping, molding, or other intricate designs.
If the chocolate feels too thick, you can thin it by adding 1 teaspoon of Paramount Crystals per pound. When adding color, stick to oil-based candy colors or powdered food colors - water-based options will cause the chocolate to seize.
For decorative elements like curls, flowers, or shards, spread the melted chocolate thinly on a cool surface. More intricate shapes can be achieved by filling molds and refrigerating them for 10–60 minutes, depending on the thickness you’re aiming for. To keep your garnishes glossy and professional-looking, cool them in an environment with good airflow and a temperature between 45°F and 65°F. For larger production runs, you can maintain the chocolate’s working temperature by placing the container on a heating pad lined with paper towels.
If you want custom colors, blend Mercken's Rainbow wafers or use oil-based colors for consistency. Whether you're crafting simple shapes or elaborate molds, precision and temperature control are key to achieving impressive results.
Adjusting Recipes for Large Batches
While decorative garnishes add flair, scaling recipes for larger batches requires just as much attention to detail. For consistent results, reduce creaming time to minimize spreading, and use uniform scoops to ensure all portions are the same size. When working with commercial mixers, mix the flour briefly to prevent the dough from becoming tough or crumbly.
For hybrid desserts with a balanced rise, aim for a ratio of 1 part flour to 1 part sugar to 0.8 parts butter. On baking sheets, make sure items are evenly spaced to avoid overcooked edges and underbaked centers.
Temperature control is especially important when baking at scale. Dough that’s baked straight from the refrigerator will hold its shape better, while warmer dough tends to spread. Once baked, transfer items from hot baking sheets to cooling racks immediately to prevent overcooking from residual heat. If your large batches turn out too flat, try adding 2 tablespoons of flour per standard batch size or slightly reducing the butter. These small tweaks can make a big difference in maintaining the quality of your desserts.
Final Thoughts
Perfecting chocolate melting, nailing dough ratios, and mastering temperature control are the keys to creating mouthwatering cakie bars, cookie dough cake layers, and stuffed lava cookies that look and taste like they came straight from a bakery.
Using premium ingredients like Mercken's chocolate wafers can make a noticeable difference. These wafers melt more smoothly and consistently than standard chocolate chips, delivering a richer flavor and a silky texture. They’re ideal for crafting fudge-like toppings and fillings that hold their texture beautifully.
If you're just starting out, begin with simpler recipes to build your skills. Once you’re more comfortable, try tackling advanced techniques like creating chocolate garnishes or adjusting recipes for larger batches. Pay attention to the small but important details - like using room temperature ingredients, chilling dough when needed, and allowing baked goods to cool properly. These steps might seem minor, but they’re what transform good desserts into bakery-quality masterpieces.
For over 50 years, Gloria's Cake & Candy Supplies has been a trusted resource for bakers in the Los Angeles area. Since 1972, they’ve offered professional-grade ingredients, expert advice, and even cake decorating classes to help bakers of all levels succeed. Whether you’re looking for Mercken's wafers, specialty tools, or tips to troubleshoot a tricky recipe, their knowledgeable team is there to support you with same-day pickup and personalized guidance.
Put these ideas into action by trying a recipe and experimenting with your ingredients. With high-quality chocolate and refined techniques, you’ll take your baking to the next level.
FAQs
What makes Mercken's chocolate wafers ideal for hybrid desserts like cake-cookie combinations?
Mercken's chocolate wafers are a dream ingredient for hybrid desserts. They melt effortlessly into a smooth, creamy consistency, adding richness to both the flavor and the overall presentation of your creations. Whether you're mixing them into cookie dough, drizzling them over cakes, or crafting intricate decorative touches, these wafers are incredibly versatile.
What sets Mercken's apart even further is their wide array of vibrant colors. This opens the door to endless creative possibilities, letting you customize your desserts in ways that are as visually stunning as they are delicious. With their consistent quality and dependable results, it's no wonder they're a go-to choice for everyone from home bakers to professional chefs.
What are paramount crystals, and how do they enhance chocolate for baking?
Paramount crystals are tiny flakes of hydrogenated palm kernel oil designed to make working with melted chocolate much easier. They help create a smoother, more fluid texture, giving the chocolate a glossy finish without changing its flavor.
Using them is simple: just add a small amount - usually about a teaspoon at a time - to your melted chocolate. Mix until you reach the consistency you need. These crystals are perfect for tasks like coating, dipping, or molding treats such as cake pops and cookies. For the best outcome, melt the crystals together with the chocolate.
How can I achieve the ideal texture for cake-cookie hybrids?
To nail the ideal texture for cake-cookie hybrids, start with precise measurements for all your ingredients - guesswork isn’t your friend here. When mixing, be gentle to avoid overworking the batter, which can make the final product dense. Introduce air by carefully folding or whipping, depending on the recipe, and always chill the dough before baking. This helps the cookies keep their shape and minimizes unwanted spreading. Follow these tips, and you'll get that perfect, bakery-style finish every time.

