
Working with chocolate can be tricky, but choosing the right method depends on your goals and skill level. Professional chocolate tempering creates a glossy finish, firm snap, and smooth texture by carefully controlling temperature and movement. It’s ideal for high-end treats like truffles and bonbons but requires precision and time (30–35 minutes). Mercken's no-temper wafers, on the other hand, skip the tempering process entirely. Made with vegetable fats, they’re easy to melt and use, perfect for quick projects like cake pops or molded candies. While tempered chocolate offers superior texture and shine, Mercken's is a beginner-friendly, hassle-free alternative.
Quick Comparison
| Method | Key Features | Best For | Time Needed |
|---|---|---|---|
| Professional Tempering | Glossy finish, firm snap, resists bloom | Truffles, bonbons, luxury treats | 30–35 mins |
| Mercken's No-Temper | Simple melt-and-use, no tempering needed | Cake pops, quick decorations | A few minutes |
Choose tempering for precision and shine, or Mercken's for convenience and ease. Both methods have their place in chocolate-making, depending on your project and expertise.
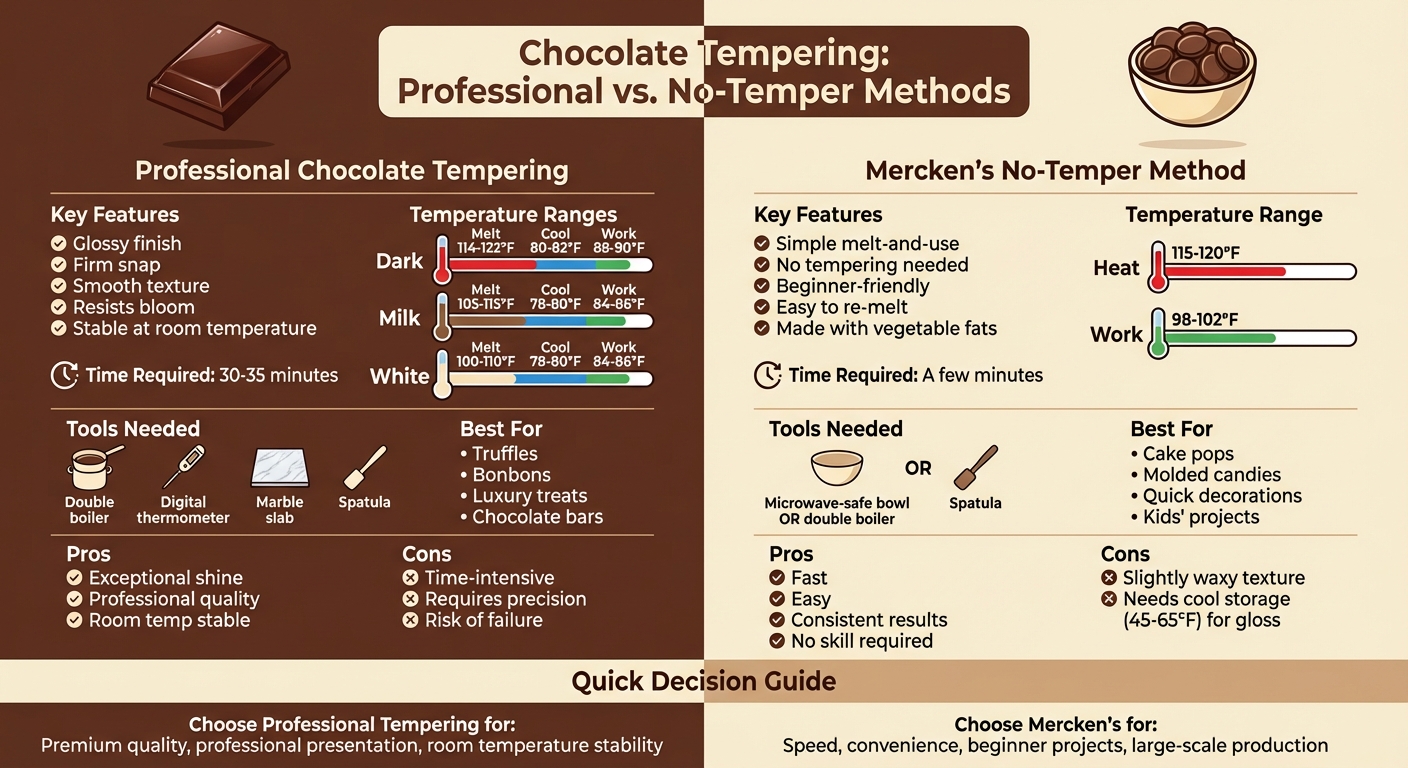
Professional Chocolate Tempering vs Mercken's No-Temper Method Comparison
Science: How to Temper Chocolate with This Easier Method
What Is Professional Chocolate Tempering?
Professional chocolate tempering involves carefully heating, cooling, and reheating chocolate to create stable Form V crystals in cocoa butter. This process gives the chocolate its glossy finish, firm snap, and smooth texture. The key is forming these Form V crystals, which are responsible for the chocolate's shine, resistance to melting, and satisfying texture. Frédéric Bau from L'École Valrhona describes tempering as a process of controlled melting and cooling.
When chocolate isn’t tempered, it turns dull, feels soft and sticky, and often develops bloom - a whitish, streaky appearance caused by fat or sugar separating. Properly tempered chocolate, on the other hand, sets in just 3 to 5 minutes at room temperature (around 68°F) and easily releases from molds due to slight shrinkage as it hardens.
How Tempering Works
Tempering depends on three key factors: time, temperature, and movement. The process starts by heating the chocolate to break down existing crystals. It is then cooled while being stirred to encourage the formation of stable beta crystals, and finally, it’s gently reheated to melt any unstable crystals while preserving the desired Form V structure.
Each type of chocolate has specific temperature ranges for melting, cooling, and working:
- Dark chocolate: Melt at 122°F–131°F, cool to 82°F–84°F, and work at 88°F–90°F.
- Milk chocolate: Melt at 113°F–122°F, cool to 81°F–82°F, and work at 84°F–86°F.
- White chocolate: Melt at 113°F–122°F, cool to 79°F–81°F, and work at 82°F–84°F.
Even slight deviations from these temperatures can ruin the temper. James Parsons, owner of SoSaSe Chocolat, emphasizes the importance of precision:
Precision of temperature is everything to me. Without my Thermapen I would be left guessing.
This careful control of temperature ensures the chocolate achieves the perfect texture and appearance, making it essential to master these steps before moving on to the tools required.
Tools You'll Need for Tempering
Once you understand the process, it’s time to gather the necessary tools. You’ll need a double boiler (or a heatproof bowl over a saucepan) to melt the chocolate, a digital candy thermometer for precise temperature readings, and a rubber spatula for stirring. If you’re using the tabling method, a marble or granite slab is ideal, along with a palette knife and bench scraper. Marble is particularly effective because it absorbs heat quickly without altering its own temperature.
Make sure all tools are completely dry - just a single drop of water can cause the chocolate to seize. If you’re adding flavor, stick to oil-based flavorings instead of alcohol-based extracts, as the water content in extracts can also affect the chocolate.
With these tools and techniques in hand, you’ll be ready to temper chocolate like a pro.
What Is Mercken's No-Temper Method?

Mercken's chocolate wafers make achieving professional-quality results a breeze. These wafers are a type of compound chocolate, which means they use vegetable fats - such as palm kernel or sunflower oil - instead of cocoa butter. This substitution eliminates the need for the strict heating and cooling process required in traditional chocolate tempering. In essence, Mercken's method takes the guesswork out of temperature control.
Stover & Company explains:
"Merckens milk chocolate wafers are remarkable because, as compound chocolate, they require very little experience or finely tuned skill to work with."
The chocolate sets beautifully without developing those white streaks (known as bloom) that often appear in untempered chocolate. It also maintains a glossy finish at room temperature. Thin coatings, such as on strawberries or cake pops, typically harden in just 60 seconds to 5 minutes. For best results, aim for a working temperature of about 102°F, and avoid exceeding 120°F to prevent burning. This unique formulation offers several practical advantages.
Benefits of Mercken's Chocolate Wafers
Mercken's wafers deliver a shiny, crisp finish that’s ideal for molding, dipping, or coating. They’re particularly beginner-friendly since they can be melted and re-melted multiple times without losing their quality. These versatile wafers work well for cake pops, pretzels, cookies, and candy molds. Their "Rainbow" line even includes seasonal flavors like vanilla and butterscotch, making them perfect for decorative treats. While some people note a slightly waxy texture compared to premium chocolates made with cocoa butter, the ease of use and consistent results make them a favorite among hobbyists and home bakers.
For the best results, store the wafers in a cool, dry place at 65°F–68°F with humidity levels below 50%. Although the wafers maintain their quality for up to 12 months, some experts suggest using them within four months to avoid potential issues caused by humidity. Additionally, working with these wafers requires only a few simple tools.
Tools for Melting Mercken's Wafers
Melting Mercken's wafers is straightforward and doesn’t require specialized equipment. You can use a microwave-safe bowl, heating the chocolate at 50% power in 30-second intervals and stirring between each burst. Alternatively, a double boiler works well - just ensure the bowl doesn’t touch the water and that no steam comes into contact with the chocolate. For larger projects, an electric candy melting pot provides consistent temperature control.
If the melted chocolate becomes too thick for dipping, you can thin it by adding Paramount Crystals (palm kernel oil flakes) one teaspoon at a time until the desired consistency is reached. For coloring, stick to oil-based candy colors, as water-based food coloring will ruin the texture.
How the Two Methods Differ
The key difference between professional tempering and Mercken's method lies in the type of fat used. Professional couverture chocolate relies on cocoa butter, while Mercken's wafers use vegetable fats like palm kernel or sunflower oil. This choice impacts everything from preparation techniques to texture and flavor.
Stover & Company puts it simply:
"Couverture chocolate is made with cocoa butter whereas compound coatings are made with vegetable fats (such as palm kernel oil, sunflower oil, etc)."
With professional chocolate, the process hinges on the intricate crystallization of cocoa butter. In contrast, Mercken's wafers skip this step entirely because vegetable fats don’t form multiple crystal structures.
Chocolate Composition and Ingredients
Couverture chocolate is a blend of cocoa solids, cocoa butter, sugar, and lecithin. Its high cocoa butter content creates that smooth, melt-in-your-mouth texture chefs love, along with a crisp snap and luxurious feel.
Mercken's wafers, however, replace cocoa butter with vegetable oils and include sugar, milk solids, and flavorings [2,3]. This substitution results in a slightly waxy texture but offers practical benefits: Mercken's stays solid at room temperature without developing bloom and has a higher melting point, making it ideal for decorations that need to hold up in warmer settings.
These ingredient differences lead to distinct preparation methods.
Melting and Cooling Steps
Tempering couverture chocolate involves a precise cycle of heating, cooling, and reheating to create stable crystals. Even a small temperature misstep can leave the chocolate dull or streaky.
Mercken's wafers simplify things. You just heat them to 115°F–120°F and work with them at 98°F–102°F. There’s no need for a cooling phase or reheating - just melt and use. While tempered chocolate sets quickly at a cool room temperature (around 65°F) within 3 to 5 minutes, Mercken's requires a colder environment, between 45°F and 65°F, to crystallize properly and maintain its shine. As Royal Wholesale Candy explains:
"Room temperature is not ideal for cooling [Mercken's]. Cold is needed to foster crystallization and to maintain gloss."
Tools and Techniques Required
The tools and techniques required further highlight the differences between these methods.
Professional tempering demands specialized equipment and a practiced hand. You’ll need a marble slab, a bench scraper, a palette knife, and a highly accurate thermometer that reads between 80°F and 90°F. Techniques like tabling (spreading chocolate on marble) and seeding (adding tempered chunks to melted chocolate) require skill and experience [12,16].
Mercken's method is far more straightforward. A microwave-safe bowl and a spatula are all you need [2,28]. Heat the wafers in 30-second intervals at 50% power, stirring between bursts, or use a double boiler, removing the mixture from heat when about 75% melted and stirring until smooth. If the coating thickens too much, you can adjust it by adding a teaspoon of paramount crystals (palm kernel oil flakes) per pound of chocolate.
Food scientist Pat Polowsky explains the tempering process:
"Tempering is the process of using heat to break down the cocoa butter crystals in chocolate and then allowing only the strongest and most stable ones to re-form."
With Mercken's wafers, you bypass this complicated step entirely, making it a beginner-friendly option.
These differences highlight how each method serves different purposes, skill levels, and project requirements.
Pros and Cons of Each Method
Expanding on the technical breakdown earlier, let’s take a closer look at the strengths and weaknesses of each approach.
Professional tempering delivers top-tier results: a crisp snap, a glossy finish, and a smooth texture. It holds up well at room temperature and resists bloom, making it a favorite for gourmet creations. The downside? It’s a meticulous process that takes about 30–35 minutes. Even a small temperature mistake can ruin the chocolate’s texture and appearance.
On the other hand, Mercken's no-temper wafers simplify the process dramatically. Since tempering isn’t required, you can finish projects in minutes - perfect for beginners or anyone short on time. However, the vegetable oil base alters the mouthfeel, and keeping the chocolate glossy requires storing it at cooler temperatures (45°F–65°F).
Here’s a quick comparison to help you decide which method fits your needs:
Comparison Table
| Method | Advantages | Disadvantages | Ideal Use Cases |
|---|---|---|---|
| Professional Tempering | Exceptional shine and snap; smooth texture; stable at room temperature; resists bloom | Time-intensive (30–35 mins); requires precise temperature control; risk of seizing | High-end truffles, bonbons, chocolate shards, professional dipping, and luxury gifts |
| Mercken's No-Temper | Quick and easy; no tempering needed; beginner-friendly; easy to color | Oil-based texture; altered mouthfeel; needs cool storage to maintain gloss | Quick treats, kids’ projects, colorful drizzles, molded candies, and large-scale production |
sbb-itb-529d1c3
How to Temper Chocolate: Step-by-Step
Tempering chocolate the traditional way requires precision and patience. Unlike methods like Mercken's no-temper approach, this process demands strict temperature control and careful handling. Professional kitchens often rely on two main techniques: the seeding method and the tabling method. Both involve managing temperature and movement to create stable cocoa butter crystals, which are key to achieving that glossy finish and satisfying snap.
The Seeding Method
The seeding method is a great choice for home bakers because it’s straightforward and doesn’t require special equipment. Here’s how it works:
- Start by melting 75% of your chocolate. You can do this using a double boiler or in the microwave with short bursts of heat.
- Once melted, remove it from the heat and gradually stir in the remaining 25% of finely chopped, pre-tempered chocolate (this is your "seed").
- Stir continuously as the added chocolate melts and cools the mixture to its working temperature (refer to the table below for temperature ranges).
To check if the tempering worked, dip a clean knife or spoon into the chocolate. Let it sit at room temperature for 3 to 5 minutes. If it sets with a smooth, shiny surface and no streaks, you’ve nailed it!
For those who prefer a more hands-on experience, the tabling method might be a better fit.
The Tabling Method
This traditional technique is a bit more involved but offers a tactile way to temper chocolate. Here’s how to do it:
- Melt your chocolate to the proper temperature - between 110°F and 120°F for dark chocolate.
- Pour about two-thirds of the melted chocolate onto a cool marble or granite slab.
- Use a bench scraper and a palette knife to spread the chocolate thin, then gather it back together. Repeat this process until the chocolate cools to around 80°F–82°F.
- Once the chocolate thickens slightly and starts setting at the edges, scrape it back into the remaining warm chocolate. Mix thoroughly to bring the entire batch to the final working temperature.
Keeping Chocolate in Temper
Once tempered, keeping your chocolate at the right temperature is crucial. For dark chocolate, this means staying between 88°F and 90°F. If the temperature goes over 90°F, the stable crystals will start to melt, and you’ll lose the temper. To fix this, you can gently reheat the chocolate using short microwave bursts at half-power or other controlled methods. Be careful to avoid any contact with water or steam, as this can ruin the batch.
Troubleshooting Common Problems
Even with careful handling, issues can arise. Here’s how to address them:
- Dull or streaky chocolate: This usually means the chocolate is out of temper or cooled too slowly. Re-temper the batch to fix it.
- Thickened chocolate: If the chocolate becomes too thick while you’re working with it, gently warm it with a heat gun while stirring.
- Seized chocolate: A single drop of water can cause chocolate to seize. Unfortunately, seized chocolate can’t be tempered again, but it’s still usable for ganache or baking.
Chocolate Tempering Temperature Guide
| Chocolate Type | Melt | Cool | Work |
|---|---|---|---|
| Dark Chocolate | 114°F–122°F | 80°F–82°F | 88°F–90°F |
| Milk Chocolate | 105°F–115°F | 78°F–80°F | 84°F–86°F |
| White Chocolate | 100°F–110°F | 78°F–80°F | 84°F–86°F |
Mastering the art of tempering chocolate takes practice, but the results - a smooth, glossy finish and that perfect snap - are well worth the effort.
How to Use Mercken's No-Temper Method: Step-by-Step
Mercken's no-temper method simplifies chocolate work by using wafers made with vegetable oil instead of cocoa butter. This means you can skip the tricky steps of temperature control and crystal formation. The process is simple: melt the wafers, bring them to the right working temperature, and start crafting your treats.
For melting in the microwave, grab a plastic or silicone bowl - avoid glass or ceramic since they retain heat. Heat the chocolate at 50% power for 30 seconds, stirring well. Then continue with 15-second intervals, stirring frequently to ensure even melting. Keep in mind that Mercken's chocolate maintains its shape even when melted, so stirring is key for even heat distribution.
If you prefer a gentler approach, the double boiler method works well. Here’s how:
Double Boiler Method: Fill a saucepan with about an inch of water and bring it to a simmer - don’t let it boil. Place a heat-safe bowl on top, ensuring it doesn’t touch the water. Stir the wafers until about 75% melted, then remove the bowl from the heat and stir until smooth. Heat the chocolate to 115°F–120°F, then let it cool to 98°F–102°F for dipping or molding. Be careful not to exceed 120°F.
If the chocolate starts to thicken during melting, you can thin it out by adding Paramount Crystals. Add one teaspoon at a time - these oil-based flakes help smooth the chocolate without changing its flavor or causing it to seize. Just make sure to avoid any contact with water or steam, as that can cause clumping.
Once your chocolate is ready, it’s time to dip. Use room-temperature treats like pretzels, cookies, or fruit. Avoid chilled items, as they can make the chocolate set too quickly and lose its glossy finish. After dipping, let the treats set in a cool, well-ventilated area (45°F–65°F) to maintain the chocolate’s shine. If you use the refrigerator, limit the time to avoid condensation.
Which Method Should You Use?
Deciding between professional tempering and Mercken's no-temper method comes down to your experience, available time, and the kind of results you’re aiming for.
Mercken's method is a favorite among home bakers for its simplicity and speed. Unlike traditional tempering, it skips the need for precise temperature control, allowing you to melt and use the chocolate right away. This ease of use, combined with consistent results, has earned it a stellar 4.9/5 rating from 1,165 reviewers. It’s a reliable option when you want quick, hassle-free chocolate for decorating or drizzling.
On the other hand, professional tempering is the go-to method for achieving that glossy finish and satisfying snap you expect in high-end treats like truffles or chocolate bars. However, it demands a lot more precision. You’ll need to carefully monitor the chocolate’s temperature, keeping it around 90°F, and be prepared to start over if it cools too much. For recipes where chocolate is mixed into other ingredients - like brownies, ganache, or cake batter - tempering isn’t necessary, as the chocolate’s structure won’t impact the final result.
Time is another key consideration. Mercken's method is much quicker, skipping the multiple cooling and reheating steps that tempering requires. If you’re working on decorations, piping, or drizzling, Mercken's is a fantastic choice. But if you’re making molded confections, tempered chocolate is essential, as its natural shrinkage during setting ensures a clean release from molds.
For expert advice and high-quality supplies to suit either method, Gloria's Cake & Candy Supplies has you covered.
Conclusion
Professional tempering offers unmatched results when it comes to achieving that flawless texture and satisfying snap. It's the go-to method for creating high-end treats like truffles, chocolate bars, and dipped fruits. Tempered chocolate delivers a glossy finish and remains stable at room temperature, giving your creations a polished, premium look. That said, it does require patience and precision. You'll need to carefully monitor temperatures, and if things veer off course, you might have to start over.
On the other hand, Mercken's no-temper wafers are all about convenience and efficiency. With a simple melt-and-use process, requiring only that you stay within the 98°F to 102°F range, they’re perfect for projects like cake pops, molded candies, decorative drizzles, and themed designs. This method is a lifesaver when you're short on time or working on projects that don’t demand the finesse of tempered chocolate. It’s especially handy for quick decorations, silicone mold creations, or when working alongside kids.
For projects where a clean release from molds is essential, tempered chocolate is the clear winner. But for simpler tasks like dipping pretzels or decorating cupcakes, Mercken's wafers make the process straightforward and stress-free. Whichever method you choose, you can count on Gloria's Cake & Candy Supplies for expert advice and top-quality ingredients. With over 50 years of experience serving Los Angeles bakers since 1972, their team is ready to help you master either technique, recommend the best products for your needs, and solve any challenges that come your way.
FAQs
What’s the difference between professional chocolate tempering and Mercken’s no-temper method?
Professional chocolate tempering is all about precision. It involves carefully heating and cooling chocolate to stabilize the cocoa butter crystals. When done right, you get chocolate with a glossy finish, a firm texture that gives a satisfying "snap", and a longer shelf life. However, it’s not exactly beginner-friendly - it demands precise temperature control (typically 88–90°F for dark chocolate), a reliable thermometer, and some practice to master.
On the other hand, Mercken’s no-temper method offers a simpler alternative. By using pre-crystallized compound chocolate wafers, you only need to melt the chocolate to about 102°F and keep it warm. This approach is quick, easy for beginners, and doesn’t require any special tools. That said, the trade-off is in the results - chocolate made this way tends to be softer, less shiny, and more prone to melting in your hand.
So, while tempering delivers professional-level results with a polished finish, Mercken’s method is perfect for quick, low-effort projects that don’t demand perfection.
Can I use Mercken’s chocolate wafers for high-quality chocolate creations?
Mercken’s chocolate wafers are a fantastic choice for high-quality chocolate projects, especially when you’re looking to add decorative and colorful touches. These wafers are a no-temper, oil-based compound chocolate, which means they melt smoothly at around 102°F (keep the temperature above 98°F but below 120°F). They set quickly and deliver a glossy, even finish, making them perfect for tasks like enrobing, dipping, molding, or drizzling. Their vibrant colors and consistent texture make them a favorite among decorators for cake pops, dipped berries, and detailed accents.
That said, it’s important to note that Mercken’s wafers are a compound chocolate, not true cocoa-butter couverture. This means they lack the crisp snap, melt-in-your-mouth texture, and rich cocoa flavor that tempered couverture chocolate offers. For premium applications - like fine truffles or high-gloss chocolate shells - tempered couverture might be the better pick. Many professionals rely on Mercken’s for decorative work while reserving tempered chocolate for elements where flavor and texture take center stage. When used thoughtfully, Mercken’s wafers can truly elevate your chocolate creations.
How can I keep my tempered chocolate shiny and smooth?
To keep your tempered chocolate looking glossy and professional, precise temperature control and careful handling are key. Always ensure your tools and surfaces are completely dry - just a tiny bit of moisture can make the chocolate seize. Start by melting about two-thirds of the chocolate to a temperature of 110°F–115°F, stirring continuously. Then, let it cool to 88°F–92°F before mixing in the remaining chocolate to stabilize the temper. You can check if it’s ready by spreading a little on parchment paper or a spoon. If it hardens quickly with a shiny finish, you’re good to go.
While working with the chocolate, maintain its ideal temperature for dipping or decorating, reheating gently if needed - but be careful not to let it go above 130°F. Once your creations are complete, store them in a cool, dry spot at around 70°F to keep their shine intact. Skip the fridge - condensation can ruin that beautiful glossy surface.
Shop Supplies at Gloria's
Everything mentioned in this article is available at our Culver City shop. Come see it in person or browse online.
Shop at Gloria's11117 Washington Blvd, Culver City • Tue-Sat 10am-6pm • (323) 289-8807

