
Edible images make decorating holiday cakes simple and personal. Whether for Thanksgiving or Christmas, you can print designs like festive symbols, family photos, or company logos onto icing sheets. Gloria's Cake & Candy Supplies in Culver City offers custom edible image printing with a 24-hour turnaround. They also provide tools like buttercream, fondant, and cake boards to help you create polished desserts.
Key points:
- Custom designs: Christmas trees, pumpkins, or personalized messages.
- Sizes: Circles (6"–10") and rectangles (8" x 10.5").
- File requirements: High-resolution JPEG or PDF at 300 DPI.
- Storage: Keep images flat, sealed, and at room temperature.
- Application tips: Use on light-colored frosting; avoid refrigeration.
Visit Gloria's (11117 Washington Blvd., Culver City, CA) Tuesday–Saturday, 10 AM–6 PM, or order online for quick and easy holiday cake solutions.
Creating Christmas Edible Image Toppers
Selecting Christmas Designs
When it comes to Christmas edible images, the design options are practically endless. Classic holiday symbols like snowflakes, Christmas trees, ornaments, and wreaths are always a hit. These timeless designs bring a festive touch and are perfect for creating an elegant look that fits any holiday celebration.
For a more personal approach, consider using family photos. They add a heartfelt, warm element that generic designs simply can’t match. If the event is for kids, licensed characters can bring an extra layer of fun and excitement.
Hosting a corporate holiday event? Turn your company logo into edible art or create a custom holiday message like “Merry Christmas from the Johnson Family” surrounded by decorative borders.
Edible images are available in standard shapes and sizes, including circles (6"–8"), squares (6"–8"), and rectangles (7.5" x 10"). If you plan to add a decorative border around your topper, it’s a good idea to order the image slightly smaller than the intended size.
Preparing and Submitting Your Design Files
For the best results, submit high-resolution JPEG or PDF files at 300 DPI. Make sure to crop out any unnecessary borders or distractions. Avoid using screenshots or links to web images, as they often lead to blurry or low-quality prints.
Pay attention to details in your photo - shadows, reflections, and watermarks can affect the final look. Keep in mind that edible inks don’t always replicate colors exactly as they appear on your screen. Bright pinks and very dark backgrounds, in particular, can be challenging to reproduce accurately.
For professional-quality edible prints, you can order custom toppers through gloriascakeandcandy.com. Each sheet costs about $17.00, and most orders are ready for pickup within 24 hours. This quick turnaround is a lifesaver for last-minute holiday planning.
After you’ve picked up your edible image, store it flat in a cool, dry spot. Keep it sealed in its original bag - your pantry is ideal. Avoid refrigerating or freezing it, as this can make the image brittle or cause it to warp. Also, keep it away from direct sunlight or heat until you’re ready to apply it to your cake.
Once your design is finalized and printed, you’re all set to create a festive and personalized edible masterpiece for the holidays!
sbb-itb-529d1c3
Creating Thanksgiving Edible Image Toppers
Choosing Thanksgiving Designs
Thanksgiving edible images bring a cozy, autumnal vibe to your cake. Popular choices include turkeys, pumpkins, harvest scenes, and autumn hues like orange, red, and gold. These timeless designs perfectly capture the holiday spirit, making them ideal for intimate family dinners or larger festive gatherings.
Adding a personalized touch can make your cake even more special. Think along the lines of "Happy Thanksgiving from the Smiths" framed by fall leaves or a cornucopia. If you're aiming for something a little more refined, you might opt for designs featuring wheat stalks, acorns, or seasonal flowers.
Keep in mind that edible images look best on light-colored icing. A base of white buttercream or off-white fondant provides the perfect backdrop. Darker icing can obscure the details or alter the image's colors, making it harder to appreciate the design.
Thanksgiving toppers come in a range of sizes, such as 6-inch, 8-inch, and 10-inch circles or squares, as well as larger rectangular sheets (8x10.5 inches) for bigger cakes. To ensure the topper fits nicely, order one about half an inch smaller than your cake's size - like a 7.5-inch topper for an 8-inch cake. This leaves room for decorative borders and accounts for any slight shrinking of the cake. Once your design is ready, the next step is to upload and size your order.
Uploading and Sizing Your Order
After deciding on your Thanksgiving design, placing your order is a breeze. Gloria's Cake & Candy Supplies offers a quick 24-hour turnaround for custom toppers, which can be picked up in-store in Culver City. You can upload your own photos, festive motifs, or specific Thanksgiving messages directly when placing your order.
For the best results, make sure your uploaded files incorporate warm autumn tones and clear seasonal details. Low-resolution images or those with dark backgrounds might not print as well as you'd hope. If you need a custom size, you can easily trim the edible sheet using a sharp cutting tool while it's still attached to its plastic backing.
| Size | For | Use |
|---|---|---|
| 6 in Circle | 6.5 or 7 in Round Cake | Small family gatherings |
| 8 in Circle/Square | 8.5 or 9 in Cake | Standard Thanksgiving dinners |
| 10 in Square | 10.5 or 11 in Cake | Large holiday parties |
| 1/4 Sheet (8 x 10.5 in) | 9 x 13 in Quarter Sheet | Rectangular cakes |
Once your topper is ready, store it in its airtight zip-top bag at room temperature. Avoid refrigerating or freezing it, as this can cause brittleness or ink bleeding.
Ordering and Pickup at Gloria's Cake & Candy Supplies
Pricing and Turnaround Times
Ordering custom edible images from Gloria's Cake & Candy Supplies is simple and hassle-free. You can either place your order online through their website or stop by their store at 11117 Washington Blvd., Culver City, CA 90232. Serving the LA community since 1972, Gloria's has become a trusted name for bakers in the area.
For local bakers, there's a quick 24-hour turnaround. Once your order is ready, you'll receive an email notification - just make sure to check your spam folder if you don't see it right away.
"As a bakery owner, I come to Gloria's anytime I need something special or last-minute. They have everything, and the staff is always so helpful and cheerful!" – Jamie P.
Got a tricky or rare design in mind? The helpful staff at Gloria's can dig through their archives to help you find just the right image. Customer Sharyn L. shared her experience:
"I happened to mention my situation and one of the ladies (Linda, I think) offered to look through their archives to try and find one - and did! I was able to make the cake thanks to her going above and beyond."
Keep reading to learn about their convenient pickup and delivery options.
Pickup and Delivery Options
Gloria's offers a Shop Online & Pick Up In Store system that’s perfect for bakers in the LA area. The store is open Tuesday through Saturday from 10:00 AM to 6:00 PM, and it’s closed on Sundays and Mondays. Be sure to plan ahead if your event falls early in the week.
When picking up your order, bring your order confirmation and a valid ID. This quick verification process ensures everything is ready for you - no waiting around or shipping delays.
Preparing Your Cake Base for Edible Images
Selecting the Right Supplies
To achieve a flawless edible image application, you’ll need to start with a smooth and sturdy base. Begin with a heavy-duty 12-inch silver cake drum ($6.95), which provides a solid, non-bending foundation - especially important when transporting cakes. For smaller creations, gold or white cake boards in sizes ranging from 8 to 12 inches ($0.75–$1.75) are ideal.
For the frosting, white buttercream is your best bet. A great option is Celebakes Whimsical White Buttercream ($24.99 for 3.5 lb), which creates the perfect crusted surface for your edible image to adhere to. If your cake has a high moisture content, consider using White Vanilla Fondant ($26.95 for 2 lb) as a barrier to prevent any sogginess. Always stick to white frosting or fondant - dark colors underneath can distort the design of your edible image.
"This shop has EVERYTHING you need to decorate your cake... They saved me in my last minute panic with two large cakes I needed to complete the next day." – Veronica M.
For chocolate cakes, smooth out the surface with a ganache made from Mercken's coating wafers ($9.50 per lb). To refine the edges, disposable piping bags (available in 12-inch or 18-inch sizes for $0.60–$0.85) and gel paste food colors ($3.95) are helpful tools.
Once you’ve gathered the right supplies, you’re ready to prepare your cake base for a seamless edible image application.
Creating a Stable and Level Base
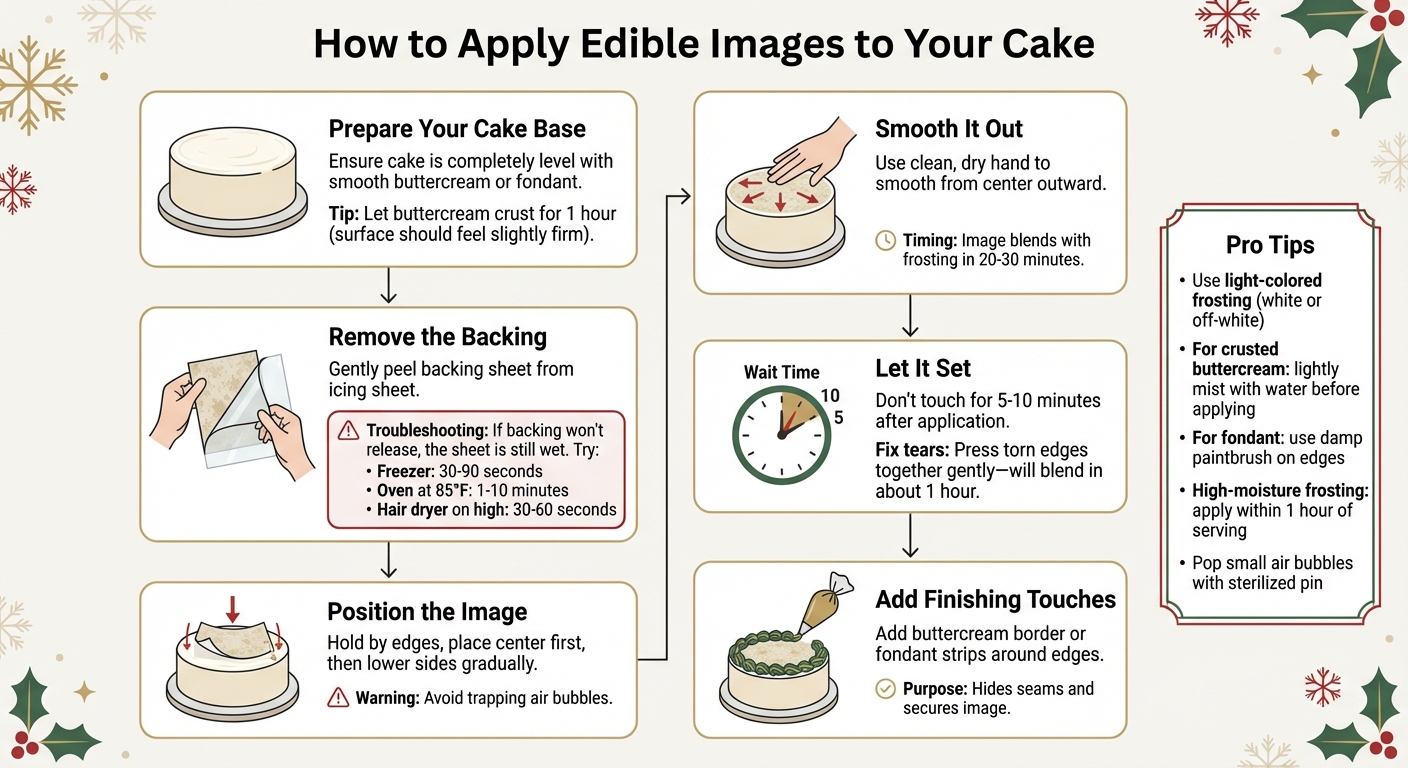
A perfectly level cake base is essential for applying edible images. Before frosting, make sure the cake is completely leveled - any uneven spots will show through the image. If you’re using buttercream, apply it smoothly and allow a thin crust to form by letting it sit for about an hour. The surface should feel slightly firm but not overly dry.
In humid areas like Los Angeles, timing becomes critical. If the buttercream crusts over too much, lightly mist it with sugar water or apply a thin layer of corn syrup to make it tacky again. For fondant bases, use a small paintbrush to apply water only to the area where the image will be placed. Be cautious - excess moisture can cause the colors to bleed.
If you’re working with a frozen cake, let it thaw until a slight layer of moisture forms, then gently pat it dry before adding frosting. Avoid refrigerating or freezing the edible image itself before use, as this can make the frosting sheet brittle and prone to cracking.
Applying an Edible Image Icing Sheet from Edible Sugar Art
Applying Edible Images to Your Cake
Step-by-Step Guide to Applying Edible Images on Holiday Cakes
Application Steps
Once your cake is ready, it’s time to add the edible image. Start by gently peeling the backing sheet off the icing sheet. If the backing doesn’t come off easily, it’s likely due to moisture. Don’t force it - there are a few tricks to help. You can place the image in the freezer for 30–90 seconds, warm it in an oven set to 85°F for 1–10 minutes, or use a hair dryer on high heat for 30–60 seconds to dry out the sheet.
"Remember the only reason the icing sheets will not easily come off the backing sheet is that the icing sheet is still wet. THEY WILL RELEASE WHEN THEY ARE DRY." - ediblecaketopper.com
When handling the image, hold it by the edges. Position the center of the image on the cake first, then lower the sides gradually to avoid trapping air bubbles. Once it’s in place, smooth it out gently from the center outward using a clean, dry hand. The image will typically blend with the frosting in about 20 to 30 minutes. If your buttercream frosting has formed a crust, lightly mist it with water before applying the image. For fondant-covered cakes, use a slightly damp paintbrush to press down the edges and corners. After smoothing, let the image settle before moving forward with additional decorations.
Tips for a Clean Finish
To avoid damaging the image, don’t touch it for at least 5 to 10 minutes after application. If you notice small air bubbles, sterilize a pin to carefully pop them, then smooth the area with a dry finger. In case the image tears during placement, gently press the torn edges together with your finger - most tears will blend in after about an hour. For frostings with high moisture, like whipped cream, apply the image as close to serving time as possible, ideally within an hour, to prevent colors from bleeding or fading. To complete the look, add a piped buttercream border or fondant strips around the edges. This not only hides seams but also helps keep the image secure.
Conclusion
From choosing the perfect design to achieving a flawless finish, each step adds that extra magic to your holiday cakes. Creating custom edible images for your festive treats is straightforward when you have the right supplies and expert guidance. Whether you're decorating a cake for your family or fulfilling multiple client orders, the process becomes seamless with high-quality printing and dependable materials.
With a 24-hour turnaround on custom edible image orders and a wide range of professional-grade supplies, you'll have everything you need to craft eye-catching holiday cakes. The team is ready to offer personalized support, helping you select the best materials and providing expert tips to ensure your designs turn out just as you envisioned.
Plan your visit between Tuesday and Saturday, 10:00 AM–6:00 PM at 11117 Washington Blvd., Culver City, CA 90232. Whether you're just starting out or have years of experience, Gloria's Cake & Candy Supplies has the tools, materials, and advice to take your holiday baking to the next level. Stop by and make your festive cake ideas a reality this season!
FAQs
How can I ensure my edible image cake topper looks its best?
To create a vibrant and polished edible image topper, start with a high-resolution image (at least 300 dpi) to ensure sharp details. Make sure your monitor is properly calibrated for accurate color representation. For the best results, use premium icing sheets, as they absorb more ink and deliver richer, more vivid colors than wafer paper. Store these sheets flat in their sealed packaging at room temperature, away from light and moisture. Avoid refrigerating them, as this can cause cracking.
When it’s time to apply the image, ensure the cake frosting is smooth, slightly moist, and light-colored to enhance the image's appearance. If you're working with darker frosting, add a thin layer of white fondant underneath to preserve the image's brightness. Carefully peel off the backing sheet with dry hands, or use the quick-freeze method - place the sheet in the freezer for 10–15 seconds - to make peeling easier and prevent damage. Trim any excess while the image is still attached to the backing sheet, and handle it gently until it’s securely placed on the cake. By following these steps, your holiday cakes will have a professional and festive finish.
How should I store edible images before using them on cakes?
To keep your edible images in great shape, store them flat inside the resealable bag they come in, at room temperature (around 68–72°F). Steer clear of direct sunlight, as it can cause the colors to fade. And whatever you do, don’t refrigerate or freeze them - this can dry out the icing layer and lead to cracking.
Pay attention to humidity levels, too. If the air is too dry, the sheets might become brittle. On the flip side, high humidity can make them sticky and difficult to handle. Always keep the bag tightly sealed in a cool, dry spot. In very dry conditions, you can revive moisture by placing the sheet in an airtight container with a damp cloth nearby (just make sure it doesn’t touch the image). For humid climates, using a proof box or a dehumidifier can help.
When stored correctly, most edible images can last about 12 months, and in some cases, up to 24 months if unopened. By following these tips, your festive cake toppers will stay vibrant and ready to wow your guests at Christmas, Thanksgiving, or any special occasion.
Can edible images be applied to any type of cake frosting?
Edible images work well on a variety of frosting types, including buttercream, store-bought frosting, fondant, gum paste, whipped cream, non-dairy toppings, fudge, chocolate, and even frozen ice cream cakes.
To get the best results, make sure the frosting surface is smooth and slightly moist, as this helps the image stick properly. If you're using whipped cream or non-dairy toppings, it's best to apply the image close to serving time to avoid any dissolving or loss of clarity.
Shop Supplies at Gloria's
Everything mentioned in this article is available at our Culver City shop. Come see it in person or browse online.
Shop at Gloria's11117 Washington Blvd, Culver City • Tue-Sat 10am-6pm • (323) 289-8807
Related Blog Posts
- Edible Image Printing 101: Everything You Need to Know Before Ordering Custom Cake Images
- Same-Day Edible Image Printing in Los Angeles: Skip the Shipping, Get Expert Results
- Custom Printed Wafer Paper in Los Angeles: Same-Day Service for Unique Cake Designs
- The Ultimate Edible Image Troubleshooting Guide: 10 Common Problems Solved

