
Textured buttercream techniques have transformed cake decorating, moving beyond basic piping to include intricate designs like rustic swirls, abstract art, and ombré effects. The secret to success? High-ratio shortening. Unlike butter, it holds its shape in warm conditions, crusts quickly, and provides a smooth, stable base for detailed designs. Whether you're creating rosettes, using palette knives for painterly effects, or experimenting with household tools for unique textures, these techniques make buttercream designs more durable and visually striking.
Key takeaways:
- High-ratio shortening ensures stability, sharp details, and vibrant colors.
- Classic methods include rosettes, rustic swirls, and cake comb patterns.
- Modern techniques like ombré gradients and abstract textures push design boundaries.
- Tools like offset spatulas, piping tips, and even household items enhance designs.
- Proper photography and styling can make your cakes stand out online.
With the right tools, techniques, and ingredients, textured buttercream opens up endless possibilities for cake decorating.
Textured Buttercream Tutorial
Why High Ratio Shortening Works Best for Textured Buttercream
High Ratio Shortening vs Butter for Buttercream: Complete Comparison
High ratio shortening is a go-to choice for bakers crafting detailed buttercream designs. Thanks to its built-in emulsifiers, it locks in liquid and sugar, creating a frosting that's smoother, creamier, and less greasy. One standout feature is its ability to "crust" quickly. Within 5 to 10 minutes of air exposure, it forms a firm outer layer, perfect for techniques like the Viva paper towel method to achieve a flawless finish.
"The hi-ratio shortening not only makes a smoother less greasy frosting, it is creamier and holds its shape without a greasy mouthfeel." - Lisa, The Bearfoot Baker
Another advantage? High ratio shortening has a higher melting point than butter. This means your rosettes and swirls will stay sharp and defined, even in warmer or more humid conditions. Plus, its pure white base is ideal for creating vibrant colors with gel food coloring.
For bakers focused on textured designs, high ratio shortening provides unmatched stability and consistency. Brands like Sweetex, priced at approximately $84.05 for a 50-pound container (about $1.68 per pound), are a reliable investment for professional results.
Crusting Buttercream Recipe
The crusting ability of high ratio shortening is the foundation of this buttercream recipe. It produces a smooth, stable frosting that sets quickly, making it perfect for designs that need to hold their shape.
| Ingredient | Amount |
|---|---|
| Confectioners' Sugar | 2 lbs. (about 8 cups) |
| Unsalted Butter (softened) | 1/2 cup (1 stick) |
| High Ratio Shortening | 1 1/4 cups |
| Clear Vanilla Extract | 2 Tablespoons |
| Milk or Heavy Cream | 1/4 cup + 2–3 Tablespoons (adjust as needed) |
| Salt | 1/2 teaspoon (fine grain) |
Start by creaming the butter and shortening until smooth to eliminate lumps. Gradually add confectioners' sugar on low speed, then mix on medium for about 8 minutes. Add the vanilla, salt, and milk, one tablespoon at a time, until you achieve the desired consistency. Finally, mix slowly for 2 minutes to remove air bubbles.
Pro tip: Use pure cane sugar instead of beet sugar to avoid a gritty texture. Store the frosting in an airtight container in the refrigerator for up to 2 weeks or freeze it for up to 3 months.
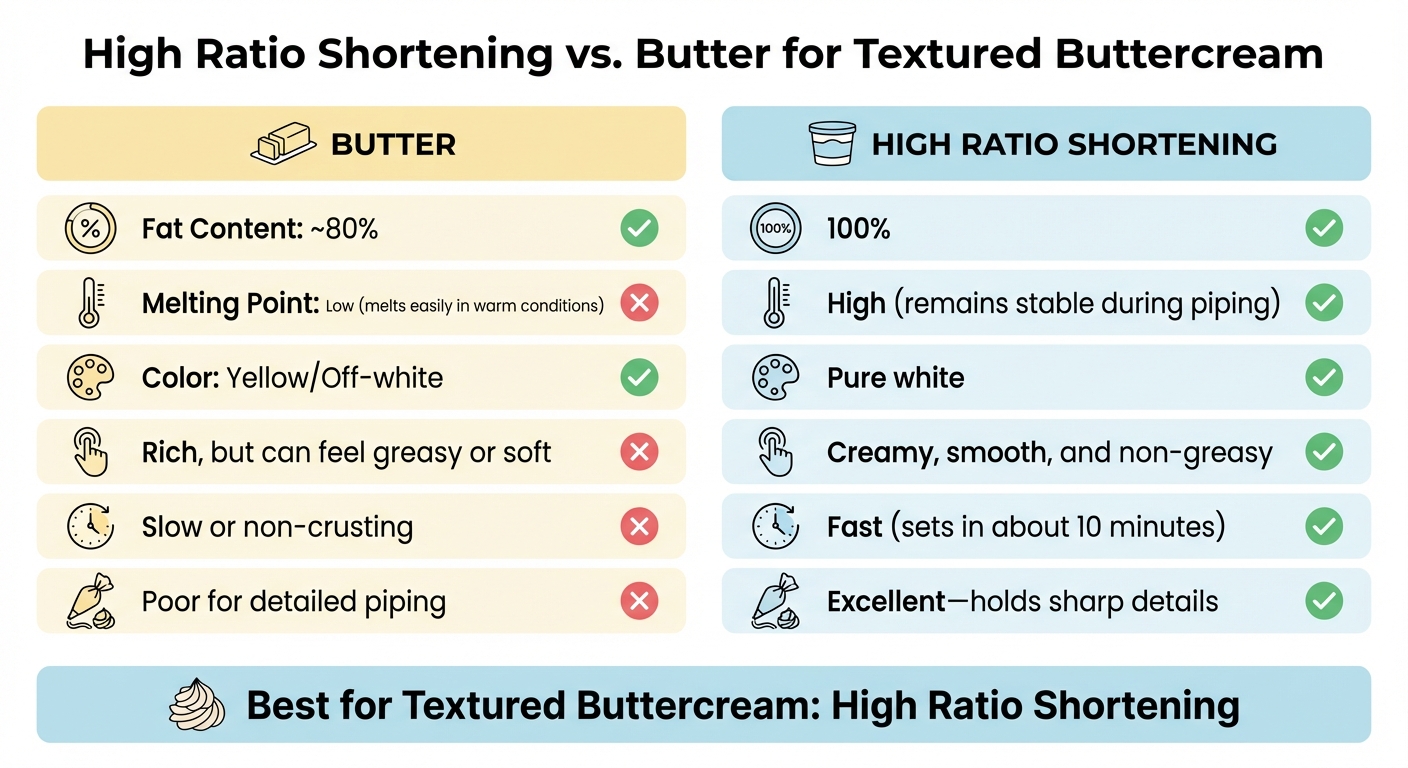
High Ratio Shortening vs. Butter: Side-by-Side Comparison
| Feature | Butter | High Ratio Shortening |
|---|---|---|
| Fat Content | ~80% | 100% |
| Melting Point | Low (melts easily in warm conditions) | High (remains stable during piping) |
| Color | Yellow/Off-white | Pure white |
| Texture | Rich, but can feel greasy or soft | Creamy, smooth, and non-greasy |
| Crusting Speed | Slow or non-crusting | Fast (sets in about 10 minutes) |
| Shape Retention | Poor for detailed piping | Excellent - holds sharp details |
In practical use, the differences are clear. Butter-based buttercream, while rich in flavor, softens quickly with warm hands or in temperatures above 75°F. It can even separate under heat. High ratio shortening, on the other hand, holds its structure in hot kitchens or during summer transport, making it the better choice for intricate designs that demand precision and durability.
Classic Buttercream Texturing Methods
Start with basic techniques like rosettes and comb patterns before moving on to more modern, abstract designs. These classic methods are popular because they consistently produce polished, professional-looking results.
How to Pipe Rosettes
Begin by applying a thin crumb coat to your cake and chilling it for 10–30 minutes to set the base for your design. Chelsey White, the baker behind Chelsweets, offers this helpful tip:
"If you want to use colorful buttercream to pipe your rosettes, I highly recommend using the same color of buttercream to crumb coat your cake. This will help camouflage any little gaps between your rosettes."
Before piping, use an offset spatula to mark three or four horizontal guide lines around the cake. These will help you keep your rows even. For the rosettes, equip a piping bag with an open star tip (like Wilton 1M or Ateco 824) for well-defined ridges, or a closed star tip (such as Wilton 2D or Ateco 34) for a softer, ruffled look.
Hold the piping bag perpendicular to the cake surface and begin the spiral at the center of each rosette, working outward in a circular motion. To finish, stop squeezing the bag but continue the motion slightly to taper the tail. Place the end of each rosette at the center of the next one to hide the tails seamlessly.
Practice your spirals on parchment paper to reduce waste, and ensure your buttercream is firm enough to hold its shape while still soft enough to pipe easily.
Once you've mastered rosettes, try more relaxed techniques for a rustic aesthetic.
Rustic Swirls and Cake Comb Patterns
Rustic swirls bring a casual, charming look to your cake and pair beautifully with more precise piping. Using an angled icing spatula, create quick swipes, "C" shapes, or "S" shapes across the frosting. The trick is to work while the buttercream is still soft. Sugar & Sparrow suggests:
"In order to get that carefree look, you have to let loose a little bit. Once you get to the point of wild abandon, your cake will look amazing!"
For uniform ridges and stripes, cake combs are your best friend. Hold the comb steady and perpendicular to the cake while spinning your turntable. To create horizontal stripes, use a metal spatula and spiral upward as you rotate. For vertical ridges, drag the rounded side of a spoon upward along the cake.
| Technique | Tool | Key Motion |
|---|---|---|
| Rosettes | Star Tip (Wilton 1M / 2D) | Spiral outward |
| Rustic Swirls | Angled Spatula | C-shapes and S-shapes |
| Combed Stripes | Cake Comb | Steady hold with turntable spin |
| Horizontal Waves | Metal Spatula | Spiral upward while spinning |
| Vertical Ridges | Back of a Spoon | Upward vertical drag |
Make sure to clean your cake comb between spins to avoid buttercream buildup, which can distort the ridges. If the patterns look clumpy or uneven, your buttercream might be too thick - adjust it to a smoother, spreadable consistency for better results.
Contemporary Textured Buttercream Techniques
Today's cake decorators are pushing boundaries, transforming buttercream into a canvas for artistic, painterly designs that go beyond traditional piping.
Creating Ombré Effects with a Palette Knife
To achieve a flawless ombré effect, prepare at least four shades of the same color to create a seamless gradient. Spread these shades in horizontal bands around a fully chilled, crumb-coated cake, letting the colors overlap slightly at the edges.
Blend the colors using a technique called "The Wiggle." British Girl Bakes describes it best:
"Using the tip of your offset spatula or palette knife, use light pressure to zigzag up and down the buttercream. Do this as you spin the cake on the turntable, which starts the blending of the different shades."
Once blended, use a heated metal cake comb at a 45° angle to smooth the surface while rotating the cake. If you’re aiming for textured ombré swoops, apply a generous amount of buttercream to your knife, press it firmly at the top of the cake, and swipe downward, thinning the frosting as you move toward the base.
Temperature plays a key role here. Stacey from The Sugar Coated Cottage advises:
"The buttercream should not be soft or tacky. Crumb coat, final coat and chill your cake completely."
Between layers, chill the cake for at least an hour. Also, keep your palette knife clean by wiping it with a towel after every swipe to prevent mixing old buttercream back onto the cake.
Ready to elevate your designs further? Let’s dive into creating abstract textures with everyday tools.
Abstract Textures Using Household Tools
You don’t need fancy equipment to create eye-catching abstract buttercream designs. Household items like pastry brushes, aluminum foil, and even spoons can help you craft unique textures. Pastry brushes, for instance, are perfect for creating effects like fur, grass, woodgrain, or concrete. Kerrie Wyer, a buttercream expert, shares:
"Pastry brushes... are a secret texture-creating weapon; perfect for fur, grass, woodgrain, concrete, and a host of other strand–like textures."
For best results, work while the buttercream is still soft. If it starts to set, dip the brush in warm water, shake off the excess, and continue. Other tools like toothpicks, wooden dowels, or crumpled foil can be used to stamp, drag, or score abstract patterns into the frosting. Just make sure all tools are clean, new, and free of any non-edible residues.
Using a buttercream made with high ratio shortening can help maintain stability during scraping and layering, ensuring your designs stay intact.
For decorators seeking precision and sharp patterns, stenciling is a fantastic option.
Stencil Layering for Clean Designs
Start by chilling the cake until the base buttercream is firm. Aman from Bakingo explains:
"A firm, cold base ensures the icing spreads evenly and holds its shape, preventing colours from merging unintentionally."
Choose thin, flexible stencils made of plastic or foam that contour easily to the cake’s shape. To prevent sticking, lightly coat the stencil’s surface with shortening before applying it to the cake. For better control, pipe buttercream directly into the stencil openings instead of smearing. Craftsy highlights:
"Piping allows you to be more precise. When you just smear buttercream over a stencil, you run the risk of pushing the color underneath your stencil, which can cause it to move and smudge."
Spread the piped buttercream outward from the center of each stencil opening using an offset spatula. Lift the spatula away from the stencil to avoid color bleeding. For layered designs, chill the cake between each step to keep the lines crisp. Clean the stencil thoroughly after each use to maintain sharp patterns as you work your way around the cake.
Using high ratio shortening in your buttercream helps keep the texture stable during stenciling, ensuring your designs remain sharp throughout the process. If any smudges occur, chill the cake again before scraping away the mistake - firm buttercream is much easier to clean up than soft frosting.
sbb-itb-529d1c3
Tools for Textured Buttercream Work
Having the right tools can turn a challenging decorating session into an enjoyable and creative experience. You don’t need an overflowing toolkit - just a handful of essentials that suit your style and the textures you want to achieve.
Offset spatulas and palette knives are must-haves for creating painterly effects. Smaller palette knives are ideal for intricate details like petals or leaves, while larger ones help you craft sweeping strokes and abstract waves. These tools are perfect for turning buttercream into textured masterpieces, allowing you to execute the techniques described earlier with precision.
For a refined finish, bench scrapers and cake combs are indispensable. Bench scrapers aren’t just for smoothing; when held at a 45-degree angle and paired with a rotating turntable, they ensure even frosting distribution. For a flawless finish, try dipping the scraper in hot water, drying it off, and making a final pass to slightly melt the buttercream’s surface.
Cake combs are perfect for creating uniform patterns like stripes, honeycomb, or plaid. Keep them clean between uses to maintain sharp, defined ridges. When it comes to adding three-dimensional details, piping tips are your go-to tools. Star nozzles work beautifully for rosettes and borders, while small round tips (such as #2 or #3) are excellent for pointillism and intricate accents.
Don’t overlook household items - they can add unique textures too. Clean toothpicks, spoons, or crumpled aluminum foil can create one-of-a-kind effects. As British Girl Bakes points out:
"Toothpicks are probably my favourite cake decorating tool for buttercream techniques because they're useful for SO many things!" - British Girl Bakes
Just make sure any household tools you use are clean and food-safe.
Tool Comparison Chart
Here’s a quick guide to the primary uses and effects of each tool:
| Tool | Primary Function | Texture/Effect Produced | Best Use Case |
|---|---|---|---|
| Offset Spatula | Spreading and lifting | Sweeping arcs, rustic swirls, soft ridges | General frosting and basic texturing |
| Palette Knife | Detailed "painting" | Petals, leaves, feathery strokes, abstract art | Floral designs and impressionist styles |
| Bench Scraper | Smoothing and leveling | Flawless flat surfaces, sharp vertical edges | Creating a clean canvas for other textures |
| Cake Comb | Patterning | Uniform stripes, honeycomb, plaid, ridges | Modern, geometric side-designs |
| Piping Tips | 3D Application | Rosettes, shells, pointillism (dots), grass | Borders, flowers, and detailed 3D accents |
| Pastry Brush | Dragging/Brushing | Fur, grass, woodgrain, concrete strands | Nature-themed or industrial textures |
With these tools in hand, your buttercream designs can go from simple to stunning, giving your cakes a professional look and feel.
How to Photograph and Share Textured Cakes on Social Media
Once you've nailed your textured buttercream techniques, the next step is showing off your creation online. Capturing the beauty of your cake doesn't require fancy gear or a professional studio - just a few smart photography and styling tricks.
Photography Tips for Textured Cakes
Natural light is your best friend. Place your cake near a window with soft, indirect sunlight to bring out the intricate details of your buttercream design without washing out the colors. For a polished look, shoot at eye level with your cake - this ensures straight, professional-looking lines. If you've got a standout top design, like concentric patterns or a unique swirl, switch it up and take a shot from directly above.
Preparation is just as important as the photo itself. Make sure your buttercream is flawlessly smooth and the cake is well-chilled before the shoot. This keeps the textures sharp and prevents colors from blending together.
Want to make your textures pop? Add accents that play with light. A dusting of edible glitter can create a subtle shimmer along the ridges of your buttercream. Or, style your cake with fresh edible flowers, macarons, or colorful sprinkles to add a touch of flair without detracting from the main design. As recipe developer and food photographer Susan Gravatt puts it:
"Something about a bright white cake feels classy and right for any time of year"
A clean white base works beautifully in photos, enhancing both the lighting and the texture of your cake.
These tips will help you capture your cake's best angles and set the stage for a scroll-stopping social media post.
Instagram Styling Tips
Once you've got the perfect shot, it's time to refine your social media presentation. Play with varied textures to create depth. Use quick swipes, C-shapes, and S-shapes in your buttercream application to build a rustic, "perfectly imperfect" look. This technique naturally creates shadows and highlights, making your photos more dynamic. Kerrie Wyer, founder of Viva La Buttercream, explains:
"Texture adds a depth to cakes that other techniques cannot match"
Make sure every angle of your cake is photo-ready. Add texture to both the top and sides so you can capture it from multiple perspectives. For a polished design, use a toothpick to score guide marks before piping. Once you're ready to post, don’t forget to tag relevant creators or brands to increase your visibility. A well-styled and engaging presentation not only highlights your skills but can also inspire others to experiment with textured buttercream techniques.
Conclusion
Textured buttercream has come a long way, transitioning from traditional piping techniques to eye-catching designs like classic rosettes, rustic swirls, and modern palette knife artistry. Using high-ratio shortening plays a big role in achieving these textures, as it keeps the frosting firm and crisp - even in warmer conditions - making it ideal for intricate designs. This level of detail is something industry experts emphasize. As Kerrie Wyer, a buttercream specialist, explains:
"Texture adds a depth to cakes that other techniques cannot match. Whether it's creating life-like grass... or fabric on a couture wedding cake, texture can take your cake from drab to fab!"
These evolving methods showcase how blending traditional skills with fresh ideas continues to push cake design to new heights.
From professional tools like offset spatulas and icing combs to everyday items like aluminum foil and paper towels, these techniques open up endless creative possibilities. With these methods, your imagination can truly shine.
Start experimenting with these ideas today. Gloria's Cake & Candy Supplies, a trusted resource for Los Angeles bakers since 1972, offers high-quality ingredients, decorating tools, and expert advice to help bring your vision to life. Dive in, try these techniques, and share your creations on social media - you might just spark the next big trend.
FAQs
Why is high-ratio shortening a great choice for buttercream designs?
High-ratio shortening is a go-to choice for buttercream, especially when stability is a priority. It holds up well in warmer conditions, ensuring your designs stay intact without melting or losing shape. Plus, it gives buttercream a silky-smooth texture and a creamier finish by incorporating more sugar and liquid than butter-based options. Another bonus? It has a lighter, less greasy feel, making it a hit among decorators and those enjoying the final product.
What household tools can I use to create unique buttercream textures?
You can use everyday household tools to create eye-catching buttercream textures and take your cake designs to the next level. Items like pastry brushes, silicone brushes, offset spatulas, and palette knives can help you achieve a variety of artistic effects. For instance, pastry or silicone brushes are perfect for adding streaked or brushed textures, while palette knives and offset spatulas work wonders for sweeping strokes, ridges, or abstract patterns.
Other handy tools, such as toothpicks, icing combs, and even cookie cutters, are excellent for crafting intricate details or layered designs. These tools open the door to experimenting with trends like ombré effects, textured flowers, or abstract art. The best part? You probably already have many of these tools in your kitchen, making buttercream decorating a fun and accessible activity!
What are the best tips for photographing textured buttercream cakes for social media?
To photograph textured buttercream cakes for social media, start with great lighting. Natural light is ideal for highlighting intricate details like palette knife strokes or ombré designs. Position the light at an angle to bring out depth and dimension, and if the shadows are too harsh, use a diffuser to soften them.
Choose angles that emphasize the cake's texture. Close-ups or slightly top-down shots work well to showcase the details. Keep the background simple and uncluttered so the cake remains the star of the shot. Neutral or complementary backdrops can enhance the design without drawing attention away from it.
For social media, capture a mix of shots - detailed close-ups and full cake views. When editing, make subtle adjustments to brightness and contrast to maintain the cake’s true colors and textures. Adding minimal props to the scene can also elevate the photo, making it feel polished and engaging.
Shop Buttercream Tools
Piping tips, offset spatulas, bench scrapers, and decorating combs.
Shop at Gloria's11117 Washington Blvd, Culver City • Tue-Sat 10am-6pm • (323) 289-8807
Related Blog Posts
- How to Blend Colors for Ombre Cakes
- Professional Cake Decorating with High Ratio Shortening: Advanced Techniques
- High Ratio Shortening vs. Butter in Frosting: A Side-by-Side Comparison
- How to Make 'Ugly Cakes' That Look Perfectly Imperfect

