
Drip cakes are all about achieving those flawless chocolate streams cascading down the sides of a cake. To master this, focus on three key factors: ganache consistency, temperature control, and timing. Here's what you need to know:
- Ganache Consistency: Use a 1:1 ratio of heavy cream to dark chocolate. Ensure it’s smooth and pourable, like thick fudge sauce. Test drips before applying to your cake.
- Temperature Control: Ganache should be warm (86°F–95°F) but not hot. Chill your frosted cake for 30–45 minutes in the fridge to ensure the drips stop at the right point.
- Timing: Align ganache cooling with cake chilling. Test a drip before committing to avoid messy results.
Whether you’re using a spoon or a squeeze bottle to apply the ganache, precision and preparation are key. For colored drips, opt for white chocolate wafers and gel food coloring for vibrant results. With these tips, you’ll create stunning drip cakes every time.
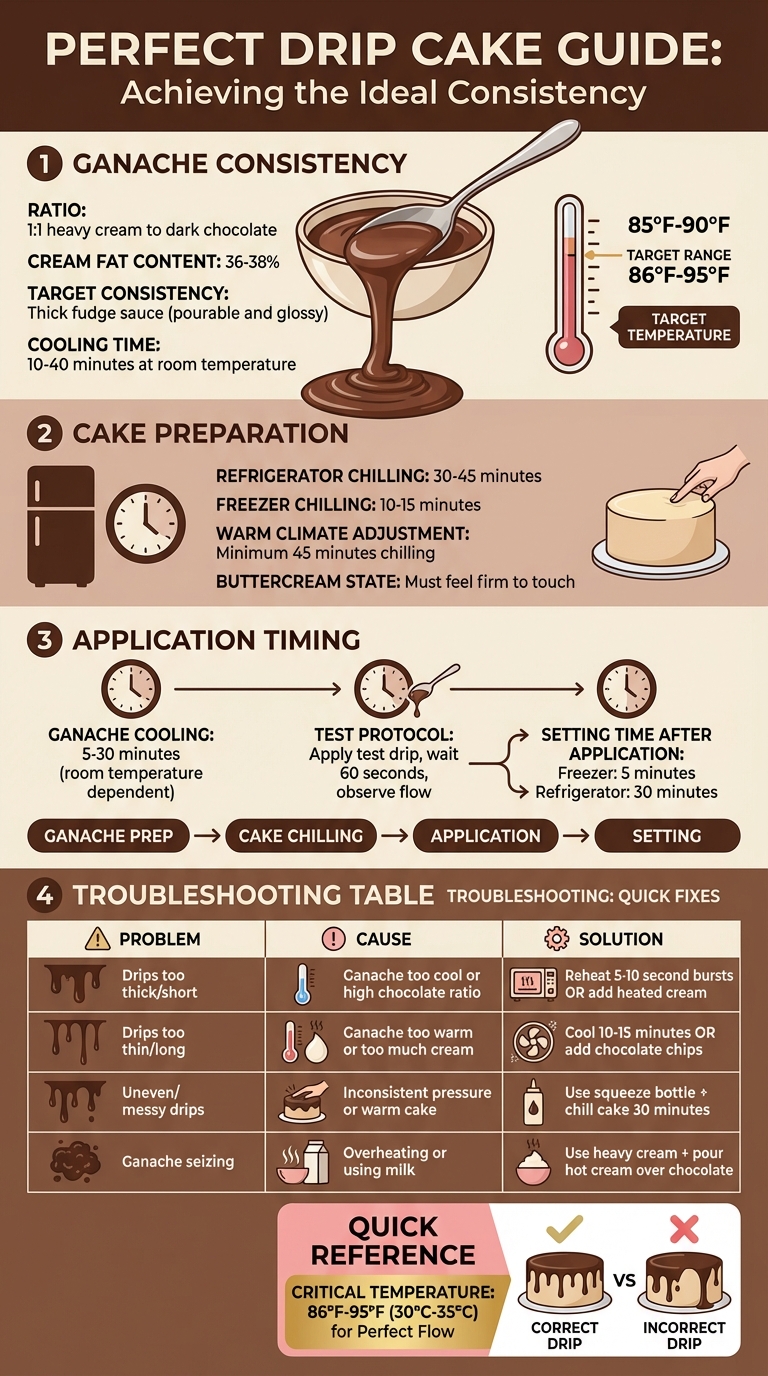
Drip Cake Temperature and Timing Guide for Perfect Ganache Application
How To Drip the Perfect Drip-Cake - Full Icing Recipe & Technique! | Cupcake Jemma
Ganache Consistency: The Foundation of Perfect Drips
The ideal ganache should look like a thick, pourable fudge sauce. It needs to flow smoothly and maintain a glossy finish without being so runny that it slides down the cake and pools at the bottom. When the consistency is just right, the ganache will create controlled, elegant drips that elevate the cake’s overall look.
How to Prepare Ganache for Smooth Drips
Start by chopping the chocolate into small, even pieces to ensure it melts quickly and uniformly. Heat your heavy cream (with a milk fat content of 36–38%) until it’s steaming or just beginning to simmer. Be careful to avoid a rolling boil, as this can cause the fat to separate and lead to a grainy texture.
Once the cream is ready, pour it over the chopped chocolate and let it sit undisturbed for 1 to 5 minutes. This resting period is key - it allows the chocolate to soften completely, minimizing the risk of lumps. Afterward, stir gently, starting from the center and gradually widening your circles, until the mixture becomes smooth and glossy.
"I always try to stir by keeping my spoon beneath the surface of the ganache so that I won't create too many air bubbles." – Melissa Diamond, Founder, My Cake School
After mixing, let the ganache cool at room temperature for 10–40 minutes until it reaches 85°F–90°F. Avoid using the refrigerator for cooling, as uneven or rapid cooling can result in a thick, clumpy texture. Before applying the ganache to your cake, test it by letting a small amount drip down the inside of a bowl or an inverted glass. If it runs all the way to the bottom, it’s too warm; if it barely moves, it’s too cold.
If the consistency isn’t quite right, don’t worry - there are simple fixes.
Fixing Common Consistency Problems
- Too Thick: Microwave the ganache in 5–10 second intervals or whisk in a small amount of warm heavy cream.
- Too Thin: Let it cool longer at room temperature or stir in a bit of melted chocolate to thicken it.
- Grainy or Separated: Reheat the ganache to about 92°F to melt the fat crystals, then whisk it until smooth again.
With the right techniques and a little patience, you’ll have ganache that’s perfect for creating those flawless drips.
Temperature Control for Ganache and Cakes
To achieve that flawless drip cake finish, mastering temperature control is a must. The secret lies in balancing the temperatures of both the ganache and the cake. The ganache should be warm enough to flow smoothly, while the cake needs to be chilled to stop the drips at just the right point. Get this wrong, and you’ll end up with drips that either run too far or barely form. Let’s dive into the specifics of temperature settings for both elements to ensure success.
Ganache Temperature Guidelines
For ganache to flow perfectly, its temperature should stay between 86°F and 95°F. At this range, it has the texture of thick chocolate fudge sauce - smooth and pourable, but not runny. A digital thermometer is your best friend here for accuracy. No thermometer? No problem. The ganache should feel warm to the touch - neither hot nor cool.
"The ganache is ready when all the butter has melted in to make a shiny glaze and is at 30 degrees Celsius." – Reshmi Bennett, Founder, Anges de Sucre
If the ganache starts to thicken while you’re working, simply reheat it in short bursts in the microwave, stirring after each interval. Cooler indoor environments might require more frequent reheating to maintain the right consistency.
How to Prepare Cakes for Drip Application
While perfecting ganache is essential, don’t overlook the cake’s temperature. A properly chilled cake is key to controlling those drips. After frosting, chill your cake for 30–45 minutes in the refrigerator or 10–15 minutes in the freezer before applying the ganache. The buttercream should feel firm to the touch - this cold surface slows the ganache and prevents it from melting the frosting on contact.
"Chilling your cake will help your drips stay in place once they're added and help prevent them from running down too far." – Chelsey White, Founder, Chelsweets
If you’re in a warmer climate like Los Angeles during summer, extend the chilling time to at least 45 minutes and opt for a heat-stable buttercream. Keep the cake refrigerated until about an hour before serving to prevent the frosting from softening in the heat. For outdoor events, leave the cake in the fridge until the last possible moment. Make sure the drips are fully set - this usually takes about 10 minutes - before moving the cake outside.
When to Apply Drips: Timing Guidelines
Getting the timing right is just as important as perfecting your ganache consistency and properly chilling your cake. These two elements - ganache cooling and cake chilling - need to align perfectly. If you rush either step, your drips might end up sliding all over the cake or barely forming at all. The ideal moment? When the ganache feels slightly warm to the touch and the cake is firm and cold. That’s when everything comes together beautifully.
Start by ensuring your cake’s buttercream is completely firm before applying the drips. At the same time, let your ganache cool at room temperature for 5–30 minutes, depending on how warm the room is, until it reaches a pourable "fudge sauce" consistency. Not sure if it’s ready? Test a small drip on the side of the cake. If it runs too quickly, let the ganache cool a bit longer. If it barely moves, warm it up slightly - five seconds in the microwave should do the trick.
"It's worth taking the extra few minutes to make sure your ganache is the perfect temperature." – Chelsey White, Founder, Chelsweets
For those in warmer climates, like Los Angeles, you might need to tweak your approach. Higher temperatures keep ganache fluid for longer, so you may need to extend the cooling time or work in a cooler room. Luckily, the area’s low humidity (27%–40%) helps keep the ganache from sweating or getting sticky. After applying the drips, pop the cake into the freezer for about 5 minutes or the fridge for 30 minutes to set everything in place. In particularly warm weather, keep the cake refrigerated until it’s time to serve. This careful timing ensures your drips stay neat and avoids any last-minute surprises.
sbb-itb-529d1c3
Creating Colored Drips with Mercken's Chocolate Wafers

Once you've nailed the timing and temperature for drip cakes, it's time to take things up a notch with custom-colored ganache. For bold, vibrant drips, Mercken's Super White chocolate wafers are a game-changer. Thanks to their bright, neutral base, they showcase gel food colors beautifully, ensuring your drips are true to the shade you want. At $9.50 per 1 lb bag, these wafers melt effortlessly and maintain the perfect consistency for smooth, reliable drips.
To create your ganache, melt the wafers with heavy cream. The cream is essential - it prevents the chocolate from seizing when you add color. Once the mixture is smooth, you can mix in your gel food coloring. Important tip: Never add food coloring directly to plain melted chocolate. Doing so will cause it to seize and become unusable.
"By melting the chocolate into the heavy cream, you prevent any seizing from the moisture in the food coloring. The cream will keep the mixture nice and smooth, even with the addition of food coloring." – Chelsey White, Founder, Chelsweets
For the best results, use high-quality gel food coloring. Its concentrated formula delivers rich, vibrant colors without altering the ganache's texture. After coloring, let the ganache cool until it's just barely warm before applying it to your chilled cake.
If you're in Los Angeles, you can grab Mercken's wafers at Gloria's Cake & Candy Supplies in Culver City. They offer same-day or 24-hour pickup, making it easy to stock up without waiting for shipping. Jamie P., a local bakery owner, shares her experience:
"As a bakery owner, I come to Gloria's anytime I need something special or last-minute. They have everything, and the staff is always so helpful and cheerful!"
Check out their online inventory to find exactly what you need - convenience and quality all in one place.
Drip Application Techniques: Tools and Methods
Once you've nailed the ganache temperature and properly chilled your cake, the final step to achieving those flawless drips is choosing the right application method. You’ve got two main options: the spoon method or the squeeze bottle method. Each has its perks, depending on your skill level and the look you’re going for.
Spoon Method
If you’re new to drip cakes, the spoon method is a great place to start. Grab a teaspoon and scoop up about 1–2 teaspoons of ganache. Gently scrape the bottom of the spoon against the bowl to get rid of any extra ganache. Then, position the spoon near the top edge of your chilled cake and carefully nudge the ganache over the edge. Let gravity do its thing as the ganache drips naturally down the sides.
Want some variety? Adjust the amount of ganache you push over the edge to create drips of different lengths. Once you’ve worked your way around the entire cake, pour the remaining ganache onto the center. Use an offset spatula to lightly spread it out until it meets the edge of the drips.
Squeeze Bottle Method
For those looking for more precision and speed, the squeeze bottle method is the way to go. Fill a plastic squeeze bottle with your ganache, then hold it at a slight angle as you work along the edge of the cake. This technique creates a clean, controlled "waterfall" effect. If you have a turntable, use it to rotate the cake smoothly while you guide the bottle.
To tweak the drip length, adjust the bottle’s tip placement: hold it closer to the center for shorter drips or nearer the edge for longer ones. After finishing the perimeter, remove the bottle’s cap and pour the remaining ganache onto the center of the cake. Smooth it out gently to connect the top with the drips. If you’re unsure about your technique, test it out first - more on that below.
Test Drip Protocol
Testing your drip is a simple but crucial step. Apply a small drop of ganache to the back of your chilled cake or into a room-temperature bowl, then wait about 60 seconds to see how it flows. If the ganache pools too much, let it cool down a bit longer. If it barely moves, warm it slightly. As Whitney from Sugar & Sparrow puts it:
"The good thing about a test drip is you're able to see how the ganache will behave. That way you don't have to commit until you like what you're seeing."
This quick test can save you from having to fix messy drips later. Once your ganache passes the test, you’re all set to create those elegant, cascading drips that make your cake look like a masterpiece.
Troubleshooting Drip Problems
Even with careful preparation, ganache drips can sometimes act up. The good news? Most issues have simple fixes once you pinpoint the problem. Building on the temperature and timing tips mentioned earlier, here are solutions to some common drip challenges.
If your drips stop short or barely form, it's likely because the ganache is too thick. This often happens when the mixture cools too much or there's too much chocolate compared to cream. Courtney Rich, founder of Cake by Courtney, shares:
"When it's warm, the consistency is thinner and smoother, making for the perfect drips down the side of your cake".
To fix this, gently reheat the ganache in 5–10 second bursts in the microwave - this prevents the chocolate from seizing. Another option is to heat 1/4 cup of heavy cream and stir it into the ganache to restore its silky texture.
If your drips run completely off the cake, the ganache might be too warm or have too much cream. Let it sit at room temperature for 10–15 minutes to cool slightly before using it.
Uneven or messy drips often happen when the pressure isn't steady or the cake isn't chilled enough. For better control, use a squeeze bottle and make sure the cake has been chilled for at least 30 minutes before applying the ganache.
The table below outlines common drip problems and how to fix them:
Table: Drip Troubleshooting Guide
| Issue | Cause | Solution |
|---|---|---|
| Drips too thick/short | Ganache is too cool or the chocolate-to-cream ratio is too high | Reheat in 5–10 second bursts or stir in heated heavy cream |
| Drips too thin/long | Ganache is too warm or contains too much cream | Let the ganache cool longer at room temperature or mix in additional chocolate chips |
| Uneven/Messy drips | Inconsistent pressure or applying to a warm cake | Use a squeeze bottle for steady control and ensure the cake is chilled for 30 minutes before dripping |
| Ganache Seizing | Overheating or using milk instead of heavy cream | Use high-fat heavy cream and avoid microwaving chocolate and cream together; pour hot cream over chocolate instead |
Conclusion
Let’s tie it all together - ganache, temperature, and timing are the secret ingredients to flawless drip cakes.
To get those picture-perfect drips, you need to master three key factors: ganache consistency, temperature control, and timing. It all starts with the right ratio of chocolate to heavy cream. Once you’ve prepped your ganache, chill your cake for 20–30 minutes. The ganache itself should feel just slightly warm to the touch, while the cake must be properly chilled to prevent unwanted runs.
"Chocolate ganache has definitely put me through the wringer before... After figuring out the perfect ratio for chocolate to heavy whipping cream and learning the do's and don'ts of drip cakes, I've got it down to a science these days." – Whitney DePaoli, Founder, Sugar & Sparrow
If the drips slide too far, let the ganache cool a bit longer. If they don’t move enough, a quick reheat will do the trick.
Using high-quality ingredients and tools can make all the difference. Bakers in Los Angeles have relied on Gloria's Cake & Candy Supplies since 1972 for premium products and expert advice. Their knowledgeable staff understands the unique challenges of achieving perfect drip cakes.
With a little practice, the right techniques, and attention to detail, you’ll be creating drip cakes that look straight out of a bakery. Whether you’re navigating the mild Los Angeles weather or tweaking for seasonal temperature changes, these methods will help you nail it every time.
FAQs
How can I adjust ganache if it’s too thick or too thin for a drip cake?
If your ganache turns out too thick, gently warm it up to make it smooth and pourable - this ensures clean, even drips on your cake. On the flip side, if it’s too thin, let it cool down a bit or rest at room temperature until it reaches the perfect consistency.
For drip cakes, the ganache should be warm (but not overly hot) so it flows nicely without running all the way down the sides. Getting the temperature and texture just right is the secret to nailing the drip effect.
What is the best temperature for applying ganache to achieve perfect drips?
For perfect cake drips, ganache should be at an ideal temperature of 90°F to 93°F. Within this range, the ganache achieves the right balance - fluid enough to flow smoothly down the sides of the cake, yet thick enough to stay in place without running off. Using a thermometer is crucial to hit this sweet spot, as temperatures outside this range can lead to drips that are either too runny or clumpy.
Environmental factors can also play a role. For instance, the warm weather in places like Los Angeles may slightly alter the ganache's texture. If you notice any changes, you can fine-tune the temperature by gently warming or cooling the ganache in small steps to keep it just right.
How do I make colorful drips for my cake?
To create colorful drips for your cake, start with a simple white chocolate ganache. Heat heavy cream (stick to a 2:1 ratio of white chocolate to cream) until it’s steaming. Pour the hot cream over finely chopped white chocolate, let it sit for about a minute, and then stir until the mixture is smooth. Once the ganache cools to a pourable yet slightly thick consistency, mix in gel food coloring to get your desired color. Gel food coloring is ideal because it blends seamlessly without affecting the texture.
If you’re going for chocolate-based drips, use the same method but swap in regular chocolate. In warmer places, like Los Angeles, you might need to reduce the cream slightly or allow the ganache to cool longer to ensure the drips hold their shape. Always check the consistency before decorating - this helps avoid drips that are too runny or uneven. With these tips, you’ll be able to create bright, polished drips that take your cakes to the next level!
Shop Supplies at Gloria's
Everything mentioned in this article is available at our Culver City shop. Come see it in person or browse online.
Shop at Gloria's11117 Washington Blvd, Culver City • Tue-Sat 10am-6pm • (323) 289-8807
Related Blog Posts
- How to Make Chocolate Curls for Cakes
- Why Chocolate Seizes and How to Avoid It
- Thanksgiving Cake Decorating: Fall Colors and Flavors
- Mirror Glaze Mastery: Achieving Perfect Reflective Finishes at Home

