
Cake stencils are a simple way to create professional-looking designs without advanced decorating skills. Whether you're working with buttercream, fondant, or an unfrosted surface, stencils can help you add clean patterns, textures, or colors to your cakes. Key techniques include:
- Buttercream Stenciling: Spread thick icing over the stencil for a raised effect.
- Airbrushing: Use an airbrush or edible spray for smooth, blended colors.
- Dusting: Sift powders like cocoa or sugar for a delicate finish.
To get started, you'll need flexible stencils, an offset spatula, and tools like icing scrapers or airbrush machines. Proper preparation, such as chilling buttercream or drying fondant, ensures crisp designs. With the right technique, even beginners can create polished cakes with ease.
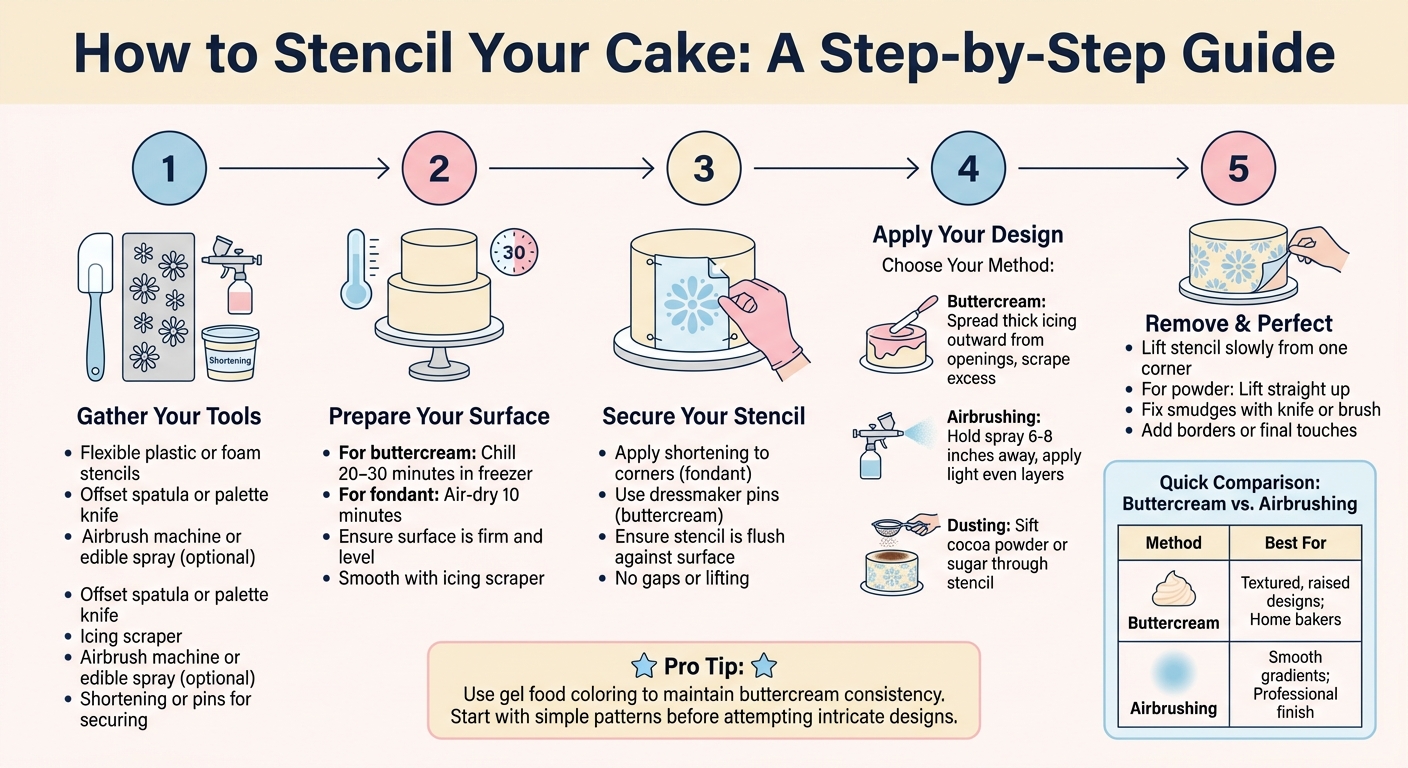
Step-by-Step Guide to Cake Stenciling Techniques
16 Ways To Use Stencils On Cakes
Tools and Materials You'll Need
Having the right supplies is key to achieving precise cake stenciling. Flexible plastic or foam stencils are ideal because they can bend and conform to your cake's curves. Avoid using paper or cardboard stencils - they don’t hold up well against moisture or buttercream. Metal stencils are better suited for flat surfaces like cookie tops or cake boards, as they’re too rigid for curved cake sides.
Stencils and Decorating Tools
Choose stencils that match the size of your project. For reference: cupcake stencils are typically about 3.5 inches, cookie stencils average 5.5 inches, and full cake stencils are around 6 inches. It’s best to start with stencils that have larger openings, as these are easier to work with than those featuring intricate designs. If your stencil has hard plastic corners, trimming them can help prevent damage to your frosting.
To apply buttercream, use an offset spatula or palette knife for even coverage. An icing scraper is handy for removing excess icing and creating clean, sharp lines. If airbrushing is part of your plan, you’ll need an airbrush machine or edible spray cans. Hold the spray about 6 to 8 inches away from the cake’s surface to avoid puddling. To keep the stencil in place, you can use a dab of vegetable shortening on the corners, secure it with dressmaker pins (great for practice cakes), or use a parchment paper collar taped around the cake.
Choosing Between Buttercream and Fondant
Buttercream-frosted cakes should be chilled for about 30 minutes before stenciling. This helps firm up the surface, reducing the risk of tearing or smearing. The result? A textured, raised effect when spreading icing through the stencil. Fondant, however, offers a dry, stable surface that works well for techniques like applying lustre dust or edible sprays. If you’re using fondant, let it air-dry for roughly 10 minutes after covering the cake to eliminate surface moisture before stenciling.
For royal icing, consistency is key - it should be thick and pliable, similar to toothpaste. As Craftsy explains:
"If your icing is too runny, it will seep under the stencil and create a messy, gloopy-looking print".
Other options include using cocoa powder, powdered sugar, or cinnamon for a subtle, dusted finish. Simply sift them through a fine mesh sieve over the stencil.
Once your base is prepped, upgrading your tools can help you achieve even crisper designs.
Professional Supplies from Gloria's Cake & Candy Supplies
If you’re aiming for professional results, high-quality supplies can make all the difference. At Gloria's Cake & Candy Supplies in Culver City, you’ll find everything from high ratio shortening for stabilizing buttercream to premium fondant for smooth finishes. They also stock specialized airbrushing tools and Mercken's coating chocolates, which are perfect for airbrushing techniques and creating flawless drips. Need a custom touch? Their same-day edible image printing service allows you to design personalized cake toppers with intricate details.
One customer raved about the store, saying:
"This shop has EVERYTHING you need to decorate your cake in full celebration and style".
Preparing Your Cake Surface
Getting your cake surface ready is the first step toward achieving crisp, clean stencil designs. A firm, level surface is crucial for professional results. If your buttercream is too soft, the stencil might sink in or stick, ruining the design. As Craftsy advises:
"Your cake needs to be chilled solid before you begin stenciling. Soft buttercream will smear easily, and if your cake isn't chilled all the way through it may dent with all the steadying and spreading as you work."
Once your surface is firm, you’re ready to prepare for precise stencil placement.
Chilling and Smoothing the Surface
For buttercream cakes, chill the cake in the freezer for about 20 to 30 minutes after applying a smooth base layer. Use an icing scraper to even out the frosting before chilling, ensuring the stencil sits flat against the surface. If you’re working with fondant, let it air-dry briefly to eliminate any tackiness. For longer projects, allow the fondant to firm up completely. Be sure to brush away any excess cornstarch or powdered sugar from the fondant so the stencil adheres properly.
Once your surface is smooth and firm, it’s time to focus on precise measurements for stencil alignment.
Measuring for Accuracy
Most damask or repeated-pattern stencils are around 6 inches tall, so ensure your cake tier is at least 5 to 6 inches high for proper placement. Apply a 1/4-inch layer of frosting or fondant to create a stable base. If your cake has a domed top, flip it over and use the flat bottom as your stenciling area instead.
A revolving turntable can make it easier to rotate the cake while keeping your stencil placement consistent and measurements accurate. To avoid disturbing the chilled buttercream as you work, lightly rest a piece of parchment paper greased with shortening on top of the cake. These steps will help you achieve precise and professional-looking stencil designs.
sbb-itb-529d1c3
How to Apply Stencils to Cakes
Once your cake is prepped and ready, it’s time to bring your design to life using stencils. With a smooth, chilled surface as your base, follow these steps to apply stencils effectively and achieve a polished result.
Securing Stencils in Place
Keeping the stencil steady is key to getting crisp, clean lines. For fondant-covered cakes, apply a small amount of shortening (like Crisco) to the corners or back of the stencil to help it stick securely. If your cake is covered in buttercream, use dressmaker or pearl-headed pins to hold the stencil in place. Push the pins through the stencil holes before positioning it to avoid damaging the frosting. Another option is to cut 1-inch slits into the stencil edges and secure it by tying a ribbon or tape around the cake.
Applying Buttercream Through Stencils
For buttercream designs, use frosting with the texture of smooth, room-temperature peanut butter. Spread the buttercream outward from each stencil opening, lifting your spatula slightly to prevent it from seeping underneath. Once applied, use a cake scraper or offset spatula to remove any excess buttercream, leaving a thin, even layer that’s flush with the stencil surface. The chilled cake helps the buttercream set quickly, resulting in sharp, clean lines. Be sure to wash and dry your stencil between applications to keep edges crisp and avoid unwanted smudges.
Airbrushing Over Stencils
Airbrushing offers a polished look, perfect for gradients and ombré effects. Hold the airbrush or edible spray bottle 6 to 8 inches from the cake surface to apply a fine, even mist. Make sure the stencil is completely flush against the cake to prevent the color from bleeding underneath and blurring the design. Apply light, even layers, as saturating one area can lead to puddles that smudge or dry unevenly. Before starting, shake the spray bottle and test it on scrap paper. Allow the design to air-dry for 10 to 15 minutes before removing the stencil or touching the cake surface. This method creates crisp, vibrant designs that pair beautifully with a well-prepared cake surface.
Buttercream vs. Airbrushing Comparison
| Method | Advantages | Best For |
|---|---|---|
| Buttercream | Simple to use with basic tools; adds texture and dimension | Home bakers, bold or rustic designs |
| Airbrushing | Smooth, professional finish with gradient effects | Advanced designs, professional decorators |
Removing Stencils and Final Details
Removing Stencils Without Smudging
Taking off a stencil without ruining your design requires a steady hand and patience. Start by gently lifting one corner to confirm the design transferred cleanly before fully removing the stencil. For buttercream designs, peel the stencil slowly in one direction - beginning at a top corner or side - to avoid dragging the icing and breaking its clean edges.
"Let the stencil pull away naturally at first, if this doesn't happen, from the top corner gently and slowly pull away the stencil in one direction." – Casey, Cake Artist, Cake by Casey Lee
When working with dry materials like cocoa powder or confectioners' sugar, lift the stencil straight up rather than peeling it. This prevents extra powder from falling onto clean sections and smudging your design. For chilled cakes, the stencil might naturally loosen as the buttercream firms, so allow this to happen instead of forcing it. Once the stencil is off, inspect the design and fix any small flaws immediately.
Fixing Edges and Imperfections
Even with careful handling, minor imperfections can happen. If edges are smudged or icing bleeds, chill the cake further to firm up the buttercream. Then, use a food-safe brush or the tip of a sharp knife to gently scrape away any excess icing.
"Buttercream smears will be easier to scrape away when the cake is firm." – Craftsy
For designs that need more definition, an edible marker can help sharpen edges and hide small flaws. You can also enhance the look by adding precise borders or other finishing touches.
Adding Borders and Final Touches
A piped pearl border is a simple way to hide uneven edges, while piped flowers or dots can cover any small holes left by securing the stencil. Adding dimension - like piping the centers of stenciled flowers - gives the design a layered, dynamic look. To ensure these details hold their shape, make sure the cake is well chilled before applying them. This helps prevent sagging or smearing, keeping your final touches crisp and clean.
Conclusion
Stenciling can transform cakes into stunning works of art. The key is to start with a well-chilled cake, use thick, pliable icing, and ensure your stencil stays flush against the surface for sharp, clean designs.
"Flexibility is key when using stencils on buttercream. Look for ones that are thin and bendy, so they'll easily form to the cake's curves." – Craftsy
The tools you use make all the difference. Flexible, professional-grade stencils - made from thin plastic or foam - are perfect for adapting to curved surfaces and can handle repeated use. Pair these with gel food coloring to maintain your buttercream’s consistency without thinning it out. For beginners, starting with simple patterns is a great way to build confidence before moving on to more intricate designs.
Gloria's Cake & Candy Supplies provides a wide range of high-quality decorating tools and ingredients. Whether you're a home baker trying stenciling for the first time or a professional looking to expand your skills, their expert support and same-day pickup can help you achieve your goals.
FAQs
How can I keep stencils from smudging on buttercream cakes?
To keep your buttercream cakes looking flawless when using stencils, start by making sure the buttercream is smooth and well-chilled. A cold, firm surface ensures the stencil stays in place and prevents any unwanted movement or smudging.
Secure the stencil to the cake with light pressure or tools like dressmaker pins - just be careful with placement. For best results, use thin, flexible stencils, especially on curved surfaces, as they help create clean and precise designs. Once secured, gently apply buttercream, airbrush color, or edible paint. When you're done, carefully remove the stencil to preserve those sharp edges.
Need professional-grade stencils or tools? Stop by Gloria's Cake & Candy Supplies in Los Angeles. They've been a go-to spot for bakers since 1972, and their knowledgeable staff can help you find exactly what you need for your next masterpiece!
What tools do I need for airbrushing cake designs?
To craft impressive cake designs using airbrushing, start with a food-safe airbrush kit that offers adjustable pressure settings. These settings give you better control, allowing for precise and detailed work. Before diving into decorating cakes, practice on parchment paper or a similar surface to refine techniques like creating gradients or achieving smooth stenciled designs. Don’t forget to protect your workspace - cover it with disposable materials such as butcher paper or plastic tablecloths to keep things tidy. With the right equipment and some practice, you’ll be creating cakes that look like they came from a professional bakery!
Can I use stencils on both fondant and buttercream?
Yes, you can definitely use stencils on both fondant and buttercream, but the technique varies slightly depending on the surface. For fondant, make sure it’s smooth and just a bit tacky so the stencil sticks well. Once it’s secure, you can apply icing or edible color over the stencil to create your design.
For buttercream, it’s important to chill the cake thoroughly first - this keeps the frosting firm and prevents smudging. Hold the stencil firmly in place while applying your pattern for clean, crisp results.
With some practice, stencils can transform your cakes into works of art with eye-catching, professional designs!
Shop Cake Decorating Supplies
Stencils, airbrush supplies, piping tips, and edible decorations at Gloria's.
Shop at Gloria's11117 Washington Blvd, Culver City • Tue-Sat 10am-6pm • (323) 289-8807
Related Blog Posts
- How to Make Fondant Letters Without Cutters
- How to Make Rustic Fall Cake Toppers
- How to Paint Fondant Flowers
- How to Blend Colors for Ombre Cakes

