
Airbrushing chocolate can elevate your cake designs, and Mercken's chocolate wafers make the process straightforward. Here's what you need to know:
- Why Mercken's? Their Rainbow™ line melts easily without tempering, offering consistent texture perfect for airbrushing.
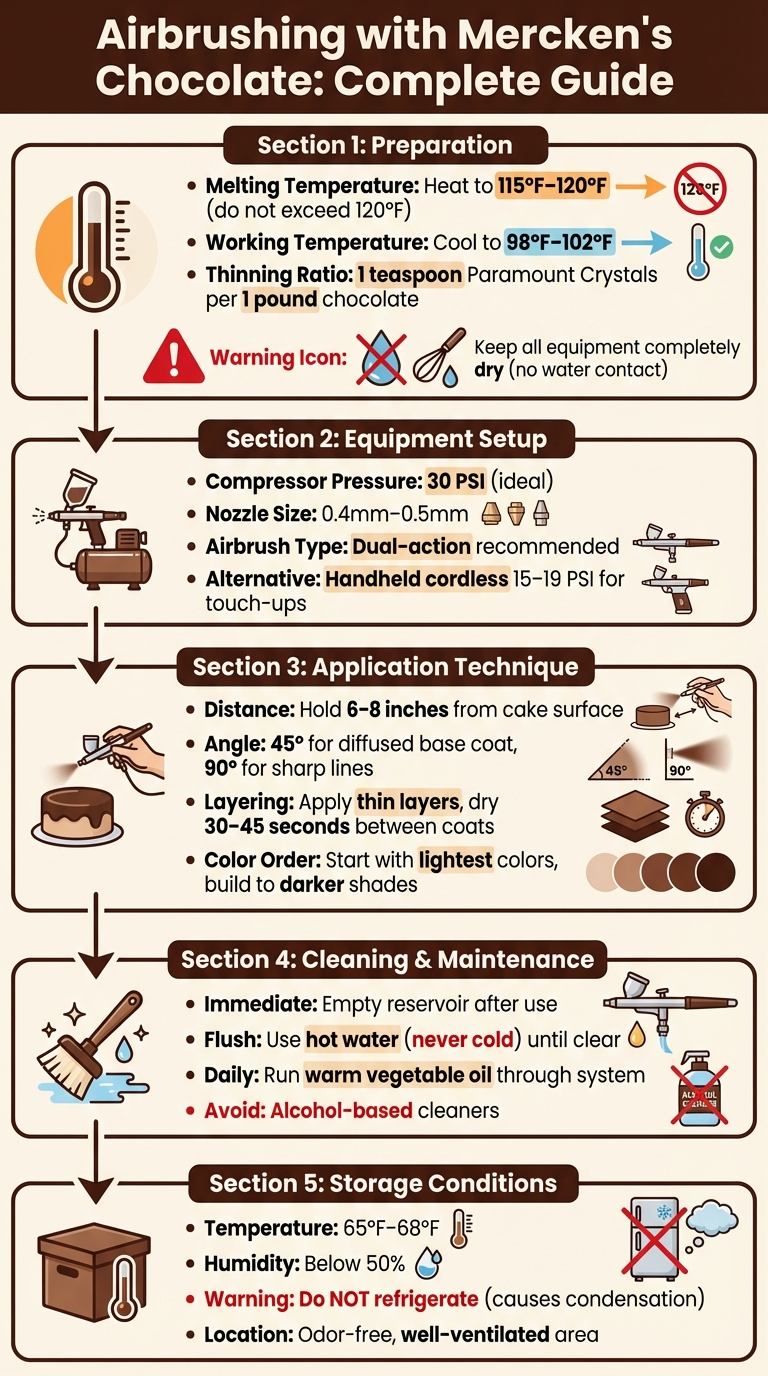
- Preparation: Melt the chocolate to 115°F–120°F, cool to 98°F–102°F, and thin it with Paramount Crystals for smooth spraying.
- Equipment: Use an airbrush with a 0.4mm–0.5mm nozzle and a compressor set to 30 PSI for even coverage.
- Techniques: Maintain a 6–8 inch distance, apply thin layers, and practice on dummy cakes before final designs.
- Troubleshooting: Address clogs, uneven sprays, or seizing by ensuring proper chocolate consistency and clean tools.
Proper storage and careful reheating ensure your airbrushed cakes remain flawless. Master these basics, and you'll create polished, professional designs.
Step-by-Step Guide to Airbrushing with Mercken's Chocolate
Easy AirBrush Chocolate Decorations Tutorial
Preparing Mercken's Chocolate for Airbrushing

To get Mercken's chocolate ready for airbrushing, you need to focus on two essential steps: melting it to the correct temperature and thinning it to a sprayable consistency. Skipping either of these can lead to clogged nozzles or uneven application.
How to Melt Mercken's Chocolate
Start by microwaving ½ pound of Mercken's chocolate wafers in a glass container. Heat on high for 30 seconds, then stir thoroughly to eliminate any hot spots. Continue heating in 15–30 second intervals, stirring after each round, until the chocolate is fully melted.
The key is to heat the chocolate to a temperature between 115°F and 120°F - but don’t go over 120°F, as this can burn the chocolate. Once melted, let it cool to a working temperature of 98°F–102°F before airbrushing. As Royal Wholesale Candy advises:
"The recommended working temperature for the Merckens® confectionery wafers is about 102°F. Always stay above 98°F and DO NOT EXCEED 120°F."
White and colored coatings are especially delicate and can burn more quickly than milk or dark chocolate. For these, reduce microwave intervals to 10–20 seconds to avoid overheating. Also, ensure all equipment is completely dry - just a few drops of water can cause the chocolate to seize.
Once the chocolate is at the right temperature, you’re ready to thin it for a smooth, even spray.
Thinning Chocolate with Paramount Crystals
Melted chocolate is naturally too thick for airbrushing, so you’ll need to thin it using Paramount Crystals. These flakes, made from hydrogenated palm kernel oil, are perfect for adjusting the consistency. Add 1 teaspoon of Paramount Crystals per 1 pound of melted chocolate and stir until fully dissolved. For an even thinner mixture, some decorators use 1 teaspoon per 1 cup of chocolate.
If the crystals don’t dissolve completely after stirring, microwave the mixture for an additional 5–10 seconds and stir again until smooth. To keep the chocolate fluid during longer decorating sessions, place the container on a heating pad covered with a paper towel.
Setting Up Your Airbrushing Equipment
Once your Mercken's chocolate is melted and thinned to the right consistency, it's time to focus on your airbrushing setup. The combination of a well-prepared compressor and a reliable airbrush gun is essential for achieving smooth, even coverage. Proper setup ensures that all the techniques you've learned come together seamlessly, avoiding clogs and uneven application.
Choosing the Right Compressor and Nozzle
For chocolate airbrushing, a compressor rated at 30 PSI is ideal. As Evil Cake Genius explains:
"High pressure is your best friend - it gives you that smooth, even spray you're after."
If you're just doing occasional touch-ups, a handheld cordless compressor (15–19 PSI) can get the job done and typically costs less than $50. However, for larger projects or frequent use, consider investing in a standard or commercial-grade compressor with a range of 20–30+ PSI for consistent performance.
When it comes to nozzles, a 0.4mm–0.5mm nozzle is the sweet spot for chocolate. This size handles thicker liquids like chocolate without clogging. Smaller nozzles, such as 0.3mm, are better suited for intricate details but tend to block quickly when used with chocolate. For maximum control, opt for a dual-action airbrush - press down for air and pull back for color. This gives you the flexibility to switch between fine details and broader coverage with ease.
Once you've selected your equipment, keeping it clean and well-maintained is crucial to ensure smooth operation.
Cleaning and Maintaining Your Airbrush
Cleaning your airbrush immediately after use is non-negotiable. As Evil Cake Genius emphasizes:
"Cleaning immediately after use is key."
Start by emptying any leftover chocolate from the reservoir. Then, use a cotton swab dipped in food-safe airbrush cleaner to wipe down the cup and nozzle tip. After this, flush the airbrush with warm or hot water (never cold, as it can cause the chocolate to harden) until the water runs clear. For a deeper clean, back-flush the airbrush by covering the nozzle cap and pulling the trigger to push out any remaining chocolate.
At the end of the day, run a small amount of warm vegetable oil through the airbrush. This prevents the chocolate fats from crystallizing and clogging the system overnight. Avoid using alcohol-based cleaners, as they won’t dissolve chocolate or cocoa butter effectively. Finally, ensure the airbrush is completely dry before storing it to maintain its performance.
Airbrushing Techniques with Mercken's Chocolate
Applying Base Coats and Layering Colors
When airbrushing, positioning is everything. Hold the airbrush about 6–8 inches away from the cake. For a smooth, diffused base coat, aim at a 45° angle. If you need sharp, defined lines, switch to a 90° angle. This technique helps avoid issues like pocking (caused by being too close) or overspray (from being too far). As Wilton points out:
Just like using a piping bag, pressure, speed, and angle are super important.
Maintain a steady motion - whether you're moving side-to-side or in circles. Using a turntable can help you keep the same distance from the cake as you work. Apply thin layers of color, letting each layer dry for 30–45 seconds before adding the next.
If you're aiming for a gradient effect, start with the lightest color and build up to darker shades. Use light trigger pressure, especially when working with delicate colors like yellow or white. As Confection Couture Stencils explains:
The #1 key to getting lighter colors is to use light trigger pressure when you start the color flowing - even if you can't see it flowing at first!
Take your time to perfect these techniques before working on your final design.
Practicing on Dummy Cakes
Before diving into your actual cake, practice is essential. Use a dummy cake or another practice surface to refine your hand movements and trigger control. Sketch your design beforehand to plan the color application sequence - always starting with lighter shades and moving to darker ones. To avoid a messy workspace, cover your area with butcher paper, newspapers, or a plastic tablecloth. This preparation ensures you can focus entirely on your technique without worrying about cleanup.
sbb-itb-529d1c3
Troubleshooting Common Airbrushing Problems
Even with the best setup and technique, airbrushing can sometimes hit a snag. Here’s how to tackle some of the most common issues.
Fixing Clogged Nozzles
Clogs are a frequent frustration when applying base coats or layers, often caused by chocolate that isn’t fully melted or thinned properly. Even the smallest unmelted particle can block the nozzle. Professional chocolatier Ruth Atkinson-Kendrick highlights this issue:
I have found that if there is even a tiny amount of butter that is not melted, it will clog. I tend to run my butter a bit warm to make sure it is melted.
If your melted chocolate still feels grainy, running it through a food processor can smooth it out. Cake decorator Myeisha shares her tip:
What I did was put it in a food processor after melting and it came out smooth.
Sometimes, the problem isn’t the nozzle itself but a blocked air hole in the reservoir lid, which prevents the vacuum needed to draw the chocolate through the system.
For clogs, start by flushing the airbrush with hot water. If the blockage persists, cover the nozzle cap, pull the trigger, and let hot water work its way through. To prevent future clogs, spray warm water through the airbrush between color changes or if it’s been idle for more than a few minutes. Keep spraying until the flow runs clear.
Correcting Uneven Spray Patterns
Blotchy or uneven coverage is often the result of incorrect pressure or poor technique. Adjusting the compressor’s PSI can help properly atomize thicker chocolate. Evil Cake Genius offers this advice:
If your color is blotchy, you're probably too close to the surface or pulling the trigger too hard.
Movement is key - keep your hand steady, using circular or side-to-side motions. Staying in one spot too long can lead to uneven coverage. If you’re using a bottle-fed system, slightly unscrewing the lid can improve fluid flow. Also, check the needle by rolling it on white paper; bends in the needle can cause spray issues. For the best results, build up color gradually with thin layers instead of trying to achieve full coverage in one pass.
Preventing and Fixing Chocolate Seizing
Mercken's Rainbow™ wafers are oil-based and highly sensitive to water. Even a single drop of water can cause the chocolate to seize. Royal Wholesale Candy emphasizes:
Rainbow™ wafers are oil-based, so never let water come in direct contact with them. Make sure all tools and your working area are completely dry throughout your candy making process.
After cleaning your airbrush, take a few minutes to blow dry it thoroughly to ensure there’s no residual moisture. Avoid refrigerating or freezing the wafers, as condensation can form when they return to room temperature, introducing unwanted moisture during melting.
To minimize issues, work in an environment with less than 50% humidity. Keep your chocolate between 98°F and 102°F during airbrushing. If the chocolate thickens but hasn’t fully seized, you can restore its smooth consistency by adding 1 teaspoon of Paramount Crystals per 1 cup of chocolate.
Storing and Maintaining Airbrushed Cakes
Temperature and Humidity Requirements
Once you’ve mastered your airbrushing technique, the next step is ensuring your cake stays picture-perfect. Proper storage is key to preserving the design. Keep airbrushed cakes in a space where the temperature ranges between 65°F and 68°F and the humidity stays below 50%. This helps prevent issues like smudging, melting, or condensation.
Condensation is a common challenge when moving cakes from a cooler environment to room temperature. Sweating and beading can ruin your design. To avoid this, if cooling the cake is necessary, opt for a cool space between 45°F and 65°F with good airflow. Avoid prolonged refrigeration, as it can lead to moisture buildup. A ceiling fan or a well-ventilated area is ideal for setting chocolate without introducing unwanted condensation. Royal Wholesale Candy emphasizes this point:
To avoid condensation, DO NOT place in refrigerator or freezer. Condensation can develop when wafers are removed and brought back to room temperature.
Additionally, keep your cakes away from strong odors. Oil-based coatings, like those often used in airbrushed designs, can absorb smells from their surroundings. Storing cakes in a clean, odor-free, and well-ventilated space ensures both the look and flavor of your creation remain intact.
Reheating Chocolate for Touch-Ups
When it’s time for touch-ups, reheating chocolate requires care. Warm the chocolate gently, keeping the temperature between 98°F and 102°F, and never let it exceed 120°F - this prevents scorching or losing its glossy finish. A candy thermometer is your best friend here to ensure precision.
Before reheating, make sure all tools are completely dry. If the chocolate has thickened during storage, you can restore its smoothness by adding Paramount Crystals. Use about 1 teaspoon of crystals per 1 cup of chocolate, adjusting as needed for the desired consistency. This small step can make a big difference in achieving a flawless finish.
Conclusion
Airbrushing with Mercken's chocolate is simple once you get the basics right. The key steps? Properly melt and cool your chocolate, and ensure all your tools are completely dry before starting.
Your equipment and technique play a big role too. Make sure your airbrush setup meets the recommended specifications, prep your tools to avoid clogs, and clean the airbrush thoroughly after each use. As Wilton advises:
Cleaning the pipes well after each use will prevent ugly splatters on your cakes down the road.
This small step can save you a lot of hassle later.
Use the troubleshooting tips and practice techniques shared earlier to perfect your control and precision. Always test your technique on a practice surface first, keeping the airbrush at the right distance and using smooth, steady movements to layer the chocolate evenly.
Finally, proper storage is essential. Keep your finished cakes in an environment between 65°F–68°F with humidity below 50%. Avoid refrigeration to prevent condensation, and store cakes in a neutral-smelling area to maintain their quality.
With these steps, you’ll be on your way to creating professional-grade designs. Start with a simple base coat, practice on test surfaces, and work your way up to intricate, polished designs.
FAQs
What are Paramount Crystals, and how do they help with chocolate airbrushing?
Paramount Crystals are a go-to ingredient for anyone working with melted chocolate. They help thin the chocolate, making it smoother and easier to handle, especially when airbrushing. By improving the consistency, these crystals ensure the chocolate flows evenly, preventing clumps or airbrush clogs.
What’s great about Paramount Crystals is that they don’t alter the chocolate’s flavor or color. This makes them a perfect choice for achieving professional-level results in cake decorating or candy-making projects.
How do I stop my airbrush from clogging when using Mercken's chocolate?
To prevent your airbrush from clogging when working with Mercken's chocolate, it's all about getting the temperature just right. Melt the chocolate to about 102°F, keeping it above 98°F but staying under 120°F. This sweet spot ensures the chocolate stays smooth and flows easily.
Since Mercken's chocolate wafers are oil-based, keep them far away from water during preparation and use. Even a small amount of water can make the chocolate seize up, creating clogs. For an extra smooth finish, run the melted chocolate through a fine mesh to catch any lumps or particles before loading it into your airbrush.
Make sure you're using a clean, food-grade airbrush, and give it a thorough cleaning after every use. Regular maintenance will keep your airbrush in top shape, ready for all your cake decorating adventures!
How should I store airbrushed cakes to keep them looking their best?
To keep your airbrushed cakes looking flawless, steer clear of refrigeration. The cold can cause sweating, which may lead to color bleeding and ruin the design. Instead, store your cake in a cool, dry spot, away from direct sunlight or any moisture. For best results, ensure the room is well-ventilated - using a ceiling fan can help the airbrushed design dry and set without issues.
Shop Airbrushing & Chocolate Supplies
Airbrush kits, Merckens wafers, food coloring, and chocolate molds at Gloria's.
Shop at Gloria's11117 Washington Blvd, Culver City • Tue-Sat 10am-6pm • (323) 289-8807

