
Creating deep black and bold red frosting can be tricky, but with the right methods, it’s entirely doable without compromising flavor or texture. Here’s what you need to know:
- Choose concentrated gel or powdered food coloring for intense hues without altering consistency.
- Start with the right base: Use black cocoa for black frosting or a pure white base for red to reduce the amount of dye needed.
- Let colors develop over time: Rest frosting overnight or use heat to deepen shades.
- Avoid bitterness: Balance flavors with vanilla extract or lemon juice, and opt for high-quality, no-taste gels.
These techniques ensure vibrant colors while maintaining the quality of your frosting. Keep reading for detailed methods and product recommendations.
Tips & Tricks for Making Dark Buttercream Colors Like Black, Red, and Navy
Selecting the Right Food Coloring Products
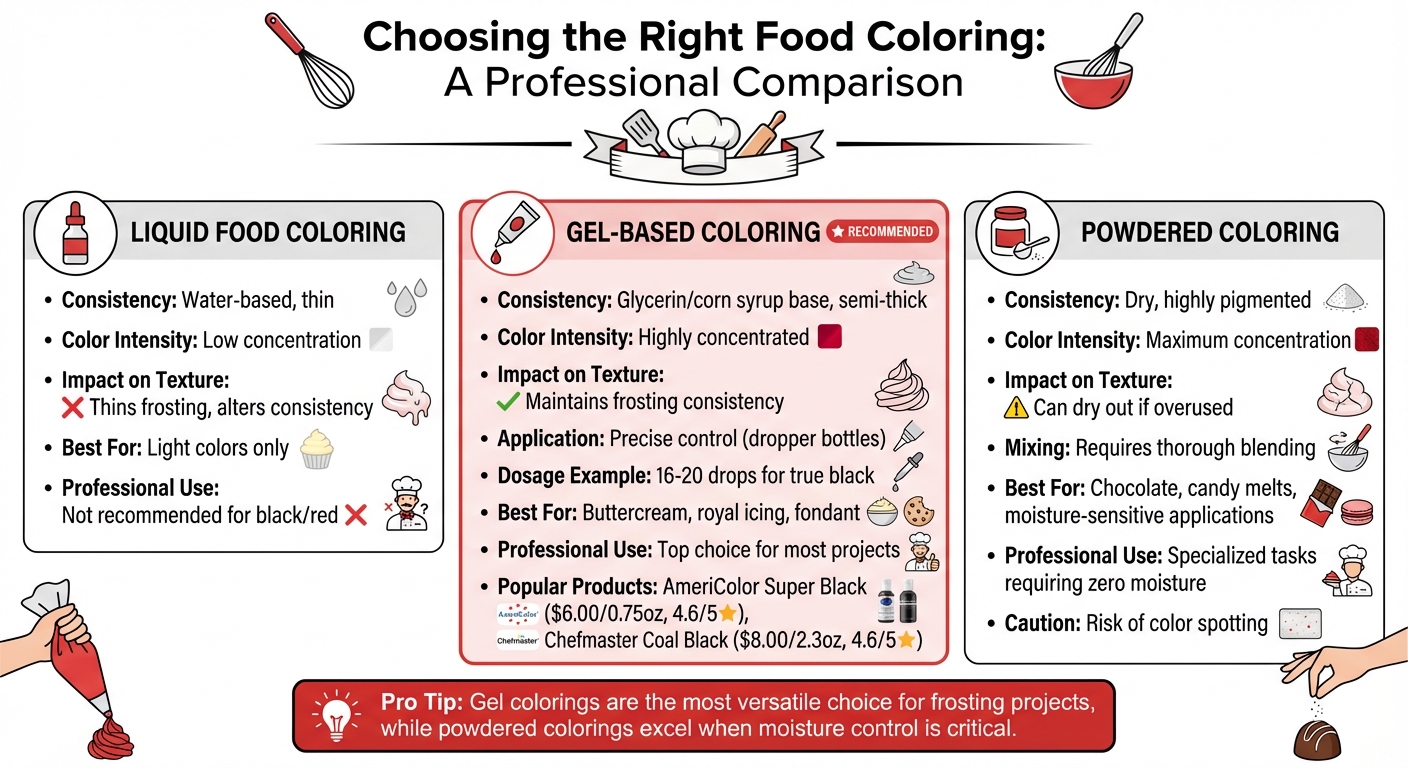
Food Coloring Types Comparison: Gel vs Powder vs Liquid for Black and Red Frosting
Choosing the right type of food coloring can make or break your efforts when tackling tricky shades like black and red. Professionals often rely on gel-based or powdered colorings for these intense hues, as liquid food colorings typically fall short.
Liquid food colorings, being water-based, can thin your mixture, which can negatively impact texture and structure. As Micah A. Leal, Chef and Recipe Developer at Southern Living, puts it:
"The gel and paste are more concentrated in color and less likely to alter the consistency of your frosting or fondant than the liquid food coloring."
Because gels and powders pack denser pigments, they require less product to achieve bold, professional-quality colors without compromising the integrity of your recipe. Let’s break down the unique advantages of gel-based and powdered colorings for achieving those intense shades.
Gel-Based Food Coloring Benefits
Gel-based colorings, made with glycerin or corn syrup, have a smooth, semi-thick consistency that blends effortlessly into buttercream, royal icing, and fondant without adding unwanted moisture . Their highly concentrated formulas ensure vibrant results while maintaining the texture of your creations.
For example, AmeriColor Super Black Soft Gel Paste ($6.00 for 0.75 oz) and Chefmaster Coal Black Liqua-Gel ($8.00 for 2.3 oz) are top-rated options, each scoring 4.6/5 on Amazon. These gels are designed to be tasteless, so even when you use 16 to 20 drops for a rich, true black, you won’t have to worry about introducing bitter or chemical flavors.
Another key advantage is their precise application. Gel colorings often come in dropper bottles or squeeze tubes, making it easy to control the intensity by adding color gradually - starting with just 1–2 drops. This level of control is invaluable when you’re aiming for a specific shade or need consistent results across multiple batches.
Powdered Food Coloring Benefits
Powdered colorings are the go-to choice when moisture control is critical. Their dry, highly pigmented formula makes them ideal for applications like coloring chocolate, candy melts, or certain fondants, where even a small amount of liquid could cause problems.
These powders deliver intense color without altering the consistency of your medium. However, it’s important to use them carefully - too much powder can dry out your mixture, so finding the right balance is key. Thorough mixing is also necessary to avoid color spotting, but the precision they offer makes them invaluable for specialized tasks where moisture must be kept to an absolute minimum.
For most frosting and buttercream projects, gels are typically the more versatile choice. But when working with chocolate or in situations where even the slightest moisture can cause issues, powdered colorings are your best bet.
Preparing the Right Base Ingredients
Getting the base right is a game-changer when it comes to creating professional-quality black and red frostings. It not only reduces the amount of dye needed but also helps avoid that unpleasant bitter aftertaste. In fact, laying the proper foundation is just as important as perfecting your coloring techniques later on.
When working with black frosting, starting with a naturally dark base like chocolate or cocoa gives you a head start. Instead of struggling to transform pure white frosting into black - which often requires a lot of dye and can mess with the texture - you’re simply intensifying an already dark shade. As Chelsey White, Founder of Chelsweets, puts it:
"Starting off with a naturally darker colored frosting base makes it so much easier."
On the other hand, red frosting requires a completely different approach. You need a pure white base to ensure the red pigment stands out. If your buttercream has a natural yellow tint (common with butter-based recipes), it can shift your red toward orange or dull its vibrancy. Using high-ratio shortening solves this issue, providing a neutral base that allows the red to shine.
Black Base: Cocoa and Dark Chocolate
To achieve true black frosting, black cocoa powder is your best friend. This ultra-Dutch processed cocoa has a pH of 8 (compared to the pH of 5–6 in natural cocoa), giving it a rich, near-black color and a bittersweet "Oreo-like" flavor. Starting with black cocoa buttercream means you’re working from a dark brown base that requires much less gel coloring to reach a true black. This avoids the dreaded washed-out, grayish tone that often happens with white-based frostings.
If black cocoa isn’t available, melted dark chocolate is a great alternative. It naturally deepens the base color while adding a layer of richness. Plus, using less food dye helps you steer clear of the bitter chemical taste that can come from overloading on food coloring.
While a dark base is key for black frosting, red frosting calls for a completely neutral starting point.
Red Base: Buttercream and High-Ratio Shortening
For bold, vibrant red frosting, you’ll want to start with "Snow White" buttercream made with high-ratio shortening. This type of buttercream provides a perfect neutral canvas, allowing the red color to truly pop.
Here’s why it matters: Butter has natural yellow undertones that clash with red pigments, often pulling the color toward orange or coral. If your base isn’t pure white, even small amounts of blue coloring could take on an unintended greenish hue.
American-style buttercream made with shortening also offers a structural advantage. It’s sugar-based, which helps water-based gel colors dissolve more effectively. This allows the color to penetrate and deepen before mixing with the fat, giving you a more vibrant and consistent result.
Starting with a pure white base not only cuts down on dye usage but also helps maintain the frosting’s flavor.
Methods for Achieving True Black and Bright Red
Once your base is ready, there are tried-and-true techniques to enhance color depth without risking oversaturation. These methods rely on heat or time to help pigments develop fully, ensuring bold, professional-quality hues. Patience is key here - rushing the process can lead to faded colors or even bitter flavors. With a well-prepared base, these approaches consistently deliver stunning results.
True Black Frosting: The Resting Method
The resting method is a dependable way to achieve deep black frosting without overloading it with dye. Start by mixing your chocolate-based frosting with black gel or powdered coloring until it reaches a dark gray or soft black shade. Then, transfer the frosting to an airtight container or piping bag and let it sit at room temperature for several hours - or better yet, overnight. As Chelsey White from Chelsweets explains:
"Letting this frosting sit is a sure-fire way to deepen its color."
When frosting is freshly made, fat molecules can block food coloring from bonding with water in the mixture. Allowing the frosting to rest gives the pigments time to fully saturate, naturally darkening the color by one or two shades. If air bubbles form during the resting period, gently smooth the frosting with a rubber spatula against the sides of the bowl.
True Black Frosting: The Microwave Method
Need a quicker solution? The microwave method speeds up the process of achieving true black frosting. Take about 1/2 cup of your frosting, add a few extra drops of black gel coloring, and microwave it in a microwave-safe bowl for 5–10 seconds. This softens the frosting and deepens the color instantly. Once heated, mix the melted portion back into the main batch and let it sit for around 30 minutes to regain a pipeable consistency.
The heat temporarily melts the fat molecules, allowing the dye to bond with water molecules more effectively. This method produces a rich black color in a fraction of the time. If the frosting becomes too soft, just pop it in the fridge until it firms up to the right consistency for decorating.
Bright Red Frosting: Flavor Balancing Technique
Creating vibrant red frosting often comes with a challenge: a bitter, chemical aftertaste. To counter this, incorporate flavor extracts like clear vanilla, almond, or coconut extract. Doubling the amount of vanilla extract in your recipe can mask the bitterness without affecting the frosting’s color. For royal icing, a touch of lemon juice can help neutralize the harsh flavor.
When mixing red gel coloring into white buttercream, aim for a shade slightly lighter than your target color. The Graceful Baker offers this essential tip:
"If the icing is the exact color you want it in the bowl, you've added too much color!"
The color will naturally deepen over the next 24–48 hours as the pigment develops. Using high-quality gel brands like Americolor Super Red or Chefmaster Super Red can also minimize bitterness, even when used in higher amounts. For a vibrant red, you’ll need at least 9 drops of gel coloring, while deeper shades may require 14–24 drops.
Bright Red Frosting: Freezer Acceleration Method
For projects where time is limited, the freezer method can speed up color development. After mixing your frosting to a slightly lighter shade than desired, store it in an airtight container and freeze it. When you’re ready to use it, let the frosting thaw at room temperature for a few hours. As Chelsey White explains:
"Allowing the buttercream to sit out at room temperature (usually as it thaws) is what really deepens the color."
The freezing and thawing process enhances pigment saturation, resulting in a richer red hue without needing extra dye. This technique is especially handy for frosting that will be stored for 1–3 months. Once thawed, smooth out any air bubbles with a spatula before decorating.
sbb-itb-529d1c3
Fixing Common Color Problems
Creating the perfect frosting color can be tricky, especially when aiming for shades like true black or bright red. Often, challenges stem from issues like base color interference, insufficient resting time, or using the wrong type of coloring. Fortunately, these problems have straightforward solutions.
Black Frosting Problems and Solutions
Black frosting often turns gray or tastes bitter when too much dye is added to a white base. To avoid this, start with a naturally dark base, which reduces the need for excessive dye. If your frosting looks gray, let it rest for 24 hours in an airtight container. This allows the pigments to deepen, as mentioned earlier.
A green or muddy tint can appear when the yellow tones from butter react with blue-toned black pigments. To fix this, opt for a white shortening-based frosting or add a small drop of purple gel to neutralize the yellow undertone. If air bubbles form during resting, gently remove them to maintain a smooth texture. For bitterness, consider using black cocoa, which provides a rich color without the unpleasant aftertaste that can result from using too much gel coloring. These adjustments can help you achieve a deep, true black with the right texture and flavor.
Red Frosting Problems and Solutions
Red frosting presents its own challenges, such as bitterness and fading color. To combat bitter or metallic flavors, double the vanilla extract or mix in freeze-dried strawberry powder. High-quality no-taste red gels, like those from Chefmaster, are also a good option for reducing bitterness, even when larger amounts are needed.
If your red frosting looks too light, it might be because you started with a pure white base or judged the color too soon. Begin with a pink base - using strawberry powder or a small amount of red gel - and refrigerate the frosting for 3–5 days to allow the color to fully develop. If the frosting is too runny, switch to concentrated gel pastes and gradually add powdered sugar or cornstarch (one tablespoon at a time) until you reach the desired consistency. These steps, combined with earlier techniques, will help you achieve bold, vibrant red frosting every time.
Professional Tips from Gloria's Cake & Candy Supplies
Gloria's Cake & Candy Supplies has spent decades perfecting the art of frosting colors, and their expert advice can help you achieve professional-quality results every time.
For a flawless black frosting, they suggest starting with Mercken's Cocoa Dark Chocolate Coating Wafers (priced at $9.50 per pound). This rich, dark base minimizes the amount of gel coloring you'll need to achieve a deep black shade. When it comes to bold reds, Celebakes Whimsical White Buttercream ($24.99 for 3.5 lbs) is the go-to choice. Its neutral white tones counteract the yellow undertones that often push reds into the orange spectrum.
Gloria's also shares insider tips for working with food coloring. For instance, an immersion blender can quickly and evenly distribute color throughout frosting, creating deeper hues while using less dye. If you're working with concentrated gels like Satin Ice Food Color Gel in Black ($8.49 for 0.61 fl oz), they recommend adding color gradually with a toothpick and checking the shade under natural light to ensure accuracy.
"I took my very first cake decorating class with Helen, which later led to Culinary Arts School and a degree in Baking and Patisserie", says Sharyn L., a loyal customer who credits Gloria's classes with kickstarting her professional baking career.
To achieve the best results, allow your frosting to rest for 24–72 hours for true black tones, as the color will deepen over time. Similarly, bright red frosting naturally intensifies after 10–15 minutes of mixing. If you're aiming for a more muted red, a single drop of black gel can do the trick.
For large-scale projects, Gloria's offers bulk pricing and same-day pickup for high-pigment products like Chefmaster Liqua-Gel (10.5 oz, $9.99–$12.99). They also provide custom color matching services using Mercken's products, ensuring consistent results across batches - a must for commercial bakeries.
Conclusion
Creating true black and vibrant red frosting comes down to three essential factors: using concentrated gel or powdered colorings, starting with the right base ingredients, and giving the pigments time to fully develop. As explained earlier, these steps form the backbone of professional techniques. Starting with a dark base - like black cocoa or dark chocolate for black frosting - or using a white shortening or pink base for red helps reduce the amount of dye needed while still achieving bold, professional-quality colors.
Techniques like the resting method and the microwave method are excellent for deepening colors without affecting the frosting's taste or texture. The choice of ingredients plays a crucial role, too. Professional bakers often prefer gel-based colorings over liquid dyes because they provide rich, saturated hues without altering the frosting's consistency. Products such as Mercken's Cocoa Dark Chocolate Coating Wafers ($9.50 per pound) and Celebakes Whimsical White Buttercream ($24.99 for 3.5 lbs) are popular choices, as they minimize color distortion and avoid any unpleasant aftertaste.
Whether you're a home baker or a seasoned professional, these methods can help you achieve bakery-level results. For personalized advice and expert tips, stop by Gloria's Cake & Candy Supplies at 11117 Washington Blvd. in Culver City.
FAQs
How do I avoid bitterness in black and red frostings?
To avoid bitterness in black and red frostings, it’s all about choosing the right food coloring and balancing the flavors with thoughtful ingredients.
For a bold red frosting, begin with a light-colored base, such as pink or vanilla buttercream. Opt for gel-based red food coloring - it’s more concentrated, so you’ll need fewer drops, which helps minimize any unpleasant aftertaste. If you prefer, high-quality powdered red food coloring is another option. While you might need to use a bit more to get the same vibrant hue, it often results in a smoother, less bitter flavor.
When it comes to black frosting, starting with a chocolate buttercream base is key. Mixing in black cocoa powder not only intensifies the color but also helps mask the metallic taste that can come from black gel food coloring. Use about 1–2 tablespoons of black cocoa per cup of frosting, then add a few drops of black gel color. Letting the frosting sit overnight allows the color to deepen naturally, reducing the need for excessive dye.
By combining flavorful bases with concentrated colorings, you can create striking, professional-looking frostings without sacrificing taste.
Why should I choose gel-based food coloring instead of liquid food coloring?
Gel-based food coloring delivers intense pigmentation, making it easy to create bold hues like deep black or bright red with just a tiny amount. Its concentrated nature means you use less product, which helps avoid over-saturating or thinning out your batters, frostings, or fondant.
The semi-thick consistency of gel coloring ensures it mixes effortlessly into buttercream, royal icing, cake batter, and even candy recipes without affecting their texture. Plus, it provides stable, long-lasting colors that can deepen over time, making it a go-to choice for home bakers and professionals seeking polished, vibrant results.
Why should I let frosting colors sit before using them?
Letting your frosting rest after adding food coloring is a simple trick that makes a big difference. This pause allows the colors to naturally deepen and settle, which is especially useful when aiming for bold reds or true blacks. These shades often need a little extra time to fully develop their intensity. Skipping this step could lead to over-coloring, which might not only throw off the taste but also alter the frosting's texture.
For the best outcome, mix in your colors, cover the frosting, and let it sit for a few hours - or, if possible, overnight. This gives you a vibrant, even finish that will make your cakes and decorations stand out.
Shop Supplies at Gloria's
Everything mentioned in this article is available at our Culver City shop. Come see it in person or browse online.
Shop at Gloria's11117 Washington Blvd, Culver City • Tue-Sat 10am-6pm • (323) 289-8807
Related Blog Posts
- Color Psychology in Cake Design
- How to Blend Colors for Ombre Cakes
- Thanksgiving Cake Decorating: Fall Colors and Flavors
- Gel vs. Liquid vs. Powder: The Complete Food Coloring Guide for Bakers

