
Food coloring comes in three main types - gel, liquid, and powder - each suited for different baking needs. Here's what you need to know:
- Gel food coloring: Thick, highly concentrated, and ideal for vibrant colors without adding much moisture. Great for buttercream, fondant, and batters.
- Liquid food coloring: Thin, water-based, and best for soft pastel hues. Works well for syrups, beverages, or recipes where added liquid isn’t a concern.
- Powder food coloring: Completely dry and the most concentrated option. Perfect for moisture-sensitive recipes like chocolate, macarons, or meringues.
Quick Tip: Use gel or powder for recipes where texture matters. Liquid is better for subtle tints or water-based applications.
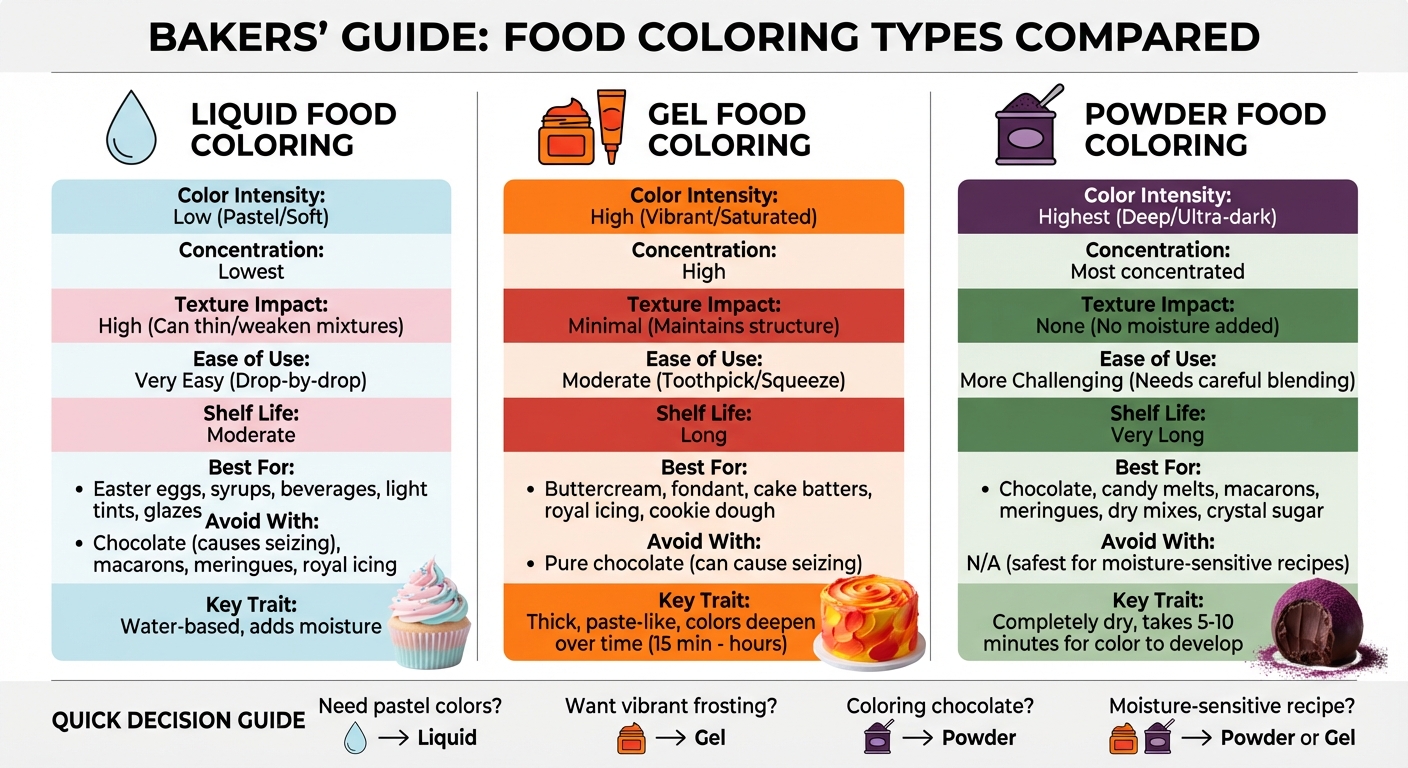
Quick Comparison:
| Type | Color Intensity | Best For | Impact on Texture | Shelf Life |
|---|---|---|---|---|
| Liquid | Low (Pastel/Soft) | Syrups, beverages, light tints | Can thin mixtures | Moderate |
| Gel | High (Vibrant/Saturated) | Buttercream, fondant, batters | Minimal | Long |
| Powder | Highest (Deep/Ultra-dark) | Chocolate, macarons, meringues | None | Very Long |
Choosing the right type ensures better results without compromising your recipe’s texture or taste.
Food Coloring Types Comparison: Gel vs Liquid vs Powder for Baking
1. Gel Food Coloring
Properties and Concentration
Gel food coloring is a thick, paste-like coloring agent made with glycerin or corn syrup. Its highly concentrated formula delivers bold, intense colors with just a small amount of product, adding very little liquid to your recipe. This is a game-changer for recipes where maintaining texture is crucial. One of its unique traits is that the colors deepen over time - sometimes taking 15 minutes to several hours to reach their full vibrancy. For instance, creating a bright red in white frosting might take at least 9 drops of red gel, while achieving a rich black could require 16–20 drops.
This concentration makes gel food coloring a go-to for recipes where even a tiny bit of extra liquid could throw things off.
Best Applications
Gel food coloring is perfect for recipes that demand precise texture control. It's especially useful in buttercream, royal icing, and fondant, where it provides rich color without altering the consistency. It’s also a great choice for delicate batters like macarons and meringues, where even a small amount of added liquid can compromise the structure. Beyond that, it works seamlessly in cake batters, cookie dough, and even candies like lollipops or gummies. However, steer clear of using it with pure chocolate. The glycerin or water in the gel can cause the chocolate to seize, which is a headache you don’t want.
Application Techniques
When using jarred gel food coloring, grab a clean toothpick to add 1–2 drops at a time, mixing thoroughly before adding more. This method ensures you can control the intensity of the color. If you're working with bold colors, wearing gloves is a smart move to prevent stubborn stains on your hands. For frosting, consider mixing the color the night before to give it time to fully develop. This little step can make a big difference in achieving the perfect shade.
2. Liquid Food Coloring
Properties and Concentration
Liquid food coloring is a water-based dye with a thin, runny texture that creates soft, pastel shades. Its lower pigment concentration means you’ll need to use more if you’re aiming for bold, vibrant colors. As Jerrelle Guy, a recipe developer and author, explains:
"Liquid food coloring [...] can be dull unless you use a lot, which can be a problem if you're watching the moisture content of what you're baking."
This makes it especially important to consider the recipe's requirements, particularly when managing moisture levels.
Best Applications
Liquid food coloring shines when you're looking for a gentle tint or pastel hue in frostings, batters, or doughs. It's the classic go-to for dyeing Easter eggs (mixed with water and vinegar) and works well in beverages, syrups, glazes, hard candy, lollipops, and ice cream. These are all cases where a bit of added liquid won’t throw off your recipe. However, it’s not ideal for moisture-sensitive recipes like macarons, meringues, or royal icing, as the added water can affect their structure. And when it comes to melted chocolate, steer clear - its water content will cause the chocolate to seize and clump.
Application Techniques
To use liquid food coloring, add it drop by drop until you reach your desired color. Keep in mind that too much can thin your mixture and mess with the recipe’s texture. If you find yourself needing a lot of color, it might be worth switching to a more concentrated option, like gel food coloring, to avoid altering your recipe.
Next, we’ll take a look at powder food coloring for even more concentrated coloring options.
3. Powder Food Coloring
Properties and Concentration
Powder food coloring packs the strongest punch when it comes to dye concentration. Made by finely grinding pigments without adding any liquid, it delivers incredibly vibrant colors that outshine both liquid and gel options. Christine Gallary, Senior Recipe Editor at The Kitchn, explains its advantage:
"Since there is no liquid in powdered dyes, it's great in recipes where any added liquid makes a huge difference, like in crystal sugar, chocolate, macarons, or French meringues."
One thing to note: powdered dyes often need 5 to 10 minutes after mixing for the color to fully develop. This makes them a go-to choice for recipes where moisture control is critical.
Best Applications
Powder food coloring shines in recipes where even a few drops of extra liquid could ruin the texture. It's the safest option for coloring chocolate and candy melts, which can seize when exposed to water. It's also ideal for delicate treats like French macarons and meringues, where precision is key. Beyond that, powdered dyes work wonderfully for tinting dry ingredients like flour, cocoa powder, or crystal sugar. They’re also perfect for decorating fondant, royal icing, buttercream, hard candy, and lollipops.
Application Techniques
When coloring chocolate, try the "marble" technique: mix a small amount of powder into a tiny portion of melted chocolate to create a rich, colored swirl, then blend it into the rest of your batch. For dry mixes like colored sugar, toss the ingredients in a zip-top bag with the powder and shake until the color is evenly distributed. To avoid clumps in batters, sift the powder in gradually. Want to make edible paint? Combine the powder with a few drops of clear alcohol or flavored extract - it dries quickly, keeping icing firm. Since the dye is so concentrated, start small - a toothpick dip or tiny scoop is usually enough. Overdoing it can dry out your mixture or even leave a bitter taste, especially with red hues.
sbb-itb-529d1c3
Liquid vs Gel vs Oil food coloring [ Cake Decorating For Beginners ]
Pros and Cons
When it comes to food coloring, each type has its own strengths and weaknesses. Liquid food coloring is the most straightforward to use - just add a few drops directly into your mix. However, it’s the least concentrated option, and adding too much can alter your recipe's consistency. This can lead to issues like cookies spreading too much, cakes failing to rise properly, or frosting becoming too thin. As baker and author Shinee Davaakhuu explains:
The more liquid food coloring you add to your recipe, the higher the chance you'll water down whatever you're making.
Gel food coloring is often the go-to choice for bakers. Its high concentration means you only need a tiny amount - a toothpick dip or a few drops - to achieve vibrant, bold colors. Plus, it doesn’t add much moisture, helping to preserve the structure of your recipe. This makes gel food coloring a cost-effective option since you’ll use less over time. However, it does have its drawbacks. It can be tricky to mix into stiff doughs and may dry out if not stored correctly, though a bit of vegetable glycerin can help rehydrate it.
Powder food coloring offers the deepest and most intense color, along with a long shelf life since it’s completely dry. It’s ideal for recipes that are sensitive to moisture, like chocolate or macarons. That said, it’s the hardest to work with. You’ll need to blend it carefully to avoid clumps, and the colors take several minutes to fully develop. Using too much can also result in a bitter taste, particularly with red shades.
Choosing the right type of food coloring for your recipe is key to achieving the best results. Here’s a quick comparison to help you decide:
| Factor | Liquid Food Coloring | Gel Food Coloring | Powder Food Coloring |
|---|---|---|---|
| Color Intensity | Low (Pastel/Soft) | High (Vibrant/Saturated) | Highest (Deep/Ultra-dark) |
| Ease of Use | Very Easy (Drop-by-drop) | Moderate (Toothpick/Squeeze) | More challenging (Needs careful blending) |
| Texture Impact | High (Can thin/weaken) | Minimal (Maintains structure) | None (No moisture added) |
| Shelf Life | Moderate | Long | Very Long |
| Best For | Easter eggs, syrups, light tints | Buttercream, fondant, cakes | Chocolate, dry mixes, meringues |
It’s worth noting that water-based liquid and gel food colorings can cause chocolate to seize. For chocolate, stick to powder or oil-based colors to avoid this issue.
Conclusion
When choosing food coloring, it’s all about picking the right type for the job. Liquid food coloring is great for pastel shades, Easter eggs, or simple syrups, but keep in mind it adds moisture, which can thin out certain recipes. Gel food coloring offers bold colors with minimal liquid, making it perfect for buttercream, fondant, and cake batters. On the other hand, powder food coloring delivers intense hues without affecting texture, making it ideal for recipes like chocolate, macarons, or meringues that are sensitive to added moisture.
Always consider your recipe’s specific needs. For chocolate or candy melts, stick to powder or oil-based colors to avoid seizing. Gel is your go-to for frosting and detailed cake decorations, while liquid works well for subtle tints in water-based glazes.
One key tip: colors tend to deepen over time. Allow at least 15 minutes for shades like red and black to fully develop before making adjustments. Start small - it's much easier to add more color than to fix an overly saturated batch.
Whether you’re a passionate home baker or a seasoned pro, using the right food coloring can elevate your creations. Gloria's Cake & Candy Supplies offers professional-grade liquid, gel, and powder colorings, along with expert advice to help you pick the perfect option for your baking needs. With these tips, you’ll be ready to choose the best coloring for any project.
FAQs
How can I stop chocolate from seizing when adding food coloring?
To avoid chocolate from seizing, stick to oil-based food coloring designed specifically for use with chocolate. Water-based options like gels or liquid colors can make the chocolate clump, turning it into an unusable mess.
When melting your chocolate, take it slow and steady. Use a double boiler or microwave in short intervals, ensuring the temperature stays consistent - around 115°F for dark chocolate or 110°F for milk or white chocolate. After melting, add the oil-based color a few drops at a time, stirring continuously with a silicone spatula until the color is evenly mixed. Be extra cautious to keep water or steam away from the chocolate, as even a small amount can ruin the texture.
With the right coloring and careful technique, your chocolate will stay smooth, glossy, and ready for decorating or molding.
Which type of food coloring gives vibrant colors without affecting the texture of my baking?
For those seeking bright, vivid colors without affecting the texture of their batters, icings, or other culinary creations, gel food coloring is an ideal option. Thanks to its concentrated formula, you can achieve bold hues with just a tiny amount. Plus, its thick, low-water consistency ensures your recipes stay just the way you want them - no thinning or unwanted changes in texture.
Gel food coloring shines when used for buttercream, royal icing, or fondant, where consistency is key. It’s a go-to choice for bakers aiming to create professional-level results with minimal effort.
Can gel food coloring be used in all baking projects?
Gel food coloring works wonderfully for a wide range of baking projects - think batter, frosting, icing, candies, and even delicate creations like macarons. Thanks to its intense pigmentation and minimal moisture content, it delivers bold, vivid colors without messing with the texture of your recipes.
That said, if you're working on something that absolutely can't handle extra moisture - like chocolate coatings or dry mixes - powdered food coloring might be the way to go. The key is to match your food coloring choice to the specific needs of your recipe.
Shop Supplies at Gloria's
Everything mentioned in this article is available at our Culver City shop. Come see it in person or browse online.
Shop at Gloria's11117 Washington Blvd, Culver City • Tue-Sat 10am-6pm • (323) 289-8807
Related Blog Posts
- Color Psychology in Cake Design
- How to Blend Colors for Ombre Cakes
- Seasonal Color Palettes with Mercken's Chocolate: From Pastels to Metallics
- Thanksgiving Cake Decorating: Fall Colors and Flavors

