
Want to create stunning portrait cookies that look like miniature works of art? Here's how bakers are achieving photo-like detail using edible image technology. By printing high-resolution images onto icing sheets with food-grade ink, you can produce cookies with photographic precision for any occasion - weddings, birthdays, or corporate events.
Key takeaways:
- High-quality images (300 DPI) are essential for sharp, detailed prints.
- Same-day edible image printing services save time and ensure professional results without owning expensive equipment.
- Pair edible images with royal icing bases and decorative borders for a polished finish.
- Tools like Canva or Photoshop make resizing and formatting images easy for cookie dimensions.
From selecting the right image to applying it seamlessly, this guide covers everything you need to know about creating portrait cookies that impress.
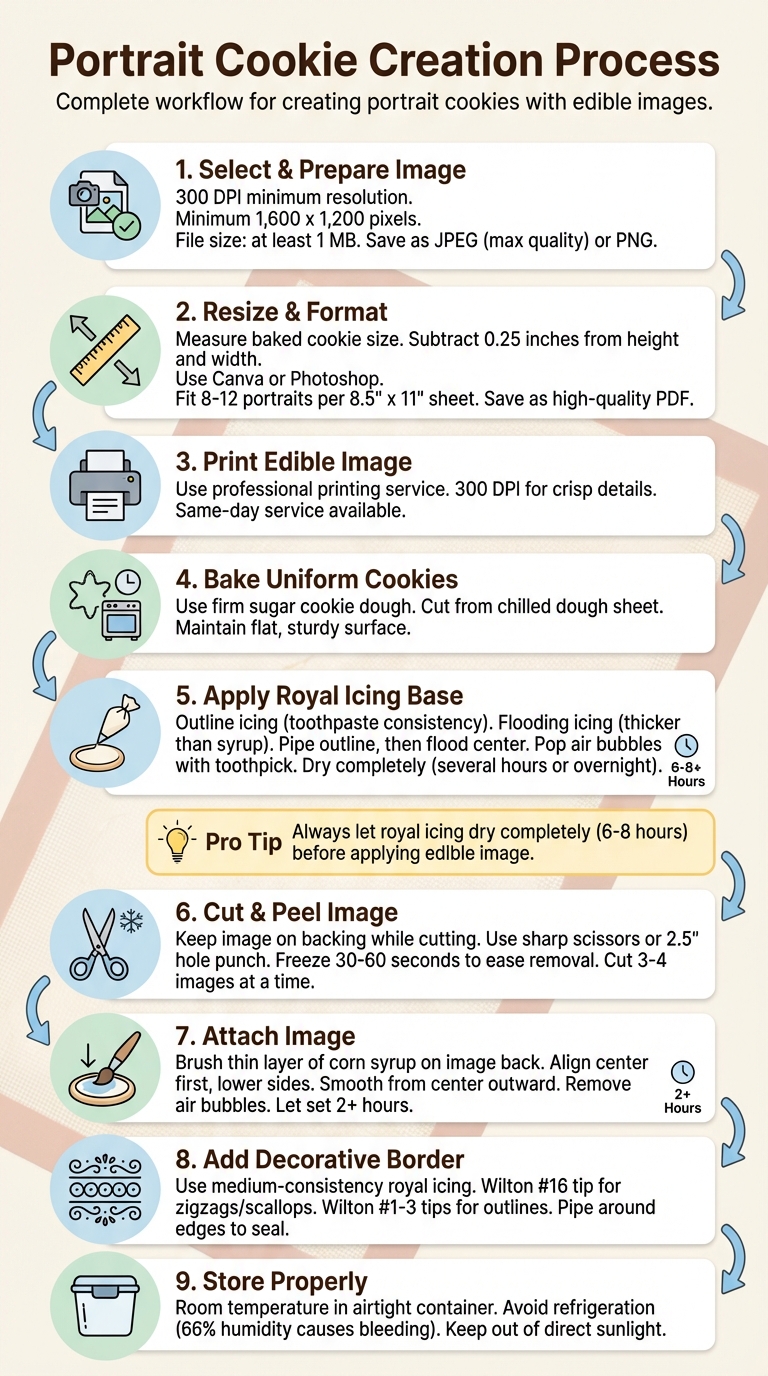
Step-by-Step Guide to Creating Portrait Cookies with Edible Images
Selecting and Preparing Portrait Images for Cookies
Choosing High-Quality Images
Creating stunning portrait cookies starts with selecting a high-quality image. For the best results, use images with a resolution of at least 300 DPI - this ensures crisp, detailed edible prints. Lower resolutions, like the standard 72 DPI used for websites, will appear blurry and pixelated when printed on icing sheets.
"For a high-quality print, the industry standard is at least 300 DPI."
- Brett Henrichsen, Professional in large-format printing, Poster Print Shop
When choosing an image, aim for a minimum resolution of 1,600 x 1,200 pixels and a file size of at least 1 MB. As a reference, a 300 PPI JPEG typically weighs around 3.5 MB, while a low-resolution web image might only be 500 KB. Save photographic images as JPEG files at maximum quality, or opt for PNG format if transparency is needed. Additionally, set your canvas resolution to 300 DPI to match the dimensions of your cookie.
Once your image is selected, resize it to perfectly fit the size of your cookie.
Resizing and Formatting Images for Printing
After selecting a high-resolution image, resizing it correctly is key to achieving a flawless fit on your cookies. Start by measuring your baked cookies - remember, dough tends to spread during baking. Then, subtract 0.25 inches from both the height and width to allow space for decorative borders.
"I first picked my cookie cutter then measured it. I subtracted a .25in from the height and width to make sure my images would be a bit smaller than the cookies."
- Toni, Author, Make Bake Celebrate
For formatting, tools like Canva and Photoshop are excellent options. In Canva, you can use the "Frames" feature under "Elements" to fit portraits into specific shapes, such as circles or rectangles, that align with your cookie dimensions. To save on expensive icing sheets, arrange multiple images on a single 8.5" x 11" canvas - you can usually fit 8–12 small portraits per sheet. Keep in mind that many icing sheets are slightly shorter, measuring 10.5 inches instead of a full 11 inches, so leave a bit of extra space at the top and bottom of your layout. Save your final design as a high-quality PDF to lock in the dimensions and maintain resolution.
Using Gloria's Edible Image Printing Services
After preparing your images, you can rely on Gloria's Edible Image Printing Services for professional-quality results. This service eliminates the hassle of maintaining edible printers, such as dealing with clogged printheads or inconsistent colors. With Gloria's same-day service, you can quickly pick up vibrant, precisely printed images that are ready to use. Simply prepare your PDF according to the sizing guidelines, and Gloria’s experienced team will handle the rest. This is a game-changer for commercial decorators who need sharp, detailed prints on a tight schedule. With Gloria’s help, your 300 DPI images will translate into flawless edible prints every time, saving you time and money on trial and error with icing sheets.
Preparing the Cookie Base
Baking Uniform Cookies
Creating portrait art on cookies starts with a solid foundation. A flat, sturdy cookie is key, so opt for a firm sugar cookie or no-chill cutout dough recipe to minimize spreading during baking. For the best results, always cut your shapes from a chilled sheet of cookie dough rather than dough at room temperature. This helps maintain clean, sharp edges that hold their shape in the oven.
"I used the stencils to cut the cookies from a chilled sheet of cookie dough and once they were baked I traced the stencils on the cookies with an edible ink marker."
- Amber Spiegel, Founder, SweetAmbs
To avoid distortion, roll the dough directly onto a parchment sheet, cut the shapes in place, and leave enough space between them to account for minor spreading. This ensures crisp edges and a uniform, flat surface - perfect for decorating.
Icing the Cookie Surface
A smooth icing base is essential for portrait cookies, and royal icing is your best friend for this step. You'll need two consistencies: outline icing (similar to toothpaste) and flooding icing (thicker than syrup but thinner than molasses). Start by piping an outline around the cookie's edge to create a barrier that keeps the flooding icing in place. Next, fill the center with the flooding icing, tapping the cookie lightly to smooth it out. Use a toothpick to pop any air bubbles to avoid imperfections on the surface.
"The outline icing acts as a dam to hold in the flooding icing while it dries into a nice, smooth surface."
Let the icing dry completely for several hours or overnight before adding edible images. This drying period is crucial - if the icing is still soft, any added moisture can cause the image to dissolve or the colors to bleed. A fully dried white royal icing base provides the perfect canvas for your portrait, making the colors stand out beautifully. Once the icing has crusted, you're ready to move on to applying the edible images.
Applying Edible Images to Cookies
Cutting and Peeling the Images
When cutting edible images, keep them attached to the backing paper to maintain stability and reduce the risk of tearing. For detailed shapes, use sharp scissors, and for perfect circles, a 2.5-inch hole punch works well. Cut 3–4 images at a time, and store the rest of the sheet in an airtight bag to prevent it from drying out or crumbling.
Icing sheets can be tricky to handle due to humidity and temperature changes. To remove them cleanly, try placing the sealed bag in the freezer for 30–60 seconds. Alternatively, run the backing over a sharp edge to help loosen it. If the sheet still sticks because of moisture, briefly blow warm air on the backing using a hair dryer.
"The easiest way to remove an icing sheet without difficulty is to pop the sheet still in the sealed bag in the freezer for about 30 seconds."
- Melissa Diamond, Baker and Founder, Legacy Cakery Studios
Once your images are cut and peeled, you're ready to attach them to the cookies.
Attaching Images to the Cookie Surface
Use a food-safe paintbrush to apply a thin layer of light corn syrup (or flood icing) to the back of the edible image. Make sure to cover all edges evenly, and avoid getting any moisture on the printed side.
Hold the image by its edges, carefully align the center of the image with the cookie, and gently lower the sides to prevent air pockets. Smooth from the center outward using a clean finger or brush to push out any bubbles.
"Most of the time the bubbles come from not smoothing down the image after you lay it on the cake. After laying the image on the cake it's best to work from the center and smoothing outward."
- Melissa Diamond, Founder, Legacy Cakery
Sealing the Edges
Allow the image to set for at least two hours. To secure it and create a polished look, pipe a decorative border using royal icing. A Wilton 16 tip works well for a zigzag pattern. If the edges need extra flattening, place the cookies face-down overnight.
Adding Decorative Borders and Accents
Piping Borders with Royal Icing
After your edible image has set for a few hours, you can elevate its presentation by adding a decorative border. This not only seals the edges but also gives your cookie a polished, professional touch. For this, use a medium-consistency icing - think toothpaste texture - that holds its shape while flowing smoothly through smaller tips.
For zigzags, scallops, or small shells that frame your design beautifully, a Wilton #16 small star tip is a great choice. If you're aiming for clean outlines or delicate frames, Wilton #1, #2, or #3 round tips work wonderfully.
One technique to master is the "drape" method. Here’s how it works: press the piping tip to the cookie's surface, lift it about 1/2 inch, and let the icing fall naturally into place while maintaining a steady 90° angle and even pressure. Willow Arlen, an experienced decorator and author, shares this insight:
"Letting the icing fall into place means your lines will be smooth, and as backwards as it sounds, will actually give you better control."
– Willow Arlen, Author and Decorator
Before diving in, it’s a good idea to practice your designs on parchment paper. This helps you test the icing's consistency and steady your hand. Resting your elbows on the table while piping can minimize shakiness, and having a scribe tool handy allows you to pop air bubbles or tweak the icing while it’s still wet. Once you’ve created smooth, defined borders, you’re ready to add dimensional accents.
Creating Accents with Mercken's Chocolate Wafers
With your borders in place, you can add depth and texture using Mercken's chocolate wafers. These are perfect for creating decorative elements like scallops, curls, polka dots, or zigzags directly on the cookie. If you want to take it a step further, try making 3D accents. Pipe your designs onto parchment paper or a lightly greased transparency sheet, let them dry overnight, and then attach them to the cookie with a small dot of wet icing. This method is ideal for adding flowers, bows, or small logos that enhance the design without overwhelming the edible image.
One important tip: keep moisture away from the front of the edible image during this process to prevent any glossy spots from forming.
sbb-itb-529d1c3
Troubleshooting Common Problems
Preventing Image Curling and Poor Adhesion
Edible images can curl or lift if applied too soon. For cookies with a royal icing base, it’s crucial to let the icing dry fully - this can take several hours. Once the icing is completely dry, use a food-safe paintbrush to apply a thin, even layer of light corn syrup to the hardened surface. This acts as an adhesive.
To keep unused edible images in good condition, store them in an airtight ziplock bag to prevent them from becoming brittle or curling. When applying the image, place it gradually to avoid trapping air pockets underneath.
If the edible image sticks to its backing, gently loosen it by running a hair dryer over the back or sliding the backing over a sharp edge. Some decorators suggest placing the finished cookies face-down on a flat surface overnight to help flatten and secure curling edges.
Once the image is properly adhered, inspect the surface and fix any imperfections right away.
Removing Air Bubbles and Preventing Color Bleeding
Air bubbles can appear if the image isn’t applied carefully. To prevent this, smooth the image immediately after placement, starting from the center and working outward, using a clean, dry finger or a food-safe brush. Avoid letting water, corn syrup, or piping gel touch the printed side, as this can leave permanent glossy marks or smudges.
Color bleeding usually results from high humidity levels. As WeCookiers warns:
"Refrigerators run at 66% humidity and it'll wreak havoc on the cookies"
To avoid this, store finished cookies at room temperature in airtight containers, away from humidity, which can cause colors to bleed or create unwanted glossy spots. If you’re working with cookies that were previously frozen, let them thaw completely and gently remove any condensation before applying the edible image.
Storing Finished Cookies
Once your portrait cookies are decorated, store them in airtight containers at room temperature. This allows the edible image to fully bond with the icing overnight before packaging. Keep the cookies out of direct sunlight to preserve the image quality, and avoid refrigeration, as the high humidity can lead to color bleeding or cause the image to dissolve.
How To Make Photo Cookies
Conclusion
Creating portrait cookies requires careful attention to detail at every stage. Start with high-resolution images that fit your cookie dimensions perfectly. Make sure the royal icing base is completely dry (this usually takes 6–8 hours). Then, apply a thin adhesive layer and gently smooth the image from the center outward to avoid wrinkles or bubbles. Every step, from choosing the right image to adding the final touches, plays a role in turning these cookies into stunning edible art.
Using high-quality materials is key. Premium supplies help ensure the prints remain vibrant and clear, making your cookies stand out every time.
FAQs
How do I choose and prepare high-quality images for edible printing on cookies?
To create edible images that are both clear and realistic, start with a high-resolution photo - aim for 300 DPI at the exact size you plan to print. Save your image in a format that keeps the details intact, such as a PNG or a high-quality JPEG with minimal compression. Before printing, take the time to crop the image to match the cookie's shape and size, remove any unnecessary background elements, and adjust the colors on a calibrated monitor. Keep in mind that edible inks may appear slightly different from standard inks.
For sharp and vibrant results, icing sheets are your best bet. If you're looking for a more budget-friendly option, wafer paper works too, though it tends to produce softer colors. By following these steps, you'll achieve clean, professional-looking edible images for your cookies.
How can I stop edible images from curling or lifting on cookies?
To ensure edible images stay flat and securely attached to cookies, start by making sure the cookies are completely cool and dry. Spread a thin layer of high-ratio shortening icing over the cookie's surface. This icing works as an adhesive, staying sticky long enough to hold the image in place. Gently lay the edible image onto the icing, smoothing it from one edge to the other to eliminate any air bubbles.
Let the cookies rest at room temperature for 10–15 minutes to allow the image to set properly. When storing, place the cookies in an airtight container, separating layers with parchment paper to prevent moisture from lifting the image. For longer storage, refrigeration or freezing helps preserve the quality.
How can I apply edible images to cookies with a smooth, professional finish?
To get a smooth and polished finish, start with a slightly damp layer of royal icing. A dry base can lead to the edible image wrinkling or peeling off, so timing is everything. If your icing feels too thick, you can thin it out a bit with high-ratio shortening to create an even surface. Trim the edible image to fit the cookie’s shape precisely, then gently press it onto the wet icing. To eliminate air bubbles, use a clean, flat tool like a silicone spatula.
For optimal results, work in an environment with low humidity, and keep the edible images flat and covered until you’re ready to use them. Allow the image to dry completely - overnight is ideal - to avoid tearing when handling. Once the image is in place, let the cookie set at room temperature for 10–15 minutes before packaging or transporting. With a little care and attention, your cookies will look professionally crafted and picture-perfect!
Shop Supplies at Gloria's
Everything mentioned in this article is available at our Culver City shop. Come see it in person or browse online.
Shop at Gloria's11117 Washington Blvd, Culver City • Tue-Sat 10am-6pm • (323) 289-8807
Related Blog Posts
- Edible Image Printing 101: Everything You Need to Know Before Ordering Custom Cake Images
- Frosting Sheets vs. Wafer Paper: The Complete Guide to Edible Image Materials
- The Ultimate Edible Image Troubleshooting Guide: 10 Common Problems Solved
- Holiday Edible Images: Custom Christmas and Thanksgiving Cake Toppers in LA

