
Keeping frosting intact in warm weather can be tricky. Buttercream made with butter melts above 82°F, but a heat-stable version solves this problem. By replacing some butter with high-ratio shortening and adding stabilizers like meringue powder, you can create a frosting that holds its shape in warmer conditions. This frosting resists melting, forms a crust, and provides a smooth base for vibrant spring flower designs.
Key Takeaways:
- Ingredients for stability: High-ratio shortening, meringue powder, and powdered sugar create a firm, heat-resistant frosting.
- Flavor and texture balance: A 50/50 butter-shortening mix offers flavor while maintaining structure.
- Temperature tips: Refrigerate cakes until serving, display in shaded areas, and adjust frosting consistency for heat or humidity.
- Decorating tools: Use petal tips, flower nails, and gel-based food coloring for detailed spring flower designs.
This method ensures your cakes look stunning, even at outdoor events, without worrying about frosting melting in the sun.
Stable Buttercream Recipe for Hot Weather
How Heat-Stable Buttercream Works
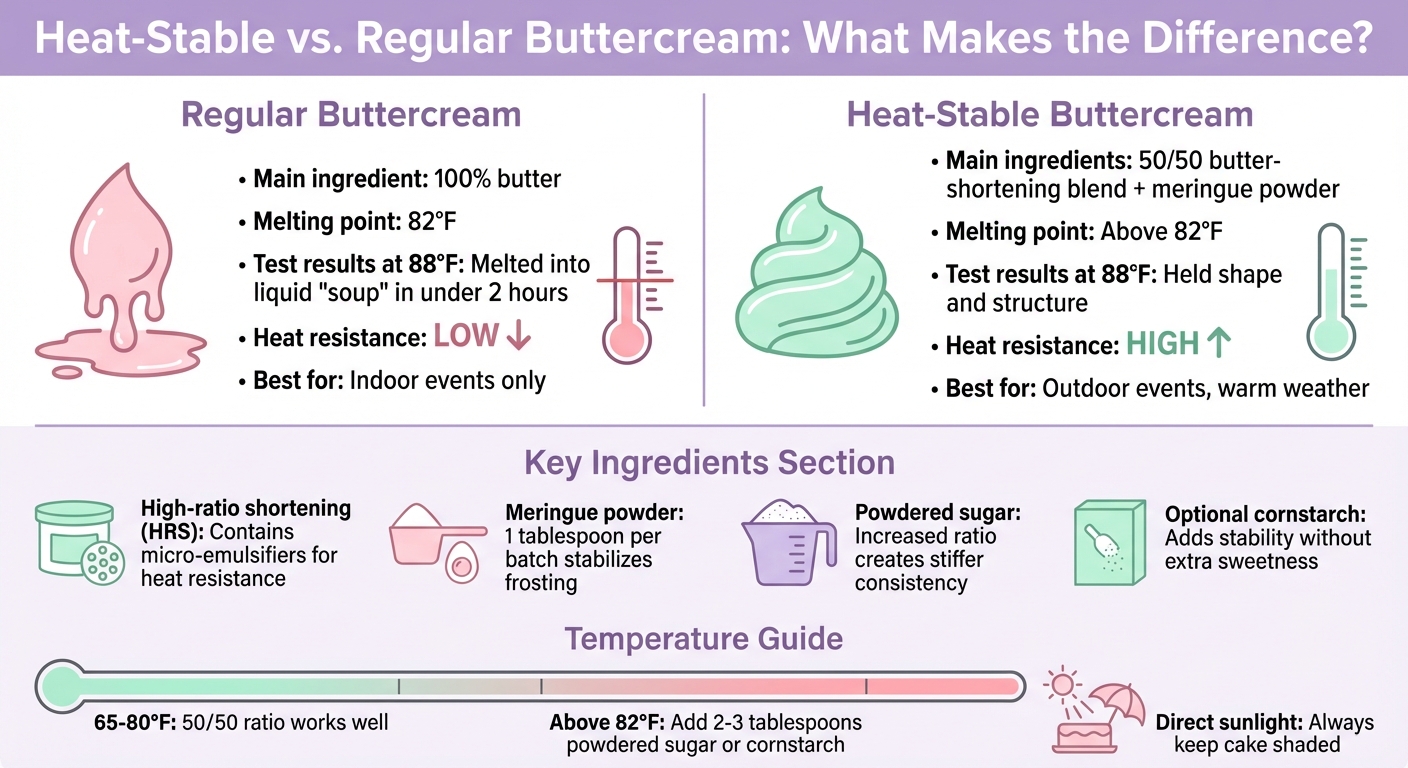
Heat-Stable vs Regular Buttercream: Temperature Resistance Comparison
Heat-stable buttercream swaps out butter for high-ratio shortening and stabilizers, making it more resistant to warmer conditions. Instead of relying entirely on butter, this recipe uses high-ratio shortening combined with stabilizers to ensure the frosting stays firm, even when the temperature rises.
Ingredients That Provide Stability
The magic starts with high-ratio shortening (HRS), which contains micro-emulsifiers that improve heat resistance. These emulsifiers allow the frosting to hold more sugar and liquid, making it less likely to break down in heat. Brands like Sweetex, Alpine, Bake Supply, and Oasis are often recommended for professional results. In tests conducted at 88°F, all-butter frosting melted into a liquid mess, while a 50/50 blend of butter and shortening stabilized with meringue powder held its shape.
Meringue powder - a mix of powdered egg whites, cornstarch, gum arabic, and cream of tartar - plays a crucial role in stabilizing the frosting under heat. Adding just 1 tablespoon per batch can make a big difference, especially for piped decorations like flowers.
Powdered sugar isn’t just about sweetness. Increasing its ratio creates a stiffer consistency, perfect for piping sturdy flower petals. For added stability without making the frosting overly sweet, cornstarch can be used as a thickening agent.
Once you have these essential ingredients, the next step is finding the right balance between texture and flavor.
Getting the Right Texture and Flavor
A stable base is just the starting point; now it’s time to refine the texture and flavor. A 50/50 mix of butter and shortening offers the best of both worlds - authentic butter flavor with the heat resistance of shortening. This balance is important because shortening-only frostings can taste overly sweet and have a different mouthfeel.
To enhance the flavor, try adding a pinch of salt and high-quality butter emulsions, such as those from LorAnn Oils. These additions replicate the taste of traditional buttercream without compromising stability. For a bright white frosting that works beautifully with pastel colors, use clear vanilla extract instead of regular vanilla.
To test the consistency, dip a spatula into the frosting and hold it upright. The frosting should form stiff peaks that stay in place. If it’s too soft, mix in 2–3 tablespoons of powdered sugar. If it’s too stiff, add room-temperature milk, 1 teaspoon at a time.
Adjusting for Temperature
For spring temperatures in Los Angeles, which typically range from 65°F to 80°F, a 50/50 butter-to-shortening ratio works well. If the temperature exceeds 82°F or the cake will be exposed to direct sunlight, gradually add 2–3 tablespoons of powdered sugar or cornstarch to stiffen the frosting. In humid conditions, reduce the liquids and add stabilizers incrementally. Keep the cake refrigerated until 1–2 hours before serving, and always display it in a shaded area.
Kara from I Scream for Buttercream offers a helpful reminder:
"This buttercream stands up better to warmer temperatures than an all-butter buttercream, but you want to be reasonable about it. There is nothing you can do to buttercream to keep it from melting if you put it out in the direct hot sun".
If your kitchen becomes too warm while you’re working, pop the buttercream into the refrigerator for 10–15 minutes. Remix it on low speed afterward to restore its stability. These tips will help ensure the frosting stays firm and ready for precise decorating, setting the stage for the spring flower piping techniques covered next.
How to Make Spring Flower Buttercream
Making the Heat-Stable Buttercream Base
Start by creaming ½ cup of unsalted butter (softened to room temperature) with ½ cup of high-ratio shortening. Beat the mixture on medium-high speed for about 7 minutes, until it becomes light and fluffy.
While the butter and shortening are mixing, combine 1 tablespoon of meringue powder with 3.5 cups of powdered sugar in a separate bowl. Gradually add this sugar mixture to the creamed fats, one cup at a time, using low speed. Be sure to scrape down the sides of the bowl after each addition to ensure everything is well-blended.
Once the sugar is fully incorporated, mix in 2 teaspoons of clear vanilla extract, 2 tablespoons of milk, and ¼ teaspoon of salt. Beat the frosting on low speed for about a minute, until it’s smooth and consistent. If the frosting feels too soft, you can add powdered sugar a tablespoon at a time. If it’s too stiff, add milk in small increments - about ½ teaspoon at a time. To prevent a crust from forming, keep the bowl covered with plastic wrap while you work. This method ensures your buttercream is both smooth and heat-stable.
Adding Color to Your Buttercream
Now that your buttercream base is ready, it’s time to add some vibrant spring colors. For the best results, use gel-based food coloring like Americolor Soft Gel Paste or Wilton Color Right. These gels provide rich, intense shades without adding extra moisture to your frosting.
To achieve the perfect tint, use a toothpick to add the gel color gradually. If your buttercream has a yellowish tone, a tiny drop of violet gel can help neutralize it. Just remember, a little goes a long way.
If adding color changes the consistency of your frosting, adjust it as needed. Add powdered sugar if it’s too soft or a small amount of milk if it becomes too stiff.
Piping Spring Flowers
With your buttercream colored and adjusted, you’re ready to start piping beautiful spring flowers. Here’s how to create a few popular designs:
- Roses: Use a flower nail and a petal tip. Hold the tip so the wide end is at the base and the narrow end is pointing upward. Start by piping a small cone in the center of the nail. Then, add overlapping petals while gently rotating the nail counterclockwise. This technique helps the petals stand upright and gives your roses a realistic look.
- Daisies: Adjust your frosting to medium consistency by mixing in about 1 teaspoon of liquid per cup of stiff frosting. Pipe elongated petals radiating outward from a central point. Finish by adding a yellow dot in the center using a round tip.
- Tulips: Use a petal tip to pipe three upright petals. Start at the base and lift upward to form a cup-like shape.
When mixing your buttercream, opt for a paddle attachment instead of a whisk. This helps avoid incorporating too much air, which can create unwanted gaps in your piped flowers.
Now you’re all set to create stunning buttercream flowers that are perfect for spring celebrations!
sbb-itb-529d1c3
Tools You'll Need for Buttercream Flowers
Piping Tips and Flower Nails
To create stunning buttercream flowers, you’ll need the right tools, starting with piping tips. These are essential for crafting realistic floral designs. For example:
- Petal tips: Perfect for crafting roses, tulips, and individual petals. Their teardrop-shaped openings allow you to create lifelike textures.
- Leaf tips: Ideal for adding those finishing touches of greenery to your designs.
- Round tips: Great for piping flower centers - like the yellow dots in daisies - or creating stems and small accent buds.
Another must-have is the flower nail, a small but mighty tool that makes assembling layered flowers, such as roses, a breeze. It works as a rotating platform, giving you precise control over the angle and placement of each petal. Here’s how it works: pipe a small dot of frosting onto the nail, press a square of parchment paper onto it to hold it in place, and start building your flower. Once finished, simply slide the parchment square off the nail and freeze the flower until it’s ready to be placed on your cake.
"Instantly elevate your dessert with an elegant buttercream rose. Made by layering petals on a flower nail, this blooming buttercream flower is easy to make once you get the hang of it!" - Wilton
These tools are the backbone of buttercream flower decorating, but pairing them with additional accessories can make the process even smoother.
Additional Decorating Tools
While piping tips and flower nails are the stars of the show, a few extra tools can make decorating easier and more precise.
- An offset spatula is perfect for spreading the base layer of frosting and carefully positioning frozen flowers onto your cake.
- A turntable allows you to smoothly rotate your cake as you decorate, helping you achieve even, polished designs.
- Bench scrapers are excellent for creating clean, sharp edges on your cake before adding your floral details.
For added convenience, couplers are a game-changer. They let you switch between piping tips without needing to change the entire bag, making it simple to alternate between petals and leaves. And here’s a pro tip for filling piping bags: place the bag into a tall glass and fold the edges over the rim. This keeps the bag open, making it much easier to fill with frosting - no mess, no stress.
With these tools in your arsenal, you’ll be well-equipped to create buttercream flowers that look as good as they taste.
Solving Common Outdoor Decorating Problems
Keeping Buttercream from Melting
Outdoor Easter gatherings call for strategies that can withstand the heat. Butter begins to break down at temperatures above 82°F, and during tests at 88°F with 35% humidity, buttercream frosting turned into a "soup" in under two hours. To avoid this, keep your decorated cake refrigerated until it’s time to head out.
"There is nothing you can do to buttercream to keep it from melting if you put it out in the direct hot sun. This buttercream stands up better to warmer temperatures... but you want to be reasonable about it."
– Kara, Author, I Scream for Buttercream
Set your fridge to about 40°F to reduce condensation when transitioning the cake outdoors. Once outside, place the cake in the shade. If the temperature climbs above 75°F and the event lasts more than an hour, either bring the cake back indoors or keep it on ice between servings. Should the frosting begin to droop, a quick chill in the fridge for 10–15 minutes can help. For extra stability, mix in 2–3 tablespoons of powdered sugar before re-whipping.
If the heat causes minor texture issues during decoration, don’t worry - there are simple fixes.
Correcting Piping Errors
Warm weather can lead to piping mishaps, but they’re easy to fix. If your piped flowers or details look frayed, the buttercream might be too stiff. Adjust the consistency by mixing in 1 teaspoon of room-temperature liquid at a time until it smooths out.
"If your buttercream is too thick... the details look frayed when you pipe with it. To fix it, simply add room temperature milk, 1 tsp at a time, until the consistency is just right."
– Whitney, Founder, Sugar & Sparrow
For air bubbles or damaged areas, apply a thin layer of buttercream over the trouble spots, chill until firm, and then add a final smooth layer to even things out. To prevent the buttercream from forming a dry crust while you work, keep the main bowl covered with plastic wrap.
Once your buttercream is smooth and your designs are on point, it’s time to ensure those vibrant spring colors stay bright.
Protecting Colors from Fading
After tackling heat resistance and piping issues, focus on keeping your cake’s colors bold and beautiful. Direct sunlight can fade even the most vibrant shades. To offset yellow tones in white frosting, add a tiny speck of violet gel food coloring. Stick to concentrated gel colors, like Americolor Soft Gel Paste, instead of liquid food coloring for more vibrant results. For a bright white base, opt for clear vanilla extract rather than the traditional brown version.
Position your finished cake out of direct sunlight whenever possible. Even heat-stable frosting can lose its vibrancy after prolonged UV exposure. If you need to display the cake in full sun, aim to limit it to 30 minutes or less to keep those colors looking fresh.
Conclusion
Make your outdoor Easter celebrations a success with heat-stable buttercream. A 50/50 blend of butter and shortening, strengthened with meringue powder, ensures your frosting holds its shape even in warmer weather while keeping those intricate spring flower designs intact.
Using high-ratio shortening, which contains micro-emulsifiers, adds extra temperature resistance. As Whitney from Sugar & Sparrow explains:
"High ratio shortening has a high ratio of fat with added emulsifiers... the micro emulsifiers in it help your frosting to hold more sugar and liquid and thus make it more temperature resistant".
Pair this with gel food colors for vibrant Easter hues, and you're ready to tackle outdoor decorating. Managing temperatures carefully and using these specialized ingredients will help your cakes stay flawless throughout your event.
A few tips to keep in mind: refrigerate your creations until serving time, display them in shaded areas, use professional-grade ingredients, mix at low speeds to avoid air bubbles, and whip shortening-based frosting for 5 to 7 minutes for a light, fluffy texture. These steps will set you up for success.
For bakers in Los Angeles, Gloria's Cake & Candy Supplies has been a trusted resource since 1972. They offer everything you need for outdoor decorating, including high-ratio shortening brands like Sweetex or Alpine, professional piping tools, meringue powder, and Americolor gel food colors. Stop by for expert advice and specialty items that go beyond what you’ll find at your local grocery store.
FAQs
What makes high-ratio shortening ideal for heat-stable buttercream frosting?
High-ratio shortening is a pure fat product that includes emulsifiers, making it a great choice for buttercream in warmer conditions. Unlike butter, it has no water content, which increases the frosting's melting point. The result? A buttercream that's firmer, more stable, and capable of holding its shape while keeping its smooth texture and bright colors - perfect for outdoor events.
How can I keep buttercream frosting from melting at outdoor Easter events?
To keep buttercream from melting in warm outdoor conditions, it’s all about choosing the right ingredients and handling it with care. Swap out some or all of the butter for high-ratio shortening or solid vegetable shortening - these hold up much better in the heat. Another option is using crusting buttercream, which creates a firm outer layer that’s still easy to work with when decorating.
Refrigeration is your best friend here. Keep your cake and frosting chilled until it’s time to serve. If you’re transporting the cake, use a cooler or an insulated carrier to protect it from the heat. And whatever you do, keep it out of direct sunlight as much as possible. With a heat-resistant recipe and a little extra attention, your buttercream creations can stay picture-perfect throughout your event.
How can I make buttercream frosting stable for different weather conditions?
To fine-tune buttercream for different weather conditions, keep these tips in mind:
- Cooler temperatures (below 70°F): Use softened unsalted butter as the primary fat to achieve a smooth, spreadable texture. For a light and fluffy frosting, add 1–2 tablespoons of milk, heavy cream, or water per cup of powdered sugar.
- Warmer temperatures (above 82°F): Swap some or all of the butter with high-ratio shortening to ensure the frosting holds up. Reduce the liquid to about 1 tablespoon or skip it entirely, and slightly increase the powdered sugar to improve stability. You can also mix in a pinch of cornstarch or a teaspoon of meringue powder for extra firmness.
To check the consistency, spread a small amount of frosting at room temperature. If it’s too soft, add more powdered sugar or shortening. If it’s too stiff, incorporate a little liquid or butter. These tweaks will keep your buttercream looking flawless, even for outdoor events on hot days.
Shop Supplies at Gloria's
Everything mentioned in this article is available at our Culver City shop. Come see it in person or browse online.
Shop at Gloria's11117 Washington Blvd, Culver City • Tue-Sat 10am-6pm • (323) 289-8807
Related Blog Posts
- Heat-Stable Frosting for LA's Warm Climate: Why Bakers Trust High Ratio Shortening
- Professional Cake Decorating with High Ratio Shortening: Advanced Techniques
- High Ratio Shortening vs. Butter in Frosting: A Side-by-Side Comparison
- Summer Pool Party Treats: Heat-Resistant Decorating for Outdoor Fun
Spring Flowers Meet Easter
Easter falls on April 5 this year, and buttercream flowers are one of the most popular ways to decorate an Easter cake. For a personalized touch, pair your hand-piped flowers with a custom Easter edible image printed at the store. Bring your design to our Culver City shop and we will print it same-day.

