
When royal icing cracks, it’s usually due to uneven drying, incorrect ingredient ratios, or mishandling during the drying process. These cracks can ruin the finish of decorated cookies, but the good news is they’re preventable. Here’s what you need to know:
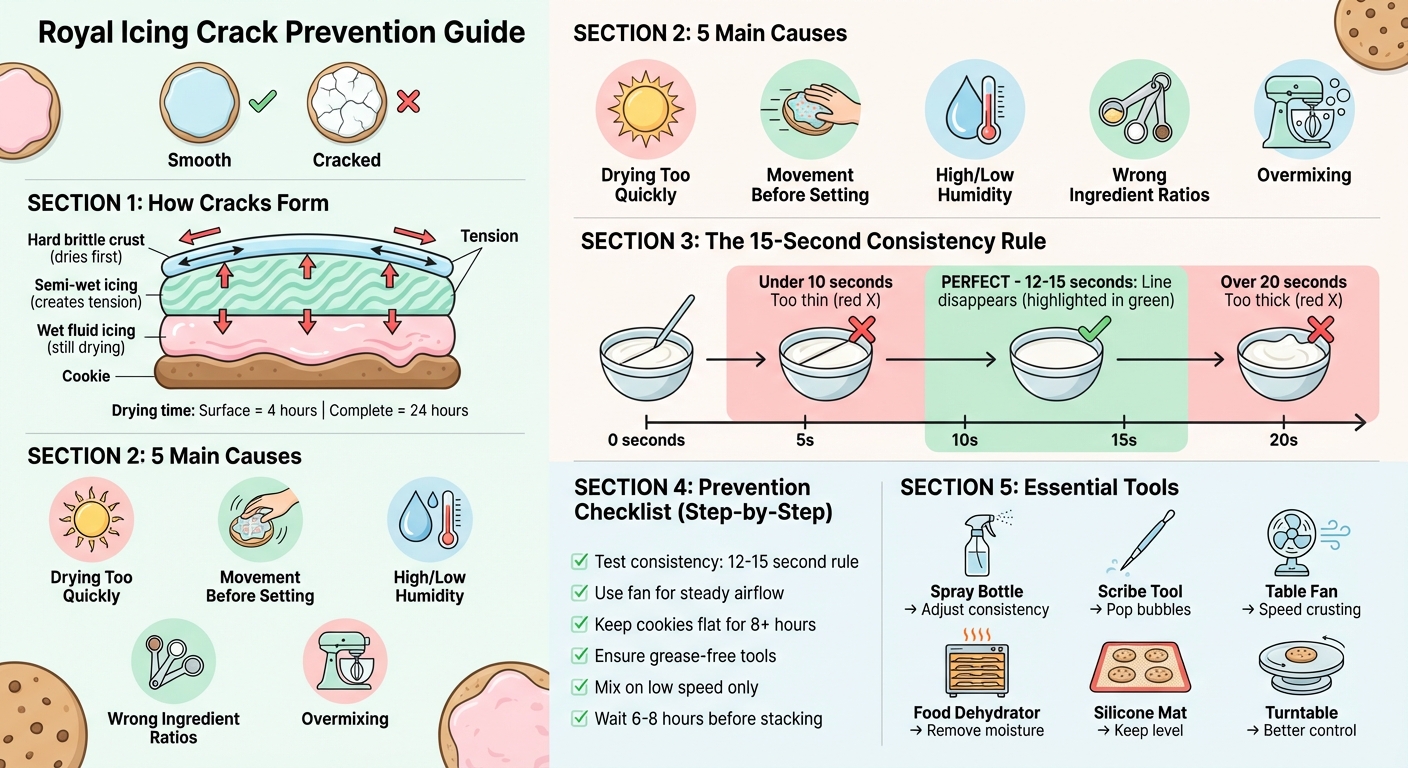
- Drying Too Quickly: The surface hardens faster than the inside, creating tension that leads to cracks.
- Movement Before Setting: Shifting cookies too soon can disrupt the delicate icing crust.
- Humidity and Temperature: High humidity slows drying, while low humidity makes the surface brittle.
- Ingredient Issues: Incorrect ratios or contamination (like grease) can weaken the icing’s structure.
- Overmixing: Too much air in the icing creates bubbles and uneven results.
Quick Tips to Prevent Cracks:
- Nail the Consistency: Use the 15-second rule - icing should smooth out in 12–15 seconds when tested.
- Control Drying: Use a fan or food dehydrator to create steady airflow and speed up crusting.
- Handle with Care: Let cookies dry flat for at least 8 hours before moving or stacking.
- Tweak Ingredients: Keep tools grease-free and adjust icing with small amounts of water or sugar.
- Avoid Overmixing: Mix on low speed to prevent excess air bubbles.
Small adjustments, like improving airflow or testing icing consistency, can make a big difference in achieving smooth, crack-free designs. Keep your workspace controlled, your tools clean, and your drying process steady for the best results.
How Royal Icing Cracks Form and Prevention Guide
Troubleshooting Sugar Cookie Decorating: How to Prevent Cracks in Royal Icing
How Royal Icing Cracks Form
Understanding how royal icing dries and moves is key to preventing cracks and achieving a flawless finish. Royal icing dries from the outside in, forming a brittle outer layer while the interior stays moist. This imbalance creates tension, which can lead to cracks.
Surface Drying vs. Internal Moisture
When royal icing begins to dry, the top layer hardens into a thin shell, while the layers beneath remain wet and fluid. Anna Marie from The Graceful Baker explains:
"At the early stages of drying, the very top layer of the flood icing has crusted over while the bottom layer is still quite wet. If you move the cookies too much at this stage, the wet icing underneath will push up against the delicately dried layer on top".
This difference between the hard surface and the liquid interior creates mechanical tension. If the wet icing shifts, it presses against the brittle crust, causing it to crack or collapse. Low humidity can worsen the problem by speeding up surface drying, leaving the outer layer too brittle. Although royal icing may feel firm to the touch after 4 hours, it typically takes 24 hours to dry completely and become stable . During this time, the icing is especially vulnerable, making gentle handling essential.
Movement Before Icing Sets
Moving cookies before the icing is fully set is one of the quickest ways to cause cracks. Even small movements - like tilting the tray or picking up a cookie - can cause the wet icing beneath the crust to shift and break through the hardened surface. Coastline Cookies Co. highlights this issue:
"The top layer of icing begins to crust - meaning it's just barely dry on the surface - while the icing underneath is still wet. When the cookie is moved, shaken, or held vertically during this stage, the wet icing underneath breaks through that delicate top layer, creating cracks, waves, and dents."
To avoid this, cookies should remain flat on a level surface for at least 8 hours. Even a slight tilt can cause the icing to pool or shift, putting uneven pressure on the crust and leading to imperfections.
Cookie Size and Shape Effects
The size and shape of the cookie also play a role in how icing cracks form. Larger cookies, which hold more wet icing under the crust, are more prone to internal shifting. Smaller or narrow sections face a different challenge: uneven drying rates. For example, in narrow areas like the stem of a pumpkin-shaped cookie, the edges dry faster than the center. Judit from The Sweet Designs Shoppe explains:
"When you flood with Royal Icing the edges dry faster and applying too much weight causes the icing to sink mostly in the middle".
This uneven drying often results in craters or depressions, particularly in smaller or narrow flooded areas. Complex shapes with protruding parts are especially at risk during the semi-dried stage. These sections lack the surface tension needed to support the weight of the icing as moisture evaporates, making them more likely to crack or collapse .
Environmental and Ingredient Factors
The way your royal icing dries - whether it forms a smooth, flawless surface or ends up cracking - depends heavily on environmental conditions and the precision of your ingredient ratios. Even the best decorating technique can't overcome an unfavorable environment or poorly balanced recipe. Understanding these variables is key to applying the practical solutions detailed in the next section.
Humidity and Temperature Effects
Humidity and temperature play a huge role in how royal icing sets. High humidity, in particular, can wreak havoc, leaving the icing runny and unstable. Lisa from The Bearfoot Baker explains:
"Humidity can cause the royal icing to be runny and not allow it to dry in a timely manner. It can cause the colors of the royal icing to bleed together hours after it has dried."
Normally, royal icing sets within 2–4 hours, but under humid conditions, this process can stretch to as long as 24 hours. Since royal icing relies on being a high-sugar, low-moisture mixture, excess moisture disrupts its delicate structure. To counteract this, you can use tools like a dehumidifier, fan, or even a window air conditioner to reduce the moisture in the air. A heat gun is also a handy tool to quickly set the icing surface during decorating, helping to prevent color bleeding between sections.
Ingredient Ratios and Contamination
Getting the ingredient ratios just right is just as important as managing the environment. The balance of ingredients is critical for the icing's structural integrity. A standard recipe typically uses two parts egg white to nine parts sugar by weight. Adding a small amount of cream of tartar - about 1/4 to 1/2 teaspoon per batch - further stabilizes the whipped structure .
Another factor to watch out for is contamination. Even a tiny bit of grease or oil can stop the icing from setting correctly. Make sure all your bowls, beaters, and tools are completely grease-free before you begin. If your icing turns out too thin due to environmental moisture, you can fix it by gradually adding sifted powdered sugar, one teaspoon at a time, until you reach the desired consistency .
Overmixing and Food Coloring Problems
The way you mix your icing and the type of food coloring you use can also affect its texture and finish. Overmixing, especially at high speeds, introduces too much air into the icing, leading to bubbles that create a bumpy, uneven surface as it dries. The Frosted Kitchen advises:
"If you beat on too high of a speed, you will get air bubbles in the icing which will show up on the cookie. Trust me, these are a pain in the butt to pop."
To avoid this, use a paddle attachment and stick to low or medium mixing speeds. When it comes to coloring, stick with water-based or gel-based food colorings. Oil-based colorings can break down the icing structure, causing it to collapse. For best results, mix gel color into stiff icing before thinning it with water to avoid a lumpy texture. Start with small amounts of color and let it sit for 1 to 2 hours to deepen naturally, rather than adding too much at once.
Next, we’ll dive into techniques for achieving the perfect icing consistency and ensuring it dries effectively.
sbb-itb-529d1c3
How to Prevent and Fix Royal Icing Cracks
Now that you know what causes cracks, let’s dive into how to prevent them. The secret lies in mastering a few techniques: nailing the right icing consistency, managing the drying process, and handling your cookies with care.
Getting the Right Icing Consistency
The magic number here is "15-second consistency." When you run a knife or scribe tool through the icing, the line should vanish in about 12 to 15 seconds. This balance ensures your icing is thick enough to hold its shape for outlining but fluid enough to flow smoothly when flooding.
To fine-tune your icing, use a spray bottle to add water gradually - small amounts go a long way. If it’s too thin, sift in powdered sugar one teaspoon at a time. Be cautious: even half a teaspoon of water per 100 grams of powdered sugar can make the icing too runny. Before decorating, test your icing on a flat plate to see if it sets properly.
Once you’ve got the consistency right, the next step is creating the perfect drying environment.
Drying Methods That Work
Airflow is your best friend when it comes to crack-free icing. After decorating, place your cookies in front of a small table fan. This helps form a thin surface crust quickly, preventing craters and giving a glossy finish. If you’re battling humidity, a food dehydrator on a low setting can help remove excess moisture.
Royal icing typically needs 6–8 hours to harden at room temperature. In particularly humid conditions, consider using a dehumidifier or air conditioner in the drying area to keep moisture levels in check.
Handling Cookies During Drying
Once your icing is applied, handle your cookies with care - especially during the early drying stages. Moving them too soon can cause cracks or sunken areas since the icing underneath is still soft. Wait until a solid crust has formed before relocating them, and let them fully harden (at least 6 to 8 hours) before stacking. When transporting, use a flat surface like a cookie sheet or silicone mat to keep them stable.
Tools for Better Results
Having the right tools can make all the difference. Here are some essentials to help you achieve flawless icing:
| Tool | Purpose | Benefit |
|---|---|---|
| Spray Bottle | Adjusting icing consistency | Allows precise moisture control to avoid over-thinning |
| Scribe Tool | Testing consistency and popping bubbles | Easier to handle for detailed, precise work |
| Table Fan | Creating airflow during drying | Speeds up crust formation and adds a glossy finish |
| Food Dehydrator | Removing moisture in humid climates | Ensures smooth, even drying |
| Silicone Mats | Providing a stable, non-stick surface | Keeps cookies level and simplifies cleanup |
| Cookie Turntable | Rotating cookies while decorating | Offers better control for detailed designs |
A spray bottle is perfect for fine-tuning your icing without overdoing it. A scribe tool, compared to a toothpick, gives you better control for popping air bubbles without ruining your design. And if you’re working in a humid environment, tools like a food dehydrator or a dehumidifier can save you from countless headaches.
Conclusion
Cracking in royal icing often stems from issues like improper consistency, rushed drying, or less-than-ideal conditions. The process combines a bit of science with technique, and understanding these elements is key to success. Knowing how air bubbles can strengthen icing, how humidity affects drying time, and why the 15-second rule is crucial sets you on the path to achieving smooth, crack-free results.
You don’t need fancy tools or years of experience to get it right. Simple items like a spray bottle to adjust consistency, a small fan to improve airflow, and grease-free tools can make a noticeable difference. As Mike Tamplin from Semi Sweet Designs says, "Achieving the right royal icing consistencies is the hardest yet the most important part of cookie decorating". Focus on nailing the consistency and creating the right drying environment for success.
Small adjustments can go a long way in eliminating cracks. Start with one technique - test your icing on a plate, use the 15-second consistency rule, or add a fan to ensure even drying. These steps can make a big difference in the final outcome.
FAQs
How can I check if my royal icing consistency is correct?
To check if your royal icing has the right consistency, try these easy methods:
- Spoon Test: Dip a spoon into the icing and lift it out. If you're working with stiff icing, the peak should stay firm. If it flattens or collapses, the icing is too thin.
- Dot Test: Place a small dot of icing on parchment paper. Stiff icing will retain its shape, while flood icing should spread just enough to fill a shallow area without spilling over the edges.
- Piping Test: Pipe a line of icing onto parchment paper. It should flow smoothly and form an unbroken line (ideal for piping consistency). If the icing is too thick, add a few drops of water. If it’s too thin, mix in a bit of powdered sugar.
Make adjustments slowly - add powdered sugar one teaspoon at a time to thicken or a few drops of water to thin. These quick checks will help you get your royal icing just right for decorating!
What are the best tools to help royal icing dry faster and prevent cracking?
To help royal icing dry faster and minimize the risk of cracking, you can use tools that enhance airflow and provide gentle heat.
- Countertop or box fan: Position your decorated cookies in front of a fan. This promotes even air circulation around the cookies, speeding up the drying process.
- Food dehydrator: Set the dehydrator to a low temperature, around 95°F, and place the cookies on the trays. The steady heat and airflow can significantly reduce drying time compared to simply leaving them out at room temperature.
These methods can cut down the usual 6–8 hour drying time and help your royal icing set evenly and smoothly.
How does humidity impact royal icing, and what can I do to prevent issues?
Humidity can be a real troublemaker when it comes to royal icing. It can make the icing sticky, stop it from setting properly, or even lead to cracks and color bleeding. On humid days, both the icing and cookies can soak up extra moisture, leaving you with soft or uneven finishes. And even after you've finished decorating, high humidity during storage or transport can ruin your designs.
To sidestep these issues, try decorating in a space where the humidity is low - ideally below 50%. If necessary, use a dehumidifier or air conditioner to help control the environment. Store your icing in airtight containers, pressing plastic wrap directly onto the surface to shield it from moisture. For extra insurance, make sure your cookies are fully cooled before icing them. You might also tweak your icing recipe slightly by adding a bit more powdered sugar or a pinch of cornstarch to help it stay firm. Once decorated, let your cookies dry in a low-humidity area. To speed things up, you can use a fan or a food dehydrator set to around 95°F.
By following these tips, you'll keep your royal icing smooth, vibrant, and free from cracks, no matter how humid it gets.
Shop Supplies at Gloria's
Everything mentioned in this article is available at our Culver City shop. Come see it in person or browse online.
Shop at Gloria's11117 Washington Blvd, Culver City • Tue-Sat 10am-6pm • (323) 289-8807
Related Blog Posts
- Why Fondant Cracks And How To Prevent It
- Ultimate Guide To Fixing Fondant Flaws
- How to Master Royal Icing Piping Techniques
- Thanksgiving Cake Decorating: Fall Colors and Flavors

