
Mercken's colored chocolate wafers are pre-colored, meltable candy coatings that simplify decorating cakes, cookies, and candies. Unlike traditional chocolate, these wafers don’t require tempering, making them easier to use. Available in 12 vibrant colors, along with milk and dark chocolate options, they melt smoothly and set with a professional finish. Popular for holiday treats, weddings, and themed events, these wafers are perfect for dipping, molding, and creating custom designs.
Key Details:
- Colors: White, Super White, Red, Pink, Blue, Royal Blue, Yellow, Orange, Orchid (Purple), Light Green, Dark Green, Black.
- Flavors: Mostly vanilla-based, with chocolate options for Cocoa Lite (milk) and Cocoa Dark.
- Uses: Molding, dipping, drizzling, and custom decorations.
- Melting Tips: Melt between 115°F and 120°F, cool to 98°F–102°F for best results.
- Storage: Keep in a cool, dry place (65°F–68°F); avoid refrigeration.
For bakers in Los Angeles, Gloria’s Cake & Candy Supplies offers these wafers at $9.25–$9.50 per pound, along with expert advice and same-day pickup. Whether you're creating bold holiday designs or elegant wedding confections, Mercken's wafers make decorating simple and effective.
Merckens Chocolate Melts 101: When to Buy, How to Store & Shelf Life
Mercken's Rainbow Line Color Options

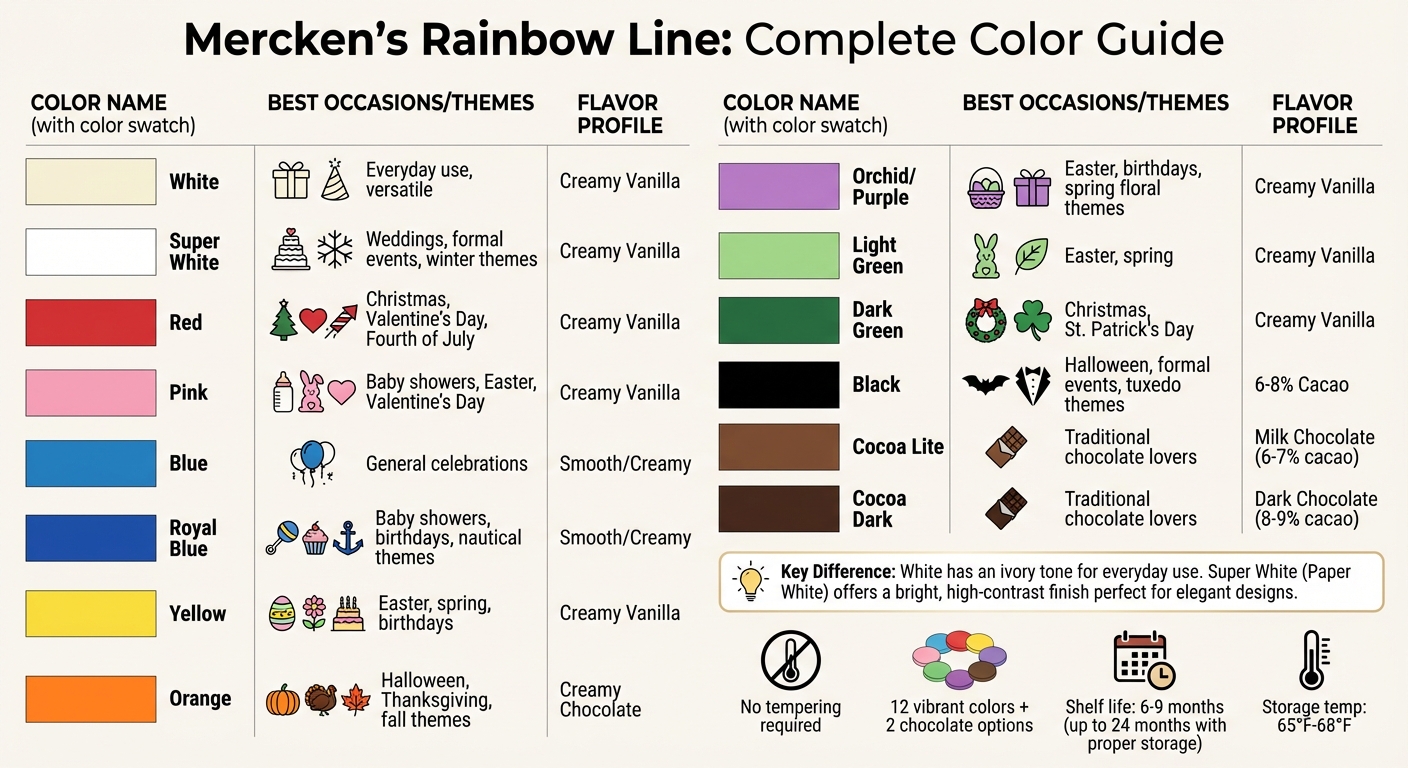
Mercken's Colored Chocolate Wafers Color Guide by Occasion and Flavor
Available Colors and Descriptions
Mercken's Rainbow Line features 12 bold, eye-catching colors alongside classic chocolate options. The selection includes White (with an ivory tone), Super White (a bright white), Red, Pink, Blue, Royal Blue, Yellow, Orange, Orchid (Purple), Light Green, Dark Green, and Black. These wafers melt effortlessly without requiring tempering and set with a smooth, non-waxy finish at room temperature.
A key difference lies between White and Super White. The standard White wafers have a soft ivory tint, making them versatile for everyday use. On the other hand, Super White (also called Paper White) offers a strikingly bright finish, perfect for high-contrast designs or elegant wedding confections. The Black wafers stand out with their 6–8% cacao content, delivering a glossy, subtle chocolate flavor rather than vanilla. Red and Pink wafers maintain their vibrant hues even in thin coatings, making them ideal for decorative work.
For traditional chocolate enthusiasts, Cocoa Lite (milk chocolate style with 6–7% cacao) and Cocoa Dark (dark chocolate style with 8–9% cacao) are also available. Proper storage ensures these wafers retain their quality for 6–9 months.
Understanding these color and flavor profiles can help you select the perfect option for your project, as outlined in the next section.
Matching Colors to Themes and Occasions
Each color in the Rainbow Line brings its own personality to themed events and special occasions. Red and Dark Green are holiday favorites for Christmas, while Orange and Black dominate Halloween and fall treats. For spring and Easter, Light Green, Pink, Yellow, and Orchid are excellent choices, whether you're making chocolate bunnies or decorative Rice Krispies nests.
Weddings often call for the crisp, clean look of Super White, while Black wafers add a bold, modern touch to formal or tuxedo-themed designs. Baby showers and birthdays frequently feature Pink and Royal Blue for gender-specific treats, with Yellow and Orchid adding a lively touch to general celebrations. Royal Blue is also a fantastic choice for nautical themes, and Dark Green works beautifully for St. Patrick's Day festivities.
| Color | Best Occasions/Themes | Flavor Profile |
|---|---|---|
| Super White | Weddings, formal events, winter themes | Creamy Vanilla |
| Red | Christmas, Valentine's Day, Fourth of July | Creamy Vanilla |
| Orange | Halloween, Thanksgiving, fall themes | Creamy Chocolate |
| Pink | Baby showers, Easter, Valentine's Day | Creamy Vanilla |
| Royal Blue | Baby showers, birthdays, nautical themes | Smooth/Creamy |
| Orchid (Purple) | Easter, birthdays, spring floral themes | Creamy Vanilla |
| Black | Halloween, formal events, tuxedo themes | 6–8% Cacao |
Understanding Flavor Notes in Different Colors
While most colors in the Rainbow Line feature a creamy vanilla base, a few stand out with distinct flavors that can influence your recipes.
For example, Orange wafers offer a creamy chocolate taste. Black wafers, with their 6–8% cacao content, lean toward a chocolate base rather than vanilla. If you're using the Cocoa Lite or Cocoa Dark options, expect the familiar flavors of milk chocolate (6–7% cacao) or rich dark chocolate (8–9% cacao).
"Our Rainbow™ line of confectionery wafers comes in delicious flavors like vanilla, chocolate, and butterscotch and offers a wide range of vibrant complexions to make all of your creations come alive." – Royal Wholesale Candy
Before diving into your project, always check product labels to confirm the flavor profile. If you're aiming for a specific taste, like peppermint for green wafers, you can add oil-based flavorings to the melted chocolate. Just steer clear of water-based flavorings, as they can cause the chocolate to seize.
How to Use Mercken's Colored Wafers
Dipping and Coating Methods
To get started, melt the wafers between 115°F and 120°F, then let them cool to around 98°F–102°F. Be careful not to exceed 120°F, as this can ruin the texture. Always use room-temperature treats for dipping - cold items can lead to uneven coatings. For cake pops, fully submerge them in the melted candy. When working with pretzels or cookies, dip them halfway and place them on parchment paper to set. If the chocolate becomes too thick, mix in some paramount crystals to restore a smooth consistency.
"Rainbow™ wafers are oil-based, so never let water come in direct contact with them. Make sure all tools and your working area are completely dry throughout your candy making process." – Royal Wholesale Candy
Once dipped, let your treats set in a cool space between 45°F and 65°F with good airflow. If you’re in a hurry, you can briefly use the refrigerator, but avoid storing them there for too long to prevent condensation or bloom.
Working with Candy Molds
One of the perks of Mercken's wafers is that they don’t require tempering, making them easy to use for molds. Pour the melted wafers directly into the molds - no greasing needed, as the chocolate will release naturally. For detailed designs, keep the chocolate at a steady 98°F–102°F. You can add extra flair by painting details into the mold with a small brush or piping bag. Let each color set briefly before adding another layer. If the chocolates stick after cooling, pop the mold into the freezer for one to two hours. This helps the chocolate contract, making it easier to release. Depending on the thickness, your candies should harden in 10 to 60 minutes.
Next, let’s explore how to use these wafers for drizzles and decorative accents.
Creating Drizzles and Decorations
Once you’ve mastered dipping and molding, it’s time to add some flair with drizzles and custom decorations. For a zig-zag pattern or colorful lines on cookies and brownies, use a fork or whisk to flick the melted wafers over your treats. Want to create custom cake toppers? Pour the melted candy onto parchment paper in your desired shapes. Once hardened, peel them off and place them on your cakes or cupcakes. For intricate piping work, mix in a touch of paramount crystals to improve the flow. To keep your decorations glossy and professional-looking, let them cool in a dry, cool area with low humidity.
Creating Custom Colors
Blending Pre-Colored Wafers Together
Mixing different colored wafers is a simple way to create custom shades. Start by placing your chosen wafers in a microwave-safe bowl to ensure they blend evenly when melted. Want pastel tones? Use a smaller amount of colored wafers and combine them with a larger base of White or Super White wafers. For an ombre effect, prepare separate bowls with varying ratios like 4:1, 2:1, and 1:1 of white to colored wafers. To adjust the shade, add more white wafers to lighten or more colored wafers to darken.
Mercken's provides a Color Magic Mixing Chart to guide you through creating a wide variety of hues. If you're working on matching specific colors - like brand colors for corporate events - measure your wafers carefully. Use wafer counts for small batches or switch to weight-based measurements for larger quantities to ensure consistent results.
Once you've mixed your base color, you can refine it further with precise tinting techniques.
Tinting with Oil-Based Candy Colors
To achieve a specific shade that isn't available in standard options, you can tint white or light-colored wafers using oil-based candy colors. Avoid water-based or gel-based food coloring, as these will cause the chocolate to seize, making it unusable. Begin with White or Super White wafers as your base to ensure the most accurate color. Add the oil-based color gradually, using a toothpick, and stir thoroughly between each addition.
If the mixture becomes too thick, you can adjust its consistency by incorporating paramount crystals. It's crucial to work in a completely dry environment to prevent moisture from ruining your batch.
These tinting methods allow you to customize colors for any occasion. For exact matches, especially for events or branding, follow the steps below.
Recreating Event and Brand Colors
When preparing for weddings, corporate events, or themed parties, test your color ratios in small batches first. For example, combine 5 wafers of one color with 5 of another to experiment until you find the perfect shade. Once you've nailed the color, scale the recipe by multiplying the ratio and record the measurements by weight to maintain consistency in larger batches. These methods pair seamlessly with earlier guidance on blending and tinting.
| Method | Ideal Occasions | Key Requirement |
|---|---|---|
| Blending Wafers | Pastel tones, ombre effects, standard colors | Use Mercken's Color Magic Chart for ratios |
| Oil-Based Tinting | Precise brand matching, vibrant hues | Must use oil-based concentrated colors |
| Adding White Wafers | Softening bold colors, creating lighter tints | Start with a 1:1 ratio, adjust as needed |
Store your custom-colored wafers in a cool, dry space between 65°F and 68°F, with humidity levels below 50%. Avoid refrigeration, as condensation can damage both the color and texture.
sbb-itb-529d1c3
Melting and Troubleshooting Tips
How to Melt Mercken's Wafers
Getting the melting process right is key to achieving a flawless finish on your decorations. The microwave method is the fastest way to melt Mercken's wafers. Place the wafers in a microwave-safe bowl and heat for 30 seconds at medium/high power. Stir thoroughly, then continue heating in 15–30-second intervals. Once the wafers start to melt, switch to shorter bursts of 10–20 seconds, especially for white or colored wafers, as they burn more easily. Keep the temperature between 115°F and 120°F to avoid burning, and then let it cool to 98°F–102°F for the best results.
For the double boiler method, fill the bottom pot with simmering water - just warm enough to touch - and place the wafers in the top bowl or pot. Be cautious to keep water and steam away from the chocolate, as even a small amount can ruin the batch. Stir frequently, and ensure the bowl doesn’t touch the water to prevent scorching.
"White chocolate can burn a little easier than milk or dark chocolate, so we recommend decreasing to 10 to 20-second intervals once the chocolate starts to melt." - Niblack Foods
Stirring between each heating interval is critical. Not only does this distribute heat evenly, but it also prevents hot spots that can lead to burning. For extended decorating sessions, keep the melted chocolate warm by placing the container on a heating pad lined with a paper towel instead of reheating it repeatedly in the microwave.
These methods ensure a smooth, melted base that's ready for adjustments and troubleshooting.
Adjusting Thickness for Different Uses
To get the perfect consistency for your dipped treats, you may need to adjust the thickness of the melted wafers. Straight from the bag, Mercken's colored wafers can be quite thick. For dipping items like cake pops or strawberries, add paramount crystals (palm kernel oil flakes) at a ratio of 1 teaspoon per 1 pound of melted wafers. Add the crystals gradually, stirring thoroughly to incorporate them. If necessary, briefly warm the mixture in short bursts to help the crystals blend in.
A thinner consistency works best for smooth dipping and enrobing, while a thicker mixture is ideal for detailed mold work or stable drizzles. Be cautious not to over-thin the chocolate, as too much oil can prevent it from setting properly. Keeping the working temperature between 98°F and 102°F will help maintain the right flow.
Fixing Common Problems
Even with careful preparation, issues can arise. Here are some common problems and how to fix them. Remember, never use water-based food coloring or let steam come into contact with your chocolate - even a tiny amount of water can cause the mixture to seize and become unusable.
| Problem | Likely Cause/Solution |
|---|---|
| Seizing (Hard/Lumpy) | Cause: Water contact or steam. Solution: If paramount crystals don’t restore smoothness, the batch is unsalvageable. |
| Thick Consistency | Cause: Overheating, a cold environment, or aging. Solution: Add 1 teaspoon of paramount crystals per pound of chocolate. |
| Grainy Texture | Cause: Overheating (burning) or moisture exposure. Solution: If burnt, it can’t be saved; if just cold, reheat in 10-second bursts. |
| Dull Finish | Cause: Improper cooling (too slow). Solution: Cool items briefly in a refrigerator set to 45°F–65°F to encourage gloss and crystallization. |
| Burnt Chocolate | Cause: Exceeding 120°F or insufficient stirring. Solution: Unfortunately, burnt chocolate must be discarded. |
If the temperature goes above 120°F, the chocolate will burn, developing a bitter smell and becoming unusable. For a professional, glossy finish on your dipped treats, allow them to cool in an environment between 45°F and 65°F. Avoid using the freezer, as condensation can form when the items return to room temperature, which can ruin the chocolate's texture and appearance.
"Merckens Candy Coatings can be remelted over and over again as long as you don't overheat in the microwave." - Niblack Foods
Storing Mercken's Wafers Properly
Best Storage Conditions
To keep your colored chocolate wafers in top shape for decorating, proper storage is key. The ideal spot? Somewhere cool, dry, and well-ventilated, with a steady temperature between 65°F and 68°F and humidity under 50%. A pantry or cabinet away from heat sources is a great choice, but steer clear of areas with frequent temperature swings.
Refrigeration or freezing? That’s a no-go. Sudden temperature changes can lead to condensation, ruining the wafers’ texture.
"Store in a cool, dry, and odorless environment. To avoid condensation, DO NOT place in refrigerator or freezer." - royalwholesalecandy.com
For extra protection, use airtight, opaque, and odor-free containers. Wafers are like sponges for smells, and light exposure can dull their vibrant colors. Following these steps not only keeps them fresh but also extends their usability.
Shelf Life and Quality Checks
When stored correctly, Mercken's wafers can last up to 24 months, compared to their standard 6–9 month shelf life. Before using, give them a quick check. Look for clumping, faded colors, or any signs of moisture or light damage.
If your wafers seem thicker when melted or have picked up unwanted odors, it’s a sign they weren’t stored properly. But don’t panic if they melt during transit in warm weather. Simply let them cool and solidify at room temperature. Once hardened, store them in an airtight container, and they’ll be ready to use again.
Conclusion
Mercken’s colored wafers are a game-changer for decorators, offering convenience and versatility. These compound coatings require no tempering - just melt and start creating. This simplicity allows you to focus on your designs rather than technical challenges. The Rainbow™ line provides bold, vibrant colors that can also be mixed or tinted with oil-based candy colors, making them perfect for any occasion, whether it’s a pastel-themed baby shower or a striking corporate event.
To get the best results, follow these tips: ensure your tools are completely dry, melt the wafers between 115°F–120°F, let them cool to 98°F–102°F before use, and add paramount crystals to thin the coating if needed. Store them properly at 65°F–68°F in an airtight container to maintain quality. These steps will help you achieve that glossy, professional finish every time.
"For almost a century, Merckens® has been the trusted brand of chocolates and confectionery coatings for sweet artisans across the globe."
- Royal Wholesale Candy
Whether you're molding chocolate hearts, dipping fresh strawberries, or adding elegant drips to cakes, Mercken’s wafers deliver reliability and stunning results. Gloria’s Cake & Candy Supplies has proudly supported creative bakers since 1972, offering expert advice, same-day pickup, and the full range of Mercken’s colors. Stop by the store for personalized guidance or join one of their decorating classes to take your skills to the next level.
FAQs
How do I mix Mercken's chocolate wafers to create custom colors?
Creating custom colors with Mercken’s chocolate wafers is a straightforward process that adds a personal touch to your baking projects. Start by melting each base color separately. Use a heatproof bowl and either a double boiler or microwave, heating in short bursts. Keep the temperature at 115°F for dark chocolate or 110°F for white and milk chocolate to prevent burning.
Once melted, use a kitchen scale to measure small amounts of each color. This lets you adjust the shade precisely without wasting chocolate. Combine the melted colors in a bowl and gently mix with a silicone spatula. If the color isn’t quite right, tweak it by adding small amounts of lighter or darker chocolate until you achieve the perfect hue. To check your work, place a small dab on parchment paper and let it set briefly.
Keep the chocolate warm as you work to maintain its smooth texture and vibrant color. For any leftover blends, store them in an airtight container, label them with the date (MM/DD/YYYY), and refrigerate for short-term storage. When you’re ready to use them again, reheat gently to preserve their quality.
These simple steps make it easy to create custom chocolate shades, perfect for taking your decorating and baking projects to the next level!
How should I store Mercken's colored chocolate wafers to keep them fresh and vibrant?
To keep Mercken's colored chocolate wafers in top condition, store them in a cool, dry place with a steady temperature between 60°F and 70°F and humidity levels below 50%. Use an airtight, food-safe container or a sealed resealable bag to protect them from moisture and odors. If you need to stack the wafers, place parchment or wax paper between the layers to prevent them from sticking together.
Refrigeration should be avoided unless absolutely necessary, as it can lead to condensation, causing sugar bloom and dulling the vibrant colors. If you must refrigerate, seal the wafers tightly and allow them to return to room temperature before opening the container. Also, ensure the wafers are kept away from strong odors, direct sunlight, and heat sources to maintain their color and flavor for as long as possible.
How can I adjust the consistency of Merckens colored chocolate wafers for different uses?
To get the right consistency for Merckens colored chocolate wafers, start by melting them to a temperature between 115°F and 120°F. You can do this using a microwave (heat in 30-second bursts, stirring after each interval) or a double boiler. Be sure to monitor the temperature with a candy thermometer to avoid overheating. Once melted, let the chocolate cool down to 98°F–102°F, which is the sweet spot for most uses.
If you need a thinner consistency - for drizzling or piping - keep the chocolate closer to 98°F. For a thicker texture, perfect for dipping or molding, aim for the higher end of the range, around 102°F. If the chocolate gets too thick while you're working, reheat it briefly in 5–10 second increments, stirring each time. On the flip side, if it’s too thin, give it a few minutes to cool while stirring occasionally.
One critical tip: make sure all your tools and workspace are completely dry. Even a tiny drop of water can make the chocolate seize, ruining its smooth texture. And whatever you do, don’t let the temperature go above 120°F, as overheating can completely ruin the chocolate’s consistency.

