
Mercken's chocolate wafers make matching brand colors in chocolate simple and precise. With their Rainbow line of pre-colored wafers and Super White base, you can create anything from vibrant hues to subtle pastels. These wafers don’t require tempering, melt smoothly, and are easy to work with, making them ideal for both professionals and hobbyists.
Key Points:
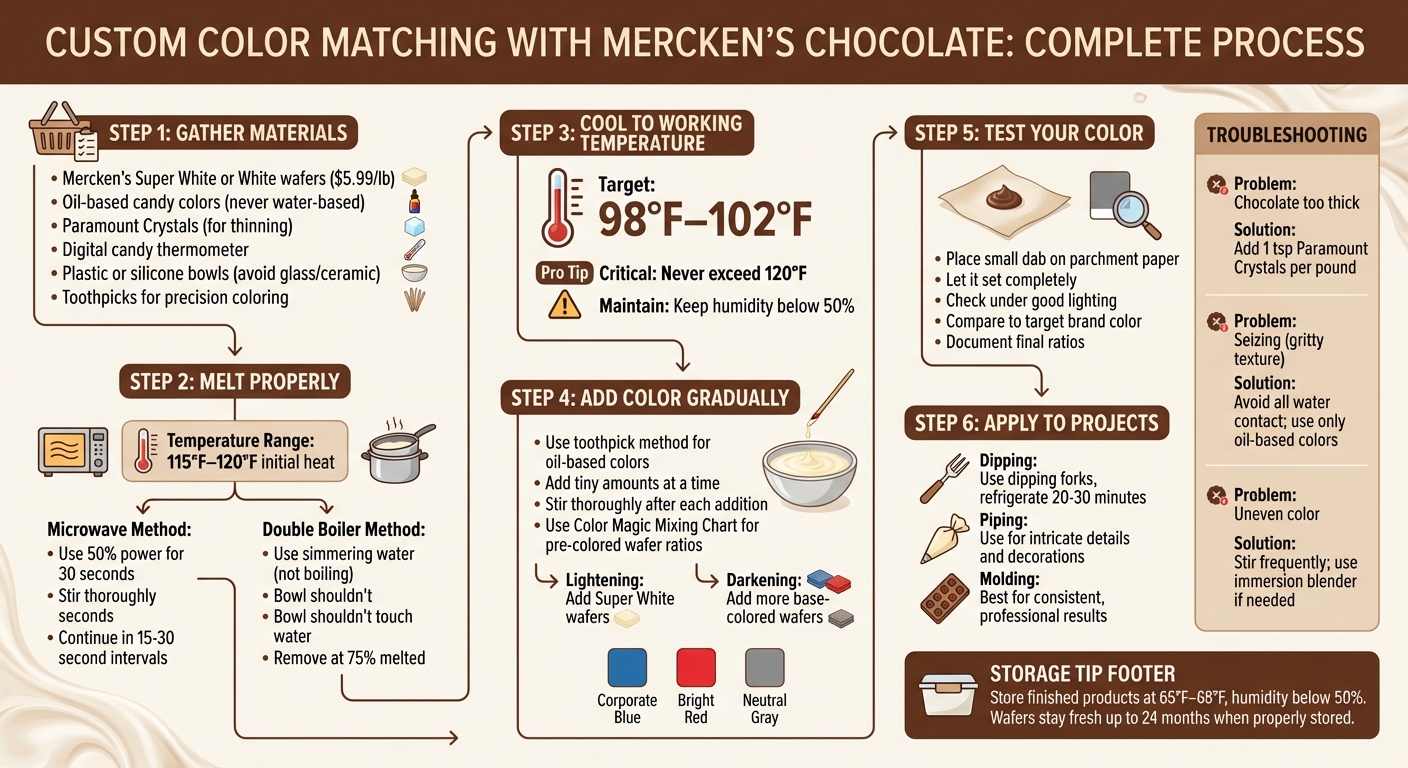
- Base Colors: Use pre-colored wafers like Navy Blue, Red, and Yellow, or start with Super White for custom shades.
- Coloring: Stick to oil-based candy colors to avoid seizing. Gradually mix using a toothpick for precision.
- Melting Tips: Maintain chocolate at 98°F–102°F. Use a microwave or double boiler for controlled melting.
- Tools: Use a digital thermometer, silicone bowls, and Paramount Crystals to ensure smooth consistency.
- Applications: Ideal for dipping, piping, and molding projects, perfect for replicating logos or event themes.
For Los Angeles-based bakers, Gloria's Cake & Candy Supplies offers Mercken's wafers and expert advice. Whether you're creating corporate blue or custom red, the right techniques ensure flawless results. Keep humidity below 50% and tools dry to avoid issues like seizing or uneven colors.
Step-by-Step Guide to Custom Color Matching with Mercken's Chocolate Wafers
Tools and Ingredients You'll Need
Mercken's Wafers and Oil-Based Colors

For custom color matching, Mercken's Super White and White wafers are your go-to options. Super White is ideal when precision is key, especially for replicating brand colors. Its pure white base avoids the yellow or ivory undertones common in standard white chocolate.
Both wafer types are crafted with palm kernel oil, making them easy to melt without the hassle of tempering. Pricing is reasonable, with individual bags costing about $5.99 per pound, while larger projects can benefit from a 5-pound bag at $37.99.
"White chocolate [is] sweet, creamy, perfect for coloring & decorating." – Oasis Supply
When it comes to coloring, stick to oil-based or powdered food colors. Water-based colors can ruin the chocolate by causing it to seize. If your mixture becomes too thick, add 1 teaspoon of Paramount Crystals per pound to restore its smoothness.
With the right ingredients ready, achieving flawless results also depends on using the proper tools.
Equipment for Accurate Color Matching
A digital candy thermometer is a must-have. Keep the chocolate at a steady temperature between 98°F and 102°F, and never let it exceed 120°F to avoid burning. Opt for plastic or silicone bowls for melting since glass or ceramic bowls retain too much heat, increasing the risk of overheating.
You'll also need toothpicks or a knife for precision. Since oil-based colors are highly concentrated, add them in tiny amounts, stirring thoroughly after each addition. To make blending easier, the Mercken's Color Magic™ Mixing Chart provides exact ratios for combining pre-colored Rainbow wafers to create specific shades. If you're near Gloria's Cake & Candy Supplies in Culver City, their staff can guide you through using the chart and selecting the right tools to achieve your perfect color match.
How to Melt Mercken's Wafers Properly
Melting Methods That Prevent Overheating
Melting Mercken's wafers is simpler than traditional chocolate because they’re made with vegetable oil instead of cocoa butter, eliminating the need for tempering. However, keeping the temperature under control is still essential to achieve the perfect consistency.
The microwave method is quick but demands careful attention. Always use a plastic or silicone bowl - avoid glass or ceramic, as these materials retain heat and can scorch the chocolate even after it’s removed from the microwave. Start by microwaving the wafers at 50% power for 30 seconds. Stir thoroughly, then continue heating in shorter intervals of 15–30 seconds, stirring each time.
For a gentler approach, the double boiler method is ideal. Use simmering water (not boiling) and ensure the bowl doesn’t touch the water. Remove the bowl when about 75% of the wafers have melted; the residual heat will finish melting the rest as you stir. This prevents overheating and ensures a smooth texture. Be cautious of steam, as even a small amount can cause the chocolate to seize.
Once the wafers are melted to a smooth consistency, maintaining the proper temperature is key, especially if you plan to blend in colors.
Maintaining the Right Temperature
Proper temperature control ensures smooth blending and prevents issues like thickening or seizing. Initially, heat the wafers to 115°F–120°F, then cool them to a working temperature of 98°F–102°F. A digital candy thermometer is essential for accurate monitoring.
"The recommended working temperature for the Merckens® confectionery wafers is about 102°F. Always stay above 98°F." – Royal Wholesale Candy
If the chocolate becomes too thick from overheating, you can rescue it by stirring in a few unmelted wafers or adding a teaspoon of Paramount Crystals per cup. To avoid seizing, keep your workspace humidity below 50% and ensure all tools are completely dry. Even a single drop of water can turn your oil-based chocolate into an unusable paste.
How to Blend Custom Colors
Using the Mercken's Color Magic Mixing Chart
The Mercken's Color Magic Mixing Chart is a handy guide for creating custom shades by combining pre-colored wafers in specific ratios. Whether you're working on a small test batch or scaling up for a larger project, this chart provides the exact proportions you need.
Start by choosing base colors from Mercken's Rainbow line, which includes Red, Pink, Orange, Yellow, Green, Dark Green, Blue, and Super White. Melt each color separately, keeping the temperature between 98°F and 102°F, then mix them according to the chart's instructions.
"The Merckens® Rainbow™ line offers an assortment of vibrant colors, however, you may find yourself in need of a different shade or tint for your specific project. Candy coloring can be done to achieve infinite possibilities in hue." – Royal Wholesale Candy
If you're incorporating oil-based liquid colors, use the toothpick method for precision. Dip a clean toothpick into the color and stir it into the melted wafers. Add the color gradually, mixing thoroughly after each addition. This method ensures you maintain control over the shade and avoid over-saturating the mixture.
To tweak the intensity of your color, you can lighten it by adding white or "Super White" wafers. To deepen the shade, simply increase the amount of the base-colored wafers.
Testing and Refining Your Colors
Before committing to a full batch, test your custom blend on parchment paper. Place a small dab of the mixture on the parchment and let it set. Check the color under good lighting and compare it to your desired shade. If adjustments are needed, make small changes by adding more color or white wafers until you achieve the perfect hue. Be sure to document the final ratios for consistency in future projects.
For the best results, keep your workspace humidity below 50% and ensure all tools are completely dry throughout the process.
Once you've perfected your custom color, you can use it for advanced techniques like dipping, piping, or molding to elevate your creations.
How to color chocolate using candy food coloring
sbb-itb-529d1c3
Replicating Specific Brand Colors
Once you've mastered blending techniques, you can take things up a notch by replicating precise brand colors. Here's how to tackle some common hues.
Replicating Corporate Blue
Corporate blue shades can span from deep navy to lighter sky tones. Mercken's Navy Blue and Royal Blue wafers are excellent starting points. Navy Blue wafers, priced at $9.25 per pound, work well for darker, more formal branding. On the other hand, Royal Blue wafers offer a classic, versatile corporate feel.
For lighter shades like sky blue, begin with white wafers and carefully add blue oil-based color using a toothpick. If you're aiming for a tone between navy and royal blue, melt each color separately, then mix them at a temperature between 98°F and 102°F. Want to brighten an existing blue? Gradually incorporate more blue oil-based color, checking against your target shade as you go to ensure precision.
When you're ready, you can use similar techniques to create vibrant reds.
Creating Bright Red Tones
To achieve bold, brand-specific reds, start with Mercken's Red wafers as your base. This pre-colored option provides a strong foundation while preserving the texture of your mixture. Adjust the shade toward crimson or scarlet by adding small amounts of oil-based candy color. If the mixture thickens during this process, a few thinning flakes can help restore its smooth, workable texture. Keep the temperature consistent to maintain a silky finish.
Once you've mastered reds, you can move on to crafting balanced neutral tones for minimalist designs.
Making Neutral Gray Shades
Neutral gray shades are perfect for minimalist branding. Start with white wafers and gradually add black oil-based color, one drop at a time, to avoid overshooting your desired shade. To create a cohesive look, consider adding a tiny drop of a primary brand color while mixing. Continuously compare your mixture to the target shade, and once you've nailed it, document your ratios for future reference.
"I recommend not using a pure black color in the product you are working on... as it can feel stark and inconsistent with other colors you are using." – Dennis Cortés, Product Designer
Fixing Common Color Matching Problems
Working with custom colors can be tricky, even for seasoned decorators. But don’t worry - most challenges have simple solutions. Let’s dive into some common issues and how to fix them.
Preventing and Fixing Seizing
Seizing happens when Mercken's wafers come into contact with water, steam, or water-based food coloring. The sugar transforms into a syrup that binds cocoa particles, creating a gritty, lumpy mess that’s no good for dipping or molding. Preventing this is key to keeping your colors and textures on point.
Here’s how to avoid it: Make sure all your tools are completely dry. If you’re using a double boiler, stick to simmering water and dry the bowl thoroughly before placing it over the heat. Avoid storing wafers in the fridge or freezer - condensation from temperature changes can introduce moisture and cause seizing.
If the temperature of your chocolate goes over 120°F, take it off the heat immediately and mix in some unmelted wafers to cool it down. For chocolate that’s too thick but not fully seized, add a teaspoon of paramount crystals or a small amount of refined coconut oil to smooth it out. While seized chocolate isn’t ideal for coating, you can still use it in baking recipes like brownies.
Getting Even Color Distribution
Once you’ve tackled seizing, the next step is ensuring your colors blend evenly. A smooth, uniform color is essential, especially when trying to match a specific palette. Uneven streaks can usually be avoided with proper mixing techniques.
Start by stirring frequently as you melt the wafers. Since Mercken's wafers can hold their shape even when melted, consistent stirring helps distribute the heat evenly. When adding oil-based colors, do it gradually - use a toothpick to add small amounts, mixing thoroughly after each addition.
Pay attention to temperature. If you’re using a microwave, stir every 15–30 seconds to prevent hot spots. For a double boiler, keep stirring until about 75% of the wafers are melted, then remove the bowl from the heat and let the residual warmth finish the job. If you notice stubborn streaks, an immersion blender can help emulsify everything into a smooth texture. Alternatively, strain the mixture through a sieve to remove any undissolved bits. To get the best results, keep your chocolate’s working temperature between 98°F and 102°F.
Using Custom-Colored Chocolate in Your Projects
Now that you've nailed the art of color matching, it’s time to bring your custom-colored Mercken’s chocolate to life. These techniques will help you achieve polished, professional results that stay true to your brand’s color palette. For the best outcome, keep your chocolate at a working temperature of 98°F to 102°F while applying these methods. Let’s dive into how each approach can elevate your creations.
Dipping, Piping, and Molding Techniques
Dipping is perfect for giving truffles, cake pops, and pretzels a sleek, even coating. Use dipping forks to lift items out of the melted chocolate - this helps excess chocolate drip off cleanly and reduces the chance of forming a thick "foot" at the base. For truffles, roll them in the melted chocolate before adding any final toppings. Once dipped, place your items in the fridge for 20–30 minutes to set properly.
Piping allows you to add intricate details or create custom decorations like cake toppers. For easier piping, whip cooled ganache to increase its volume. You can also pipe directly onto parchment paper to craft free-standing designs, such as filigree or chocolate curls. Be sure to let these decorations harden completely before carefully peeling them off.
Molding is the go-to method for producing consistent, professional results, whether you’re making corporate logos, themed shapes, or uniform candies. Silicone molds work best - they release easily and maintain sharp, clean edges. Press the chocolate firmly into the mold to eliminate air pockets. Alternatively, for simple shapes, use mini muffin tins or cookie cutters to mold treats like Rice Krispies squares.
Choosing the Right Technique for Your Project
Each of these techniques has its strengths, so select the one that aligns with your project’s goals. For cakes and petit fours, dipping or pouring is ideal. You can partially dip for a decorative contrast or fully submerge for complete coverage. For candies and confections, molding is the way to go, especially when consistency is key, such as replicating brand colors for corporate events or product launches. If you’re working with large batches and want to add accent colors, drizzling with a fork or squeeze bottle offers an artistic touch without the time investment of individual dipping.
A quick tip: if you need to thin your chocolate with oil, adjust other liquids in the recipe to avoid making the mixture too soft to set. Once your projects are complete, store them in a cool, dry place at 65°F to 68°F with humidity levels below 50% to maintain their quality and finish.
Conclusion
Mercken's custom color matching techniques make it easier than ever to replicate brand colors with precision. Thanks to their compound coating formula, which requires no tempering, these methods are accessible for both commercial bakeries and home bakers alike. By following temperature guidelines, using oil-based colors, and applying trusted mixing techniques, you can achieve vibrant, consistent results every time. These strategies are perfect for molding, piping, and dipping with accuracy.
The versatility of these wafers is unmatched, making them essential for projects like recreating corporate logos or crafting intricate decorations. Whether you're molding a brand identity or piping fine details, Mercken's wafers deliver a high-gloss finish that resists blooming, ensuring a polished, professional look. The Super White wafers serve as an excellent base for achieving precise brand colors, while the Rainbow™ line offers pre-colored options that can be blended to match any palette. As Stover & Company states, "Mercken's is by far the most popular with loyal customers, some of whom only use Merckens and have been using it for over 30 years".
For bakers in Los Angeles, Gloria's Cake & Candy Supplies has been a trusted resource since 1972, offering expert advice and same-day pickup for all your color-matching needs. Whether you're looking for Mercken's wafers, oil-based candy colors, or tips on achieving the perfect corporate blue, their knowledgeable staff is ready to assist. With properly stored wafers staying fresh for up to 24 months, you can stock up with confidence, knowing you'll always be prepared for your next branded creation. Mastering custom color matching with Mercken's ensures every project stands out with consistent, professional-quality results.
FAQs
How can I keep Merckens chocolate wafers from seizing while melting?
To keep Merckens chocolate wafers from seizing, it’s crucial to start with dry tools and pans - just a tiny bit of water can cause the chocolate to clump. Melt the wafers slowly using low, indirect heat, such as with a double boiler, and make sure the temperature stays under 115°F. Stir gently with a silicone spatula to avoid incorporating air.
For a smoother texture, you can mix in a small amount of neutral oil or shortening - about 1 teaspoon for every 8 ounces of chocolate. This not only improves fluidity but also helps safeguard against seizing if moisture happens to sneak in. If water does accidentally get into the chocolate, act fast: add more melted wafers and a little oil to bring the mixture back together. Following these tips will keep your chocolate silky and perfect for achieving precise color matches.
What tools do I need to match brand colors with Mercken’s chocolate wafers?
To match colors precisely with Mercken’s chocolate wafers, you’ll need a few key tools and techniques. First, grab a candy thermometer to keep the chocolate at the ideal melting temperature - between 98–102°F. Be careful not to let it go above 120°F. Use a completely dry microwave-safe bowl or a double boiler for melting, as even a tiny bit of moisture can ruin the texture by causing the chocolate to seize.
When it comes to adding color, stick with oil-based edible colorants. Add them slowly, one drop at a time, to maintain control over the shade. Use a toothpick or the tip of a knife for precise stirring, and then mix thoroughly with a spoon or spatula for an even color. If you’re aiming for a specific shade, a color-mixing chart like Mercken’s Color Magic™ Mixing Chart can be a lifesaver. With these tools and steps, you’ll be well-equipped to match colors accurately and consistently.
How do I match a specific brand color using Merckens® wafers?
To match a brand color using Merckens® wafers, start by choosing a base wafer color that comes closest to your desired shade - options like white, pink, or dark chocolate work well. Melt the wafers to a temperature of 115–120°F, then let them cool to 98–102°F before adding any color. This temperature range helps keep the coating smooth and easy to work with.
If you need to adjust the shade, blend small amounts of different wafer colors together. A color chart can be helpful here if you have one. Test the resulting shade by spreading a small amount on parchment paper. For further adjustments, you can use oil-based edible coloring, adding just a few drops at a time and mixing thoroughly. Be sure to maintain the mixture at 98–102°F while working to ensure consistency.
To simplify future projects, document the exact combination of wafers and coloring you used. This way, you can easily replicate the same shade later. Store any leftover mixture in a sealed container at room temperature to preserve its color and quality.
Shop Supplies at Gloria's
Everything mentioned in this article is available at our Culver City shop. Come see it in person or browse online.
Shop at Gloria's11117 Washington Blvd, Culver City • Tue-Sat 10am-6pm • (323) 289-8807

