
Marbled cookies look intricate but are surprisingly simple to make. By swirling different colors of royal icing, you can create stunning patterns that resemble polished stone. Whether you're dipping cookies into swirled icing or using a scribe tool to drag colors, the process is quick and requires minimal tools - think toothpicks, shallow bowls, and gel-based food coloring. Here's how it works:
- Tools You'll Need: Toothpicks, scribe tools, tipless piping bags, and food-safe brushes.
- Key Ingredients: Royal icing made with meringue powder, sifted confectioners' sugar, and gel-based food coloring for vibrant hues.
- Techniques: Use the dipping method for organic patterns or the wet-on-wet method for structured designs like hearts or chevrons.
- Tips for Success: Work with flood-consistency icing, pop air bubbles with a toothpick, and refresh colors to avoid muddy designs.
With these techniques, you can transform simple cookies into edible works of art. Whether you're decorating for a party or experimenting for fun, marbled cookies offer endless possibilities.
Easy Marbled Royal Icing Tutorial (Dipped Cookies)
sbb-itb-529d1c3
Tools and Ingredients You'll Need
Making marbled cookies is simpler than it looks, especially when you have the right tools and ingredients on hand. Most of the supplies are easy to find, and for those seeking top-notch options, Gloria's Cake & Candy Supplies offers products that make the process smoother and more reliable. Here’s a breakdown of the essentials you’ll need to create beautifully marbled cookies.
Marbling Tools
The key to flawless marbling lies in having the right tools to create those clean, consistent swirls. A scribe tool or even a simple toothpick works wonders for dragging through wet royal icing to form intricate patterns. For added convenience, tipless decorating bags allow you to pipe multiple colors without needing couplers or tips, cutting down on cleanup time. To perfect your designs, food-safe brushes are great for popping air bubbles and refining details as you go.
Ingredients for Royal Icing
The foundation of marbled cookies is royal icing, and getting the consistency just right starts with the right ingredients. Meringue powder is a must - it’s a mix of dried egg whites, sugar, flavoring, and stabilizers that ensures your icing is stable and easy to work with. Amber Spiegel, an expert in cookie decorating, highlights how meringue powder creates icing with excellent consistency and durability. Combine it with sifted confectioners' sugar and water to achieve the perfect flood consistency. For added shine, you can mix in a touch of light corn syrup.
When it comes to coloring, gel-based food coloring is your best friend. Unlike liquid food coloring, which can dilute your icing, gel colors are highly concentrated. This means you can achieve bold, vibrant hues without affecting the icing’s texture. Gloria's Cake & Candy Supplies offers professional-grade gel colors, ensuring your marbled designs stand out and last.
With these tools and ingredients in hand, you're ready to dive into the art of marbling. All that's left is to practice your technique and let your creativity shine!
Preparing Cookies and Royal Icing
A smooth cookie surface and well-prepared icing are the backbone of stunning marbled designs. Spending a little extra time on these steps ensures your results are even and polished.
Baking the Cookies
When it comes to marbling, sugar cookies and gingerbread cookies are your go-to options. They maintain their shape perfectly and provide a great base for decoration. Roll the dough to a thickness of 1/8–1/4 inch. To keep the cookies flat, cut the dough directly on parchment paper placed on your baking sheet.
Preheat your oven to 350°F and bake the cookies for 10–12 minutes, or until the edges start to turn golden. Once baked, transfer them to a wire rack and allow them to cool for at least 10 minutes. Decorating while the cookies are still warm can cause the icing to melt and slide, which could ruin your design.
Mixing Royal Icing
The consistency of royal icing is a game-changer for marbling. You’ll need two main textures: stiff peaks for piping borders and flood consistency for the marbled base. Beat the icing for 7–10 minutes to ensure it’s properly aerated. As Wilton advises:
"It's crucial to incorporate all that air so the icing doesn't fall flat on your cookies".
To achieve the right flood consistency, thin the icing with warm water until a drizzle smooths out in about 15 seconds (or 12 seconds if you’re dipping). When thinning, use a silicone spatula and mix slowly by hand to avoid introducing extra air bubbles. Make sure all your icing colors have the same consistency to prevent uneven bleeding.
Keep any unused icing covered with a damp paper towel or plastic wrap to stop it from drying out. Store piping bags in a warm spot to prevent the icing from crusting. Because royal icing begins to dry as soon as it’s exposed to air, have all your colors and tools ready before you start. With your cookies baked and icing prepared, you’re ready to dive into creating beautiful marbled effects.
How to Create Marbled Effects
Marbled Cookie Techniques Comparison: Dipping vs Wet-on-Wet Method
With your cookies and royal icing prepped, it's time to turn them into miniature works of art. Marbled cookie designs might look intricate, but they’re surprisingly approachable once you know the techniques.
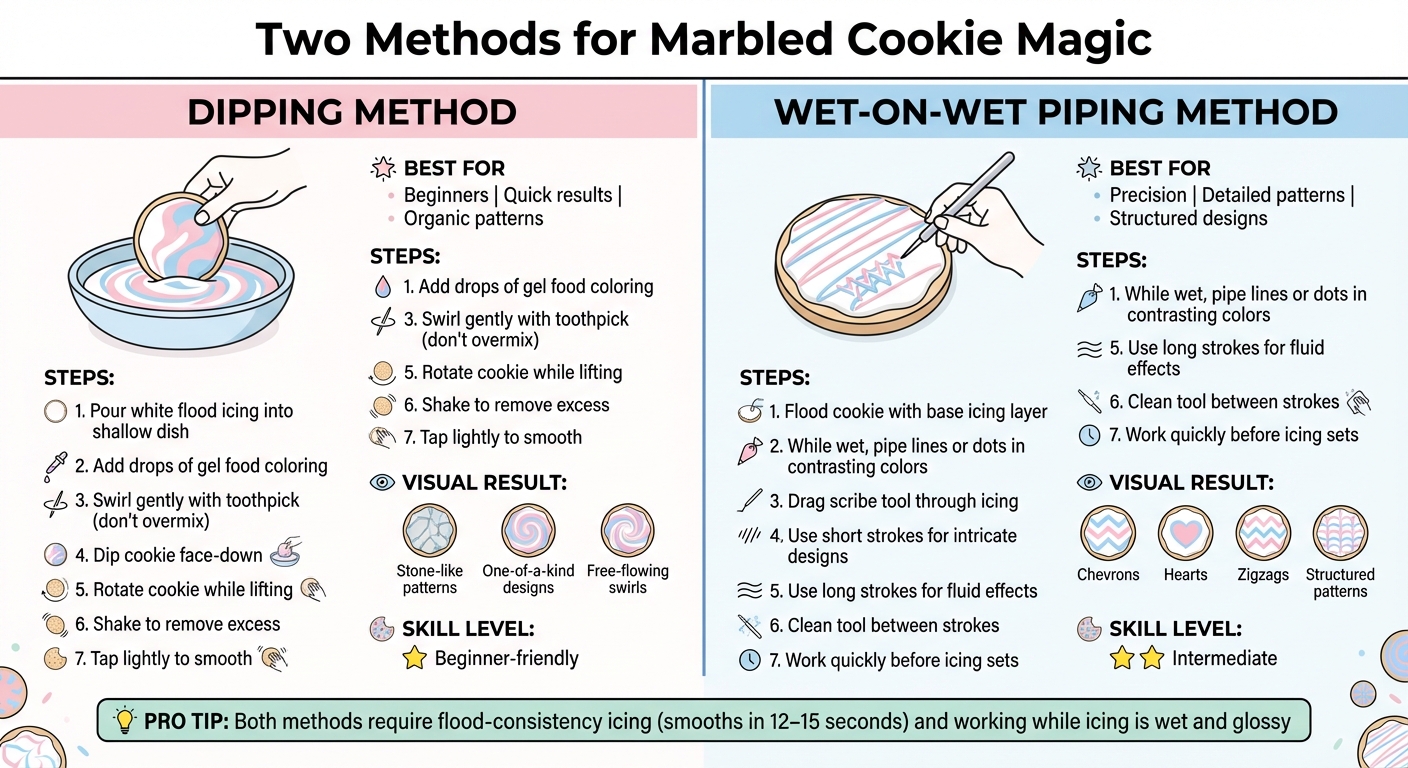
There are two popular methods for marbling cookies: the dipping method and the wet-on-wet piping method. The dipping method is quick, free-flowing, and perfect for beginners. On the other hand, the wet-on-wet technique offers more precision, making it ideal for detailed patterns like hearts or chevrons. Choose the approach that suits your style or try both to see what works best!
Basic Marbling Method
If you’re using the dipping method, start by pouring white flood icing into a shallow dish - just enough to coat the surface of your cookie when dipped. Add a few drops of gel food coloring directly onto the icing and swirl it gently with a toothpick or scribe tool. The key here is not to overmix; a few swirls are enough to create that signature marbled look.
Next, take your cookie and dip it face-down into the swirled icing. Gently rotate the cookie as you lift it to pick up a variety of patterns. If there’s excess icing, hold the cookie nearly upside down and give it a light shake to let the extra drip off. To finish, tap the cookie lightly on your work surface or give it a small shake to smooth out the icing and remove any air bubbles.
As pastry chef Julia M. Usher explains:
"While marbling gives the appearance of being complex, it's actually one of the quickest and most forgiving cookie decorating techniques around."
For the wet-on-wet piping method, start by flooding your cookie with a base layer of icing. While the icing is still wet, pipe lines or dots in contrasting colors. Then, drag a scribe tool or toothpick through the icing to create swirls or patterns. Short, precise strokes will give you intricate designs, while long, flowing strokes create a softer, more fluid effect. Be sure to clean your tool between strokes for clean results. Timing is crucial here - work quickly to ensure the icing remains wet and glossy for smooth blending.
Adding Layers of Color
To make your marbled cookies pop, incorporate at least three complementary colors. While the base icing is still wet, add small drops of gel food coloring - think vibrant pinks, blues, or yellows - and gently swirl them with a toothpick. If the colors start to look muddy, refresh the palette by adding a few fresh drops of color and lightly swirling again.
For a touch of elegance, wait until the marbled layer has completely dried before adding metallic accents. Mix gold or silver luster dust with a small amount of clear vanilla extract, then use a fine brush to trace over the natural swirls in your design. This extra detail can elevate your cookies to a whole new level.
Mastering these techniques opens up endless possibilities for creating stunning marbled cookies, whether you're aiming for bold, colorful designs or subtle, dreamy patterns.
| Technique | Application Method | Visual Result |
|---|---|---|
| Wet-on-Wet Piping | Add lines or dots to wet flood icing, then drag a scribe through the colors | Structured designs like chevrons, hearts, or zigzags |
| Dipping Method | Swirl gel colors into a dish of icing and dip cookies face-down | Organic, one-of-a-kind stone-like patterns |
Fixing Common Problems
Even the most seasoned bakers face challenges when marbling cookies. The silver lining? Many of these hiccups can be resolved quickly, saving your designs before the icing hardens.
Removing Air Bubbles
Air bubbles are a common frustration when decorating cookies. As Craftsy puts it:
"Pesky air bubbles lurking under the surface of your icing can be a huge pain".
These bubbles often show up as tiny, shadowy dots just beneath the icing's surface.
To minimize bubbles, start with your prep. When thinning royal icing to flooding consistency, avoid using a mechanical mixer - it tends to introduce too much air. Instead, stir in water slowly using a silicone spatula. Also, sift your powdered sugar beforehand to eliminate lumps that could trap air.
After flooding or dipping your cookie, lift it about 2–3 inches and drop it flat onto your work surface. This action helps trapped air bubbles rise to the surface. A gentle side-to-side shake can also help the icing settle evenly. Keep a scribe tool or a clean toothpick handy. Julie Gossett, Owner of Normaneek Bakery, advises:
"Use a clean toothpick to gently pop the air bubbles while the icing is still wet".
Once the bubbles are handled, you can shift your focus to keeping your colors vibrant.
Keeping Colors Bright
Dull or muddy colors can take the charm out of your marbled designs. The trick? Maintain sharp contrast and vibrant tones throughout the process. Start with a bright white icing base to make your colors stand out.
If you're using the dipping method, colors in your bowl may eventually blur together. When the pattern begins to look muddy, add 5–8 fresh drops of gel food coloring and swirl them in with a toothpick to refresh the design. For powder-based food colors, dissolve them with a few drops of water to maximize their vibrancy.
Timing is also crucial. Darker colors like red and black naturally deepen as the icing dries. Work while the icing is still wet and glossy to allow the colors to blend seamlessly. Over-beating the icing during preparation can strip away its sheen, leaving a dull, flaky finish.
Controlling Drips
Dripping icing can lead to uneven edges and messy designs, but you can prevent this with the right consistency and technique. Your flood icing should flow like thick syrup or cold molasses. To test, draw a line through the icing - if it disappears in about 10 seconds, the consistency is just right. For marbling, many decorators prefer a 12–15 second consistency.
Before flooding, pipe a border with thicker "outline icing" (about the consistency of toothpaste) using a #1 or #2 tip. As King Arthur Baking explains:
"The outline icing acts as a dam to hold in the flooding icing while it dries into a nice, smooth surface".
Let the border set for a few minutes before adding the flood icing. This helps maintain the intricate marbled patterns you’ve created.
After flooding or dipping, gently shake the cookie to remove any excess icing. Marian, Founder of Sweetopia, advises:
"Work as quickly as you can before the icing sets".
If the icing doesn't reach the edges, use a toothpick or scribe tool to guide it toward the outline instead of adding more icing, which could cause overflow. Place your finished cookies on a cooling rack lined with parchment paper to catch any small drips as they dry.
Conclusion
Making marbled cookies is simpler than it looks. The key is thinning your royal icing to a flood consistency - think thick syrup - and working swiftly while the icing is still wet and glossy. With just a few steps, you can achieve results that look like they came straight from a professional bakery.
What makes marbled cookies so special is their one-of-a-kind nature. Each one turns into a miniature masterpiece, as the icing patterns shift and change with every dip or swirl. Whether you're preparing for a special event or just having fun experimenting with colors, these cookies are a creative way to showcase your baking skills.
To get the best results, start with high-quality gel or powder food colors. These keep your designs vibrant without making the icing too runny. Using at least three shades adds depth and creates gradients that look polished and eye-catching. Try different dragging techniques to explore unique textures and patterns.
If you're looking for professional-grade supplies, check out Gloria's Cake & Candy Supplies in Culver City. Since 1972, they've been a go-to spot for bakers, offering everything from meringue powder to an impressive selection of gel colors. Whether you order online for same-day pickup or visit the store in person (open Tuesday through Saturday, 10:00 AM to 6:00 PM), you'll find everything you need to perfect your marbled cookies. Plus, their knowledgeable staff is always ready to share decorating tips and troubleshooting advice.
Now it’s time to gather your tools and dive in - each cookie you create will be a unique, edible piece of art.
FAQs
How can I create vibrant marbled colors on cookies?
To give your cookies a stunning marbled look, gel food coloring is your best friend. Its rich pigmentation adds vibrant colors without making the dough or icing too runny. Begin by dyeing your icing or dough in separate batches. Then, take small portions of each color and gently swirl them together to create that eye-catching marbled effect. Use food-safe brushes or toothpicks to refine the design, blending the colors just enough without overmixing. Play around with various color combos to make your cookies pop with personality!
How do I stop air bubbles from messing up my marbled cookie designs?
To keep air bubbles from ruining your marbled cookie designs, start by properly mixing your icing. Stir it gently to avoid whipping in air, and then let it rest for a few minutes. This gives any trapped bubbles a chance to rise to the surface.
When you’re ready to apply the icing, gently tap the cookie on your work surface to help release any lingering bubbles. If you still spot a few after flooding the cookie, grab a toothpick or a fine tool to pop them while the icing is still wet. By working quickly and spreading the icing smoothly, you’ll create a beautiful marbled finish that looks polished and flawless every time.
What’s the difference between the dipping and wet-on-wet marbling techniques for cookies?
The key difference between dipping and wet-on-wet marbling lies in how each technique brings designs to life.
With dipping, you submerge a cookie into a shallow bowl of colored royal icing. This process is quick and spontaneous, resulting in natural, tie-dye-like patterns. It’s a less precise method, perfect for creating unique, freeform designs with minimal effort.
On the other hand, the wet-on-wet method begins by flooding the cookie with a smooth base layer of royal icing. While the icing is still wet, you apply contrasting colors and use a toothpick or similar tool to drag or swirl intricate patterns. This approach gives you more control, making it ideal for crafting detailed and deliberate designs.
If you’re looking for organic, unpredictable effects, dipping is the way to go. For more refined, artistic finishes, wet-on-wet is your best bet.
Shop Supplies at Gloria's
Everything mentioned in this article is available at our Culver City shop. Come see it in person or browse online.
Shop at Gloria's11117 Washington Blvd, Culver City • Tue-Sat 10am-6pm • (323) 289-8807
Related Blog Posts
- How to Master Royal Icing Piping Techniques
- How to Paint Fondant Flowers
- How to Blend Colors for Ombre Cakes
- Cookie Consistency Secrets: Why Your Royal Icing Cracks and How to Fix It

