
Creating a stunning mirror glaze at home is easier than you think. This guide breaks down the essentials, from the science behind the glossy finish to step-by-step instructions for making and applying the glaze. Here’s what you need to know:
- Key Ingredients: Gelatin (for shine), glucose syrup (prevents crystallization), white chocolate (opacity), and sweetened condensed milk (smooth texture).
- Temperature Control: Pour glaze between 86°F–95°F onto a cake frozen to 0°F–-4°F for best results.
- Tools: Digital thermometer, immersion blender, fine-mesh sieve, and offset spatula are must-haves.
- Common Issues: Bubbles, uneven coverage, or glaze sliding off are often temperature-related and fixable.
With patience, practice, and quality ingredients, you can achieve a flawless, glass-like finish on your cakes. Ready to try it? Let’s dive in.
Super shiny mirror glaze | Beginner-friendly recipes
The Science Behind Mirror Glaze
Creating a mirror glaze is like conducting a chemistry experiment. It’s all about the right mix of ingredients and maintaining precise temperatures to achieve that flawless, glass-like finish. By understanding how each component works and why temperature matters, you can troubleshoot problems and consistently produce professional-quality results.
How Each Ingredient Works
Gelatin is the hero of mirror glaze. It’s what gives the glaze its signature glossy appearance. As Nagi from RecipeTin Eats puts it:
"The ingredient that makes Mirror Glazes so shiny is gelatine. It makes the glaze set into a glossy, thin layer of what is essentially chocolate jelly".
For the best results, use 2.5 teaspoons (7 grams) of powdered gelatin for an 8–9″ cake. To avoid lumps, always bloom the gelatin in cold water before incorporating it.
Glucose syrup (or corn syrup) plays a crucial role by preventing sugar from crystallizing and adding viscosity, which enhances the glaze’s shine. White chocolate contributes opacity and provides a bright base that makes colors appear vibrant, while sweetened condensed milk adds creaminess and thickness, helping to smooth out any imperfections. Together, these ingredients create a delicate, glossy layer that’s typically just 2–3 mm thick.
Despite the gelatin content, a properly made mirror glaze has a luxurious texture. It melts instantly in your mouth without feeling rubbery or jelly-like.
Temperature and Texture Control
Temperature is everything when it comes to mirror glaze. To get the right sugar concentration, the syrup must boil to exactly 217°F (103°C). Once ready to pour, the glaze should be at a temperature between 89°F and 95°F (32°C–35°C). A digital thermometer is your best friend here.
If the glaze is too hot, it can slide off the cake or even melt the frosting underneath. If it’s too cold, you’ll end up with a thick, uneven consistency and clumpy drips. To ensure the glaze sets perfectly, freeze your cake to a temperature between 0°F and -4°F (-18°C to -20°C). This allows the glaze to solidify almost instantly, typically within 5 to 10 minutes.
For a flawless finish, always strain the glaze through a fine-mesh sieve after adding the gelatin. This step removes any undissolved bits or air bubbles that could ruin the smooth look. And one final tip: steer clear of fresh pineapple. Its bromelain enzyme breaks down gelatin, preventing the glaze from setting properly.
Tools and Ingredients You'll Need
To achieve that flawless, glossy mirror glaze, having the right tools and ingredients is non-negotiable. Once you understand the glaze's chemistry, it's all about using the proper components and equipment to bring it to life.
Ingredients You’ll Need
For the best results, start with high-quality unflavored gelatin powder - a 220 bloom strength works particularly well. This ingredient is key to forming that thin, glossy layer. You'll also need glucose syrup or light corn syrup, which adds an intense shine and keeps the glaze fluid enough to pour effortlessly. To ensure the glaze remains rich and opaque, include sweetened condensed milk.
The base of your glaze relies on white chocolate, which not only enhances the vibrancy of your colors but also contributes to the glaze's creamy opacity. For the best results, consider sourcing your white chocolate from specialty suppliers like Gloria's Cake & Candy Supplies. The sweetness comes from sugar and water, while concentrated gel food coloring allows you to create vivid hues without altering the glaze's consistency. For an extra pop, white food coloring is indispensable - it helps create an opaque base that makes other colors stand out beautifully.
Essential Tools
Precision is everything when it comes to mirror glaze, and the right tools make all the difference. A digital thermometer is crucial for monitoring the glaze's temperature, which should stay between 85°F and 90°F for optimal pouring. Pair this with an immersion blender to achieve a smooth, bubble-free texture.
To ensure a perfect finish, use a fine mesh strainer to eliminate any lumps or bubbles that might interfere with the glaze's reflective surface. Set your cake on a wire rack placed over a baking sheet to catch any excess glaze. For cleanup and detail work, an offset spatula is invaluable - it’s great for tidying up drips or even creating stunning marbled effects. Lastly, a kitchen scale is a must-have for accurately measuring your ingredients, ensuring consistency every time.
How to Make and Apply Mirror Glaze
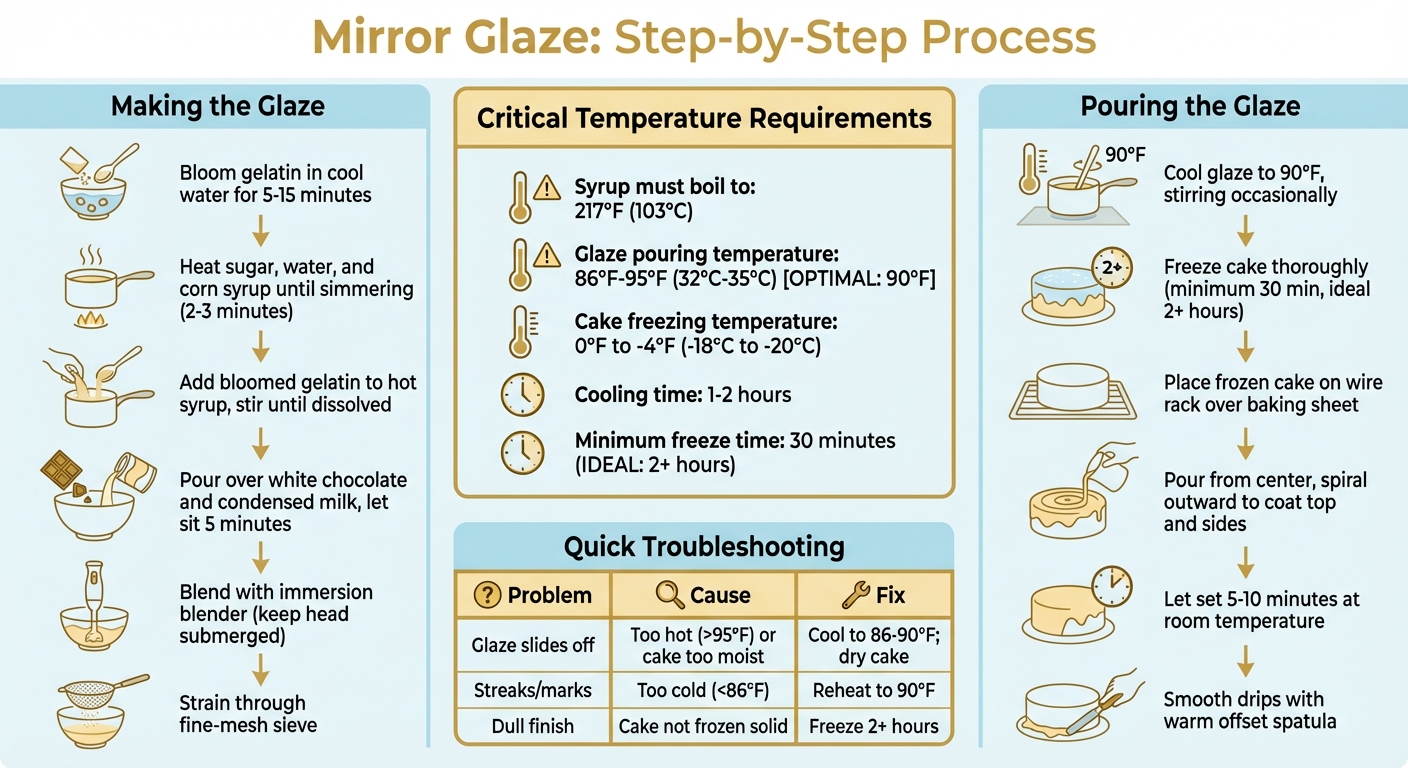
Mirror Glaze Temperature Guide and Application Process
Making the Glaze
Start by sprinkling powdered gelatin over cool water and letting it sit for 5–15 minutes to "bloom" - this step prevents lumps. While the gelatin is blooming, combine sugar, water, and corn syrup in a saucepan over medium heat. Stir gently until the sugar dissolves and the mixture starts to simmer, which should take about 2–3 minutes.
Once the syrup is ready, remove it from the heat and stir in the bloomed gelatin until it fully dissolves. Pour this hot mixture over chopped white chocolate and sweetened condensed milk. Let it sit for 5 minutes to melt the chocolate, then blend everything with an immersion blender until the glaze is completely smooth. Be sure to keep the blender head fully submerged to avoid creating air bubbles. Finally, strain the mixture through a fine-mesh sieve into a clean bowl to catch any unmelted bits.
"Mirror glaze actually isn't hard to do if you follow some key tips... It calls for patience above all else." - Nagi, Recipe Author
With your glaze smooth and ready, move straight to the pouring stage for the best results.
Pouring the Glaze
Allow the glaze to cool to 90°F (32°C), stirring occasionally. This cooling process typically takes 1–2 hours. While waiting, make sure your cake is thoroughly frozen - 30 minutes in the freezer is the minimum, but 2 hours or even overnight is ideal. A frozen cake ensures that the glaze sets instantly upon contact.
When the glaze hits 90°F, it's time to work quickly. Place your frozen cake on a wire rack set over a baking sheet to catch any excess glaze. Begin pouring from the center of the cake, moving outward in a spiral motion to coat the top and sides evenly. Let the glaze set for 5–10 minutes at room temperature. If there are any drips, smooth them out with a warm offset spatula before serving.
"The most important tip for mirror glaze is to be aware of the temperatures. You need your cake well chilled, so the glaze will set up faster as you pour it." - Erin Jeanne McDowell, Resident Baking BFF
sbb-itb-529d1c3
Adding Color and Creating Designs
Working with Food Coloring
White chocolate mirror glaze provides the perfect blank canvas for bold, vibrant colors. To achieve the best results, gel food coloring is your go-to option. It delivers rich, intense hues without diluting the glaze. If you're working with chocolate-based glazes, oil-based colors are a reliable choice. Add your chosen coloring once the glaze is fully smooth but before it cools to the ideal pouring temperature. For those deeper, dramatic shades, consider starting with a dark fruit base like blackberry purée, then enhance it with food coloring for an even richer tone.
Once you've mixed your color, strain the glaze through a fine-mesh sieve to ensure a silky finish. If pesky bubbles appear on the surface, you can easily pop them using a low-heat kitchen torch or a pin before the glaze sets. With your vibrantly colored glaze ready, you're all set to create stunning designs on your cake.
Making Patterns and Effects
With your glaze now brimming with color, it's time to take it to the next level with creative designs. These techniques can elevate your mirror glaze into something that looks like it came straight out of a professional bakery.
For a marble effect, try the swipe method. Start by pouring your base color to coat the entire cake, then immediately drizzle accent colors on top. Using a small offset spatula, give a quick, gentle swipe to blend the colors just enough to create elegant marbling without turning them into a muddy mess.
If you're after a tie-dye look, pour each new color directly into the center of the previous one without stirring. Then, move the mixture in a circular motion for a striking layered effect.
For a galaxy-inspired design, stick to a dark color palette like black, deep purple, and navy blue. Once the glaze has set, dip a pastry brush into luster dust and tap it several inches above the cake to sprinkle on a starry, shimmering finish.
"Each drip cake looks like a unique piece of art with patterns that can never be exactly recreated." – Kye Ameden, Employee-owner, King Arthur Baking
One important tip: temperature consistency is key. All your colored glazes should be at the same temperature - ideally between 89°F and 97°F - before pouring. This ensures they flow smoothly and don't blend unintentionally. To maintain the right temperature, keep your containers on a warming plate and use a digital thermometer to check each batch as you work.
Fixing Common Problems
Problem Diagnosis and Solutions
Even with all the right prep, mirror glaze can sometimes misbehave. The good news? Most problems are easy to fix with a few tweaks. Below are solutions to some of the most common mirror glaze issues.
Temperature is everything. If your glaze slides right off the cake, it’s likely too warm or the cake itself is damp. Aim to cool the glaze to 86°F–90°F, and make sure the cake surface is dry. To adjust the glaze temperature, gently reheat it in the microwave in 10-second intervals, stirring with a rubber spatula until it hits the sweet spot of 90°F.
"Air was mixed in accidentally. Always mix together the ingredients of your mirror glaze at low speed in a high recipient while keeping the blade of your stick blender submerged at all times." – Ilaria Marzullo
Bubbles are avoidable - and fixable. They typically show up when you whisk too hard or lift the immersion blender out of the glaze. To prevent them, keep the blender head fully submerged while mixing. If bubbles persist, strain the glaze through a fine-mesh sieve before pouring. Already poured and seeing bubbles? A small kitchen torch on low heat can pop them without damaging the surface.
Here’s a handy table for troubleshooting:
| Problem | Likely Cause | Quick Fix |
|---|---|---|
| Glaze slides off | Glaze too hot or cake too moist | Cool glaze to 86°F–90°F; dry the cake |
| Streaks or marks | Glaze too cold (below 86°F) | Reheat in 10-second bursts to 90°F |
| Air bubbles | Vigorous mixing or lifting blender | Strain through sieve; pop bubbles with torch |
| Dull, matte finish | Cake not frozen solid | Freeze cake for at least 2 hours before glazing |
| Lumpy texture | Gelatin not fully dissolved | Strain and gently reheat; ensure proper blooming |
A dull, matte finish is often a sign your cake wasn’t frozen solid. For the glaze to set with that signature glossy look, the cake must be rock-hard. Make sure it’s been in the freezer for at least 2 hours before you start glazing. That thermal shock is key to nailing the mirror effect.
Gloria's Product Recommendations
Best Products for Mirror Glaze
Once you've mastered the technique of creating a flawless mirror glaze, the next step is ensuring you're working with the best ingredients. The right products can make all the difference, and Gloria's Cake & Candy Supplies is the go-to spot for decorators and bakers alike.
For a dazzling white base, try Mercken's Super White Chocolate Coating Wafers - available for $9.50 per 1 lb bag. Unlike couverture chocolate, these wafers don’t require tempering, saving you time and effort. To achieve that perfect, glass-like finish, use professional-grade platinum gelatin sheets (230 bloom). These sheets ensure a clear and consistent set every time. Not sure which products are best for your project? Gloria's knowledgeable staff is always ready to guide you.
"As a bakery owner, I come to Gloria's anytime I need something special or last-minute. They have everything, and the staff is always so helpful and cheerful!" – Jamie P., Bakery Owner
Beyond the products, shopping at Gloria's means tapping into decades of expertise. Since 1972, they've been a trusted resource for decorators, offering advice on everything from controlling temperatures to achieving the perfect color blends. Plus, if you're in a hurry, online orders are ready for pickup within 24 hours. Visit them at 11117 Washington Blvd. in Culver City, open Tuesday through Saturday from 10 a.m. to 6 p.m.
Conclusion
Achieving a flawless mirror glaze is all about precision, quality ingredients, and mastering the right techniques. As Nagi from RecipeTin Eats puts it:
"Mirror glaze actually isn't hard to do if you follow some key tips that will ensure success, even if you're a first timer."
To start, a digital thermometer is your best friend - it ensures the glaze stays at the perfect temperature. Pair that with a properly frozen cake base to keep the glaze from sliding off, and you're already halfway there. The right tools and premium ingredients play a big role, too, turning your dessert into a true masterpiece.
Using high-bloom gelatin (225–230) is key to achieving that signature glossy finish. And don’t skip the fine mesh sieve - it removes pesky air bubbles that could ruin the smooth surface. By combining these essentials with the techniques outlined in this guide, like blooming gelatin correctly and pouring with a steady hand, you’ll be set up for success every time.
Of course, practice is what truly refines your skills. As Nagi reminds us:
"So what if it's not perfect?? Even if yours is a bit bumpy, the glaze will still be so shiny... and more importantly, it is still going to taste 100% amazing!"
With professional-grade tools, high-quality ingredients from Gloria's, and the guidance shared here, you’re ready to dive in. Start with a simple chocolate mirror glaze, focus on controlling the temperature and preparing your cake properly, and trust that patience will pay off. That stunning, glass-like finish isn’t just a dream - it’s completely within your reach.
FAQs
Why is gelatin important for creating a shiny mirror glaze?
Gelatin plays a key role in creating a shiny, reflective mirror glaze. It not only gives the glaze the right consistency but also enhances its glossy finish. By helping the glaze stick evenly to the cake’s surface, it ensures that smooth, polished, professional appearance.
Skipping gelatin can leave your glaze lacking structure, which might cause it to lose its shine or slide off unevenly. To get the best results, measure the gelatin carefully and make sure it dissolves completely to avoid lumps or an uneven texture.
How do I remove bubbles from my mirror glaze?
To get rid of bubbles in your mirror glaze, use a toothpick or pin to gently pop them right after pouring, before the glaze starts to set. Another trick is to tilt the bowl back and forth, which helps bring the bubbles to the surface, making them easier to remove.
If you want to stop bubbles from forming in the first place, mix your ingredients slowly and carefully to avoid trapping air. A low-speed blender or a spatula works well for keeping the texture smooth. Temperature matters too - make sure your glaze is at the ideal temperature, usually around 90°F, before pouring to achieve the best finish.
What tools do I need to make a mirror glaze at home?
To create a stunning mirror glaze at home, having the right tools can make all the difference in achieving that smooth, glossy finish. Start with a blender or immersion blender to ensure the glaze is perfectly mixed and free of lumps. Precise measurements are crucial, so a digital kitchen scale or measuring cups will help you get the exact amounts of gelatin, sugar, and sweetened condensed milk. A candy thermometer is also a must-have, as the temperature plays a big role in how the glaze sets and shines.
For a flawless finish, a fine mesh strainer is great for removing any bubbles or lumps. When it’s time to pour, a spatula or small pitcher will help you evenly coat your cake. Set up your workspace with a rotating cake stand or a flat surface, placing a drip tray underneath to catch any excess glaze. With these tools, you’ll be well-equipped to create that smooth, mirror-like surface that makes these glazes so captivating.
Shop Supplies at Gloria's
Everything mentioned in this article is available at our Culver City shop. Come see it in person or browse online.
Shop at Gloria's11117 Washington Blvd, Culver City • Tue-Sat 10am-6pm • (323) 289-8807

