
Making chocolate eggs at home is a fun and rewarding Easter tradition. Whether you're crafting hollow eggs filled with surprises or solid eggs with detailed designs, the right tools and techniques can help you achieve professional-looking results. Here's what you need to know:
- Chocolate molds: Choose from plastic (affordable but less durable), silicone (flexible and easy to use), or polycarbonate (preferred by professionals for a glossy finish).
- Chocolate types: Beginners can use compound chocolates like Mercken's wafers (no tempering required), while couverture chocolate offers a richer flavor and shine but requires tempering.
- Essential tools: A candy thermometer, scrapers, brushes, and gloves ensure precision and a polished look.
- Techniques: Melt, pour, and layer chocolate carefully to avoid air bubbles. For hollow eggs, rotate the mold to coat evenly, and join halves using tempered chocolate or gentle heat.
- Decoration ideas: Add marbled effects, painted patterns, or textured finishes for a personal touch.
With proper preparation, clean molds, and attention to detail, you can create stunning Easter chocolate eggs that look store-bought but are made with love. Ready to get started? Keep reading for step-by-step guidance.
Chocolate easter egg design, step by step
sbb-itb-529d1c3
Tools and Ingredients You'll Need
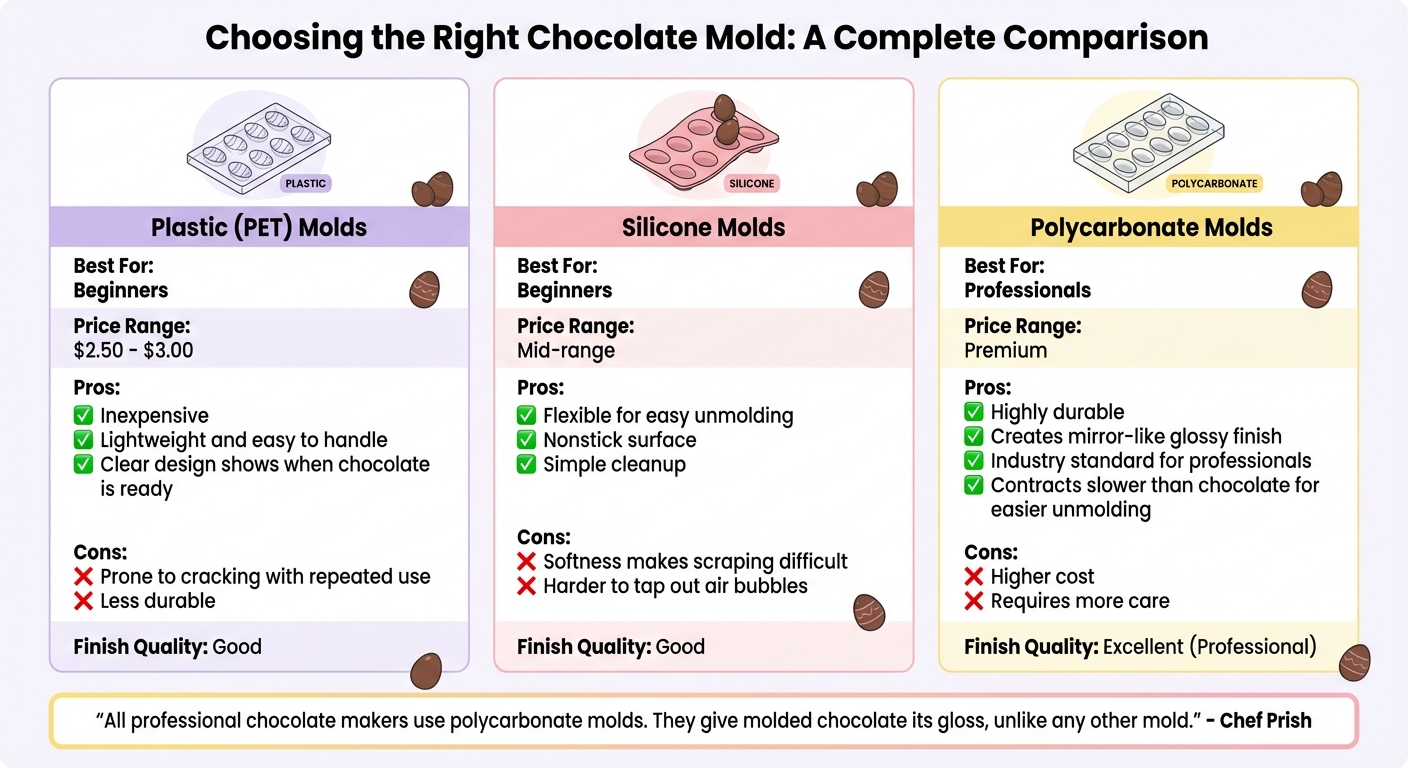
Chocolate Mold Types Comparison: Plastic vs Silicone vs Polycarbonate
The right tools can make all the difference when crafting chocolate eggs. While you don’t need to buy everything right away, knowing what’s available helps you decide what fits your needs and budget.
How to Select Chocolate Molds
Plastic (PET) molds are a great choice for beginners. They’re inexpensive - typically priced between $2.50 and $3.00 - and lightweight, making them easy to handle. Their clear design allows you to see when the chocolate has pulled away from the sides, signaling it’s ready to be unmolded. However, these molds are prone to cracking with repeated use, so handle them gently.
Silicone molds are another beginner-friendly option. Their flexibility makes unmolding effortless, and the nonstick surface simplifies cleanup. That said, their softness can make tasks like scraping off excess chocolate or tapping out air bubbles a bit trickier.
Polycarbonate molds are the go-to choice for professionals. As Chef Prish points out:
All professional chocolate makers use polycarbonate molds. They give molded chocolate its gloss, unlike any other mold.
These molds are durable and create a polished, mirror-like finish that’s characteristic of high-quality chocolates.
For hollow eggs, 3D molds are essential. These molds come in two halves secured with clips or magnets, creating seamless shells that can be filled with candies or small surprises. Before using, polish the interior with a fiberless cloth to avoid smudges or dust. Also, ensure the molds are completely dry - just one drop of water can ruin melted chocolate by causing it to seize and turn grainy.
Once you’ve chosen your mold, the next step is selecting the right chocolate for the job.
Recommended Chocolate for Molding
If you’re new to chocolate molding, Mercken's chocolate wafers are a popular choice. These compound chocolates use vegetable fats instead of cocoa butter, so there’s no need for tempering. As Confectionery House explains:
Merckens Chocolate Melts is the best chocolate for chocolate molds. These candy melts are rich and creamy and melt easily... no tempering required.
Simply melt, pour, and let them set for a smooth, stable finish.
For a more professional touch, couverture chocolate is the way to go. Known for its rich flavor and crisp "snap", it does require tempering to achieve the perfect texture and shine. When tempering, aim for these working temperatures: about 90°F for dark chocolate, 85°F for milk chocolate, and 83°F for white chocolate.
Other Equipment for Better Results
Once you have your molds and chocolate, a few additional tools can help you achieve a flawless finish.
- A candy thermometer ensures precise temperature control, which is crucial for tempering couverture chocolate.
- Metal scrapers or bench scrapers clean the molds and create sharp, professional edges.
- An offset spatula helps spread chocolate evenly in thin layers.
- Food-safe brushes are perfect for adding decorative touches or fixing thin spots.
For precise filling and a mess-free workspace, disposable piping bags are invaluable. To maintain the glossy finish of your chocolate, wear cotton or food-safe plastic gloves when handling finished pieces. If you’re working with tempered chocolate, a heat gun or hair dryer can gently warm the molds to just below the chocolate’s working temperature, preventing thermal shock and ensuring a smooth surface.
As food writer Jane Hornby notes:
The better the shine on the mold, the better the finish on the chocolate.
A little extra effort in polishing your molds can make a big difference in the final result.
How to Make Easter Chocolate Eggs
Preparing Your Workspace and Molds
Before diving in, make sure your molds are absolutely clean. Dust, fingerprints, or leftover chocolate can ruin the finish and cause sticking. Use a lint-free cloth to polish them until they gleam. Also, ensure both your molds and workspace are completely dry - just one drop of water can cause the chocolate to seize. Keep your workspace cool, ideally between 59°F and 64°F, to help the chocolate set properly. If you're using polycarbonate molds, pre-warm them to 79°F–81°F for milk and white chocolate or 83°F–85°F for dark chocolate. This step prevents thermal shock, which can mess up the chocolate's temper and create dull streaks.
Basic Molding Techniques
Start by melting Mercken's wafers in a microwave or double boiler until smooth. If you're using couverture chocolate, temper it to the right temperature: 90°F for dark chocolate, 86°F for milk chocolate, or 82°F for white chocolate.
Pour the melted chocolate into the mold, then tap it firmly on your counter to release any air bubbles and smooth out the surface. For hollow eggs, tilt and rotate the mold so the chocolate coats the sides evenly, then pour the excess back into your bowl. Use a palette knife to clean the edges, creating a flat surface for joining the halves later. Chill the mold in the refrigerator for about 10 minutes, repeating this process two more times to create a sturdy shell. Once the chocolate sets and pulls away from the mold, gently flex or tap the mold on a soft towel to release the egg halves. Wearing gloves during this step prevents fingerprints on the glossy finish.
With the basic shell complete, you can take things up a notch with some advanced techniques.
Advanced Design Techniques
Once your shells are smooth and ready, it's time to get creative. To achieve a marbled effect, drizzle melted white chocolate into the mold before adding the main chocolate layer. For sharp stripes or patterns, use a pastry or artist’s brush to paint colored chocolate directly onto the mold. Let each color set fully before adding the next to keep the lines crisp. Always use oil-based food coloring specifically made for chocolate - water-based colors can ruin the consistency by causing the chocolate to seize.
For a textured look, mix crushed hard candies like butterscotch or caramel pieces into your tempered chocolate before molding. You can also layer multiple coats for a bold effect. If you're adding text or designs, remember to write them backward inside the mold so they appear correctly on the finished egg. These techniques require practice, but they can elevate your eggs into stunning works of art.
Assembly, Decoration, and Presentation
How to Join Chocolate Egg Halves
Now that your chocolate egg shells are ready, it's time to bring them together and add some flair. Start by inspecting the edges of each shell. Use a sharp knife to carefully scrape any uneven spots, ensuring the rims align perfectly for a seamless join. If you're planning to include a surprise - like jelly beans, truffles, or even a small toy - place them inside one half before sealing.
There are two reliable methods for joining the halves:
- Tempered Chocolate Method: Use a pastry brush to apply a thin layer of tempered chocolate along the rim of one half. Press the two halves together gently but firmly.
- Heat Method: Quickly press the rims of each half against a 175°F baking sheet to melt the edges slightly, then press them together.
Whichever method you choose, clean up any excess chocolate immediately for a neat finish.
"If you place the pieces in the refrigerator first, the egg will set faster, as the cold chocolate will cause the chocolate 'glue' to harden and set quickly." - Jacques Torres, Pastry Chef and Chocolatier
Once the halves are joined, place the egg in its mold or on a stand, and let it chill for 10–15 minutes to ensure the seal is secure. After that, you're ready to move on to the fun part - decorating!
Decoration Ideas for Chocolate Eggs
With the egg fully assembled, it's time to let your creativity shine. For a simple but striking marbled effect, drizzle white chocolate over the surface of the egg. Want something more intricate? Use royal icing or water-based icing to pipe patterns, messages, or designs. To keep the egg steady while you work, rest it on a small glass.
If you're aiming for bold colors or detailed designs, edible paints, pearl cake gems, and colored icing are excellent tools. For text or patterns applied directly to the chocolate, mix oil-based food coloring with tempered chocolate - steer clear of water-based dyes, as they can ruin the texture of the chocolate. To give your egg a polished look, carefully scrape any rough spots along the seam with a sharp knife or ruler.
Packaging Options for Gifts or Sales
A beautifully decorated egg deserves equally thoughtful packaging. For a classic presentation, wrap the egg in clear cellophane and tie it with a pastel ribbon. Smaller eggs can be placed in decorated cardboard egg cartons, while a group of eggs looks charming in a basket lined with tissue paper.
"Either display the eggs in a simple basket on tissue paper or wrap them in clear cellophane finished off with a ribbon." - Simon Knott, Professional Chocolatier
If you're selling your eggs, consider adding custom labels to the cellophane for a professional touch. Always wear gloves when handling finished eggs to avoid fingerprints and smudges. Store the eggs in a cool, dry place, where they'll stay fresh for one week to a month. Avoid prolonged refrigeration, as moisture can cause unsightly blemishes on the chocolate's surface.
Common Problems and Solutions
Once you've honed your molding techniques, you might still face a few challenges. Here's how to tackle them effectively.
Preventing Air Bubbles and Uneven Coatings
Air bubbles can ruin the smooth finish of your chocolate. To avoid this, tap the mold gently after pouring in the chocolate. As Callebaut suggests:
"Gently tap the edges of the mould with the back of a palette knife to remove any air bubbles from the chocolate or shake mechanically." – Callebaut
Preheating your molds, as mentioned earlier, can also help prevent temperature shock, which often leads to gray patches or uneven coverage. When cooling, position the molds with the bottom facing sideways or upwards. This allows heat to escape evenly, reducing the risk of imperfections.
For a flawless finish, consider using a three-drop fluidity chocolate for medium molds. Its consistency helps reduce bubbles and ensures even coverage. Another option is to apply thin layers of chocolate with a pastry brush, letting each layer chill for about 10 minutes before adding the next. For larger molds, repeating the pouring process can help create a thicker, more durable shell that resists cracking.
Now, let’s move on to handling sticking and breaking issues.
How to Prevent Sticking and Breaking
Sticking and breaking often stem from tempering problems or incorrect cooling. To avoid these issues, opt for polycarbonate molds. These molds not only produce a beautiful gloss but also contract slower than chocolate, making unmolding easier. As Callebaut explains:
"Use polycarbonate moulds. These yield the best gloss and contract slower than chocolate, making unmoulding far easier." – Callebaut
When it's time to unmold, avoid twisting the mold. Instead, flip it upside down over a soft tea towel and gently tap it. This method helps release the chocolate without damaging it. Also, remember to wear gloves when handling the finished pieces. The heat from your hands can melt the surface, compromising the structure and appearance.
Solving Tempering Issues
A dull or grayish surface on your chocolate usually signals tempering problems, often referred to as bloom. Similarly, chocolate that melts too easily when touched likely wasn’t tempered correctly. Proper tempering is key to achieving that glossy, professional finish. Here’s a quick guide:
- For dark chocolate, heat it to 118°F, seed with solid chocolate, and work at 90°F.
- For milk chocolate, heat it to 113°F, seed, and maintain a working temperature of 86°F.
| Feature | Properly Tempered Chocolate | Out-of-Temper Chocolate |
|---|---|---|
| Appearance | High-gloss, shiny finish | Dull, matte, or grayish (bloom) |
| Texture | Firm with a crisp "snap" | Soft, grainy, or crumbly |
| Demolding | Shrinks and releases easily | Sticks to the mold or breaks |
| Stability | Stable at room temperature | Melts easily upon contact |
Before pouring, ensure your molds are spotless. Wash, dry, and polish them with a cotton or polyester cloth to achieve a mirror-like shine. Even the tiniest drop of water can cause the chocolate to seize, resulting in a grainy texture. If you’re using a refrigerator to speed up cooling, limit the time to 15–20 minutes to prevent condensation and surface blemishes. Should your chocolate appear dull or bloomed after unmolding, the best fix is to re-melt and re-temper it.
Conclusion
Creating stunning Easter chocolate eggs is easier when you follow a few key steps. Begin with clean, polished molds and properly tempered chocolate, layering thin coats to form a strong shell that unmolds without cracking.
Paying attention to small details makes all the difference. Tap the molds gently to remove air bubbles, handle finished pieces with gloves to avoid smudges, and clean the edges for a flawless fit. To seal the halves together, simply touch them to a warm baking sheet for a perfect bond.
These techniques provide the foundation for endless creativity. Since 1972, Gloria's Cake & Candy Supplies has been a trusted resource for Los Angeles-area bakers, offering high-quality products like Mercken's chocolate wafers, durable polycarbonate molds for a glossy finish, and expert advice to help you master your craft.
Stop by our Culver City store for one-on-one consultations, same-day pickups, and hands-on cake decorating classes that can elevate your chocolate-making skills. Whether you're a beginner or an experienced chocolatier, our knowledgeable team is ready to help you conquer any challenge and create Easter treats that impress every time.
FAQs
Why should I use polycarbonate molds for making chocolate Easter eggs?
Polycarbonate molds are an excellent choice for crafting chocolate Easter eggs with a professional touch. One of their standout features is their ability to give the chocolate a shiny, polished finish. This is because polycarbonate cools at a slower rate than the chocolate, allowing for smooth unmolding and minimizing the chances of cracks or damage.
Another advantage is their transparency, which lets you keep an eye on the chocolate as it sets. This makes it easy to catch and fix any air bubbles or flaws before the chocolate fully hardens. On top of that, these molds are built to last and can be reused time and time again, making them ideal for both small home projects and larger-scale production.
How can I temper couverture chocolate to get a shiny, professional finish?
To achieve a smooth, glossy finish and that perfect snap when tempering couverture chocolate, start by chopping about 8 ounces of chocolate into small, even pieces. Set aside about one-third (roughly 2.5 ounces) for later. Melt the remaining two-thirds using either a double boiler or the microwave set to 50% power. Stir frequently and heat until the temperature reaches 110°F–115°F for dark chocolate or 108°F–112°F for milk or white chocolate. Be cautious not to let it go over 130°F, as this can ruin the chocolate.
After melting, allow the chocolate to cool to 86°F–90°F for dark chocolate or 84°F–88°F for milk or white chocolate. At this stage, stir in the reserved chocolate pieces (known as the "seed") until they melt completely and the mixture reaches the proper working temperature. To confirm if it’s tempered, dip a spoon into the chocolate. If it sets quickly with a shiny surface and firm snap, you’re ready to go.
Pro Tip: Make sure all your tools are completely dry - just a tiny bit of water can cause the chocolate to seize, making it unusable.
What are some fun and creative ways to decorate Easter chocolate eggs?
Transform your Easter chocolate eggs into show-stopping treats with a few fun and easy techniques. Start by adding some color using white chocolate or candy melts. Want to go for stripes? Paint alternating bands of melted chocolate for a bold look. If you're feeling adventurous, try an ombré effect by blending dark, milk, and white chocolate shades. For something playful, swirl different melted chocolate colors in a dish and roll the egg through it for a cool marbled design.
Take your decorations up a notch with edible accents like glitter, crushed nuts, or cocoa powder to add texture. You can also use icing pens to draw delicate patterns or hand-paint tiny designs - think flowers or bunnies - by mixing food coloring with a drop of clear alcohol or oil. And for an extra surprise, fill the egg with mini candies, sprinkles, or even a sweet handwritten note before sealing it shut. Tie it all together with a decorative ribbon or a custom tag to make your creation stand out!
Shop Supplies at Gloria's
Everything mentioned in this article is available at our Culver City shop. Come see it in person or browse online.
Shop at Gloria's11117 Washington Blvd, Culver City • Tue-Sat 10am-6pm • (323) 289-8807
Related Blog Posts
- Ultimate Guide to Candy Molds and Tools
- Step-by-Step Guide: Crafting Your Own Dubai Chocolate Bar at Home
- Why Candy Sticks to Molds: Causes and Solutions
- Christmas Chocolate Molds and Decorations: Complete Holiday Guide
Need a custom edible image for your Easter cake? We print Easter bunny designs, spring flowers, religious imagery, and family photos on frosting sheets or wafer paper. Ready in 1 business day at our Culver City counter. See Easter cake edible image printing →

