

Packing nut-free cookies for school lunches or classroom events is more than just thoughtful - it’s essential for ensuring the safety of children with allergies. With 8% of U.S. children affected by food allergies, avoiding peanuts and tree nuts is a common school policy. But skipping nuts doesn’t mean skipping fun. Nut-free cookies can be decorated with school-themed designs like pencils, apples, or chalkboards, turning simple treats into delightful surprises.
Key Points to Know:
- Nut-Free Ingredients: Use allergy-safe frosting, sprinkles, and food coloring. Always check labels and avoid bulk bins to prevent cross-contamination.
- School-Themed Designs: Decorate cookies as pencils, apples, or notebooks using royal icing and food-safe markers for details.
- Packaging Tips: Protect cookies with sturdy backing, individual sleeves, or bento boxes to prevent breakage.
- Teacher Gifts: Personalize coffee cup-shaped cookies with messages like “Thanks a Latte.”
- Classroom Bulk Decorating: Use stencils and scrapers for fast, uniform designs.
Nut-free baking ensures every child can enjoy treats safely while adding a touch of creativity to back-to-school celebrations.
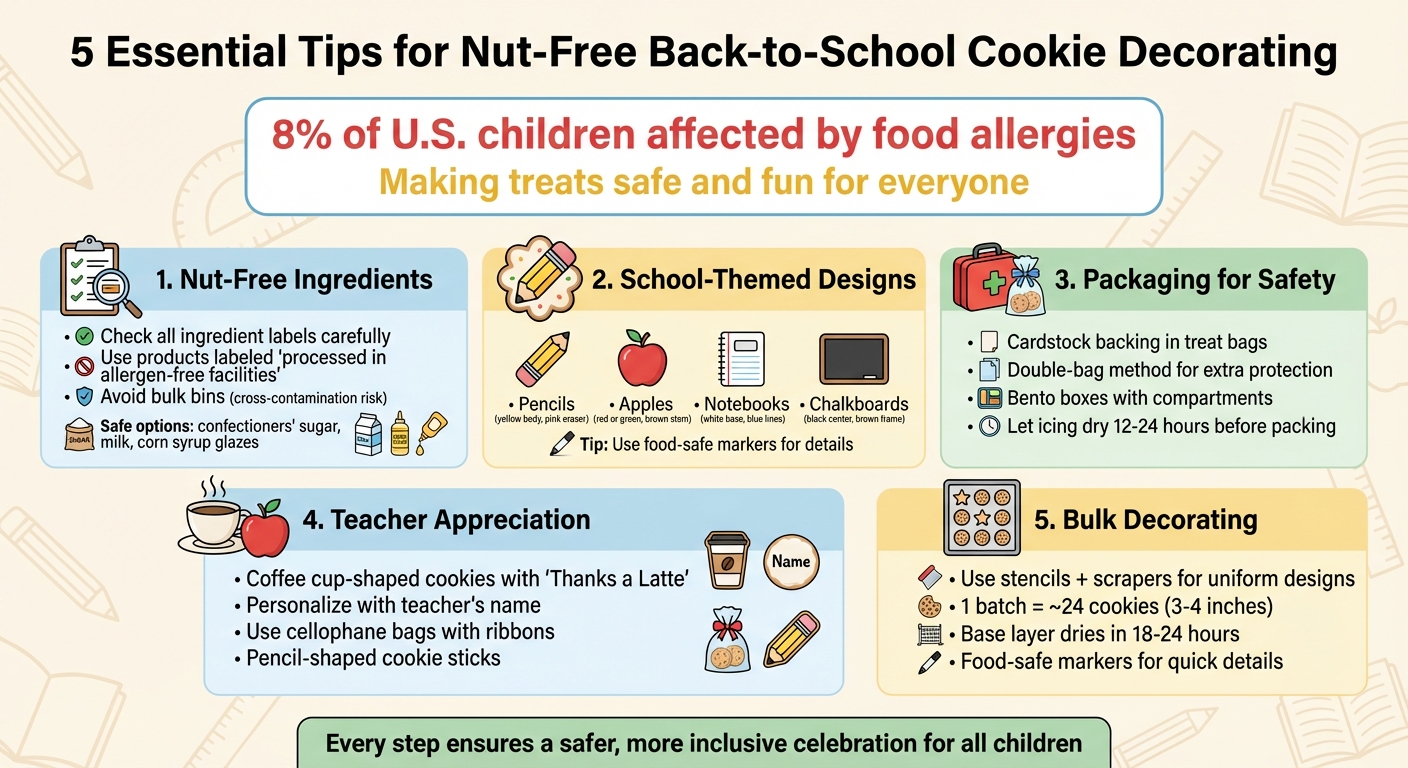
5 Essential Tips for Nut-Free Back-to-School Cookie Decorating
1. Nut-Free Ingredients
Safe Frosting and Decoration Essentials
Creating nut-free cookie decorations starts with carefully checking every ingredient. A simple cookie glaze made with confectioners' sugar, milk, and corn syrup is naturally nut-free and perfect for school-friendly treats. When it comes to sprinkles and food coloring, look for products labeled as "processed in a facility free from the top 8 allergens." These choices provide a safe foundation for allergy-conscious, creative designs.
"These natural food colors check a lot of boxes: they're plant-based, vegan-friendly, certified kosher, and free of allergens such as gluten, eggs, and peanuts." - Brook Lewis, Visual Merchandising Manager, King Arthur Baking
Brook Lewis from King Arthur Baking showcased their Natural Food Colors Set, which is plant-based and certified peanut-free, making it easy to craft vibrant, nut-free cookie glazes. For deeper hues, you can mix Black Cocoa or Triple Cocoa Blend with water.
Steer clear of bulk bins when shopping for decorating supplies. Even if nuts aren't listed in the ingredients, cross-contamination is a risk in shared facilities. In October 2024, Baby Foode highlighted Supernatural Sprinkles and Watkins Natural Food Dye as safe, dye-free options for decorating kids' cookies. Additionally, Gloria's Cake & Candy Supplies offers a curated selection of allergy-friendly decorating products.
"Avoid the bulk bins! The items inside bulk bins can easily be cross-contaminated with nuts and other allergens." - Andi Anne
2. School-Themed Designs
Classic School Supply Cookies
Get creative with sugar cookies by shaping them into school staples like pencils, apples, notebooks, and backpacks. For pencil cookies, use yellow icing for the body, add a pink strip for the eraser, a gray band for the metal, and a black tip to mimic graphite. Apples look great with red or green icing, finished with a small brown stem. Notebook cookies can be decorated with a white icing base, then detailed with blue horizontal lines and a red margin using food-safe markers.
You can also try "chalkboard" cookies. Outline them with brown icing for the frame and fill the center with black icing. Once dried - allow at least 8 hours - kids can "write" on them using edible markers, adding a fun interactive element.
For classroom settings, precision is everything. The consistency of royal icing plays a huge role: thick icing works best for fine details, medium for outlines, and thin for flooding. Anne from Flour Box Shop emphasizes the importance of tools, saying:
"This tool is ESSENTIAL for stenciling with royal icing"
Techniques like wet-on-wet can help achieve smooth, polished finishes. For example, add blue lines to notebook cookies while the white icing base is still wet to ensure seamless blending. When creating dimensional designs - like backpacks or rulers - let each section crust for 5–60 minutes before adding adjacent colors to avoid color bleeding.
Another fun option is using royal icing transfers. Pipe small designs like stars, books, or paper cutouts onto parchment paper, let them dry, and then attach them to your cookies. These add layers and make your designs pop.
3. Packaging for Lunch Boxes
Individual Cookie Sleeves with Cardstock Support
Protect your cookies from breaking apart by using a sturdy backing and secure packaging. Start by placing a piece of cardstock inside a clear treat bag before adding the cookie - this helps prevent snapping or crumbling when the lunch box gets jostled. For extra protection, try the double-bag method: slide a 3.75" x 6" cardstock into a small flat bag, then place that setup into a 4" x 9" gusseted bag with the cookie positioned opposite the cardstock to avoid oil stains.
If your cookies are frosted, refrigerate them until the icing sets to avoid smudging. Use a spatula to carefully transfer cookies into the bags, keeping them free from fingerprints or oil. Seal the bags with twine, ribbon, or staples, ensuring closures stay above the food line. If you're looking for eco-friendly alternatives, check out reusable options below.
Another way to keep cookies safe is by using bento boxes with compartments to separate them from heavier items. Or, try placing silicone cupcake liners in a larger container to create individual "nests" for each cookie.
4. Teacher Appreciation Treats
"Teacher Fuel" Latte Cup Cookies with Personalized Messages
Celebrate back-to-school season with treats that combine flavor and gratitude. One idea? Coffee cup-shaped cookies designed to look like a teacher's favorite latte. Use royal icing to craft the cup design, then personalize it with the teacher's name or a playful pun like "Thanks a Latte" using edible markers.
"A delicious treat is a great way to show the educators in your life how much they're appreciated." - The Cookie Countess
If you're aiming for a nut-free recipe, swap out almond extract for alternatives like vanilla, lemon, or clear imitation extracts to ensure everyone can enjoy these treats safely.
Packaging can make these gifts even more special. Wrap the cookies in cellophane bags tied with colorful ribbons, or arrange them in small gift boxes with crinkle paper for a polished presentation. Just make sure to let the decorated cookies dry for 12 to 24 hours before packaging to avoid smudging the royal icing.
Looking for quicker options? Try pencil-shaped cookie sticks frosted in yellow and paired with printable pencil-shaped toppers for a fun touch. Or, make chalkboard-inspired cookies by flooding rectangular cookies with black or dark green icing and piping on white "chalk" messages like "A+" or "Best Teacher". These thoughtful ideas are sure to bring a smile to any teacher's face!
sbb-itb-529d1c3
5. Classroom Party Bulk Decorating
Stencil and Scraper Method for Fast, Professional Results
If you're tackling cookies for an entire classroom, the combination of a royal icing scraper and stencil is a game-changer. This method allows you to create detailed, uniform designs on dozens of cookies in just seconds.
Here’s how it works: Start by applying a base layer of icing to each cookie and let it dry completely - this usually takes 18–24 hours. Once dry, position your stencil over the cookie and use the scraper to evenly spread a thin layer of icing. This gives you a polished, professional look without requiring advanced piping skills. A single batch of sugar cookie dough typically yields about 24 cookies (3 to 4 inches in diameter), so plan accordingly to meet your classroom party needs.
For extra speed, use food-safe markers to add details like ruler lines or "A+" marks instead of piping them. It’s a quick and easy way to personalize each cookie without spending hours on intricate designs. Once your cookies are decorated and dry, check Section 3 for tips on packaging and transporting them safely.
If you’re looking for tools to get started, Back-to-School Cookie Decorating Kits - complete with cutters and stencils - are available for around $24.99 to $32.46.
6. Allergy-Conscious Products
Glace Icing: The Egg-Free Alternative for School-Safe Decorating
Glace icing is an egg-free, school-friendly choice that aligns with allergy policies because it skips meringue powder and egg whites. Abeer Rizvi, Founder of CakeWhiz, highlights its benefits:
"This icing is perfect for people with egg allergies. It's made without meringue powder or egg whites."
The recipe is straightforward: mix powdered sugar, corn syrup, milk (or a plant-based substitute), and vanilla extract until smooth. If nut allergies are a concern, replace almond extract with clear vanilla extract. Rizvi notes:
"You can use whatever extract you like. It doesn't have to be almond [if concerned about nut allergies]."
Glace icing takes about 12 hours to dry and is ideal for simple designs like polka dots or swirls using the "wet-on-wet" technique. Leftovers can be stored in an airtight container in the fridge for up to a week. This homemade icing pairs perfectly with several allergy-conscious, ready-made products.
For convenience, try Celebakes Whimsical White Buttercream ($24.99 for 3.5 lb). Add flair with Fancy Sprinkles such as "Call Me Maybe" sprinkles ($8.00) or Moonstone Iridescent Edible Glitter ($14.00). Always confirm that these products are labeled "free-from" the top 9 allergens and meet "school-safe" certifications, as many schools require store-bought items for allergy safety.
Christmas Sugar Cookies: 4 Food Allergy Friendly Versions!
Conclusion
With so many children dealing with severe food allergies, nut-free cookie treats are more than just snacks - they're a way to protect lives and make sure every child feels welcome. It's a reminder that even the smallest choices in baking can have a big impact.
Holley Grainger, a dietitian and lunchbox expert, puts it best:
"Don that superhero cape, because you might be saving a life!"
Fun designs - like cookies shaped as apples, pencils, or chalkboards - can turn simple treats into festive back-to-school goodies. And don't forget, proper packaging is just as important. It helps prevent breakage and ensures no cross-contamination, as even a tiny trace of allergens can cause serious reactions.
Whether it's packing a lunchbox treat, showing appreciation to a teacher, or planning a classroom celebration, taking the time to choose allergy-friendly, certified products makes a world of difference. Every step, from creative designs to safe packaging, contributes to a safer, more inclusive environment.
Katie Workman, author of The Mom 100, sums it up perfectly:
"Baking and bringing in only nut-free baked goods means that every kid can enjoy them worry-free."
Whether it's a classroom party or a thoughtful gift, nut-free treats are a simple yet meaningful way to prioritize safety and inclusion for all.
FAQs
What are some safe nut-free ingredients for decorating cookies?
When decorating cookies for environments that need to be nut-free, selecting ingredients labeled as allergy-friendly is key. Opt for nut-free icing, sprinkles, and food coloring, and choose products specifically marked as nut-free or produced in nut-free facilities to ensure they’re safe to use.
For a fun and creative twist, consider incorporating allergy-safe candies or using pre-made nut-free cookies as part of your decorating. And don’t forget - always double-check ingredient labels to make sure they align with your school’s allergy guidelines.
What’s the best way to package cookies for a school lunchbox safely?
To pack cookies safely for a school lunchbox, opt for secure, food-safe packaging that preserves freshness and prevents contamination. You can individually wrap each cookie or use small, airtight containers that are simple for kids to open. This ensures the cookies stay fresh and avoids them getting crushed on the way to school.
For allergy concerns, go with nut-free, allergen-safe packaging materials that meet school guidelines. Clearly label the packaging to indicate the cookies are nut-free or allergy-friendly - this is especially important for classroom parties or shared snacks. Thoughtful packaging not only protects the cookies but also makes them easy and safe to enjoy!
What are some fun and allergy-friendly cookie ideas for back-to-school treats?
Get playful with your back-to-school cookies by shaping and decorating them as pencils, crayons, apples, or even backpacks. These fun designs are a great way to celebrate the season and can easily be made with nut-free, allergy-friendly ingredients to comply with school policies.
Want to take it up a notch? Create cookies that resemble chalkboards, alphabet blocks, or notebooks using colorful royal icing and edible decorations. These sweet treats are perfect for lunchboxes, classroom celebrations, or as thoughtful gifts for teachers. The possibilities are endless, letting you combine festive designs with allergy-conscious baking!
Shop Cookie Decorating Supplies
Cookie cutters, royal icing supplies, edible markers, and sprinkles.
Shop at Gloria's11117 Washington Blvd, Culver City • Tue-Sat 10am-6pm • (323) 289-8807
Related Blog Posts
- How to Make Rustic Fall Cake Toppers
- Thanksgiving Cake Decorating: Fall Colors and Flavors
- Christmas Chocolate Molds and Decorations: Complete Holiday Guide
- Autumn Harvest Festival Treats: Apple, Pumpkin, and Spice Decorating

